Inventory Center |
  
|
| Show/Hide Hidden Text |
Inventory Center |
|
| Show/Hide Hidden Text |
This is an all-inclusive feature and function menu for your inventory.
Click here to watch our Inventory Setup video.
(When choosing F1 for context sensitive help, you may have to explore this page further for specific topical help. See more links)
It is divided into 3 main parts:
Inventory Listing |
The list of all of your inventory items can be sorted and searched.. FINDING INVENTORY ITEMS - Various tools such as Locate, Query, Find, and Filter quickly focus on the item(s) meeting certain criteria. (see Inventory Listing) |
Access Panel Tabs |
Lists various views, properties, and actions relative to the highlighted inventory item. (see Access Panel) |
Inventory Views |
Displays specific detail or other information about the highlighted inventory item. The contents of this section will change as various views and properties on the Access Panel are selected. |
Smart Grid |
Shows a summation of settings of the highlighted inventory item for quick review without having to open other views or screens. Some fields allow you to directly edit and change settings. |
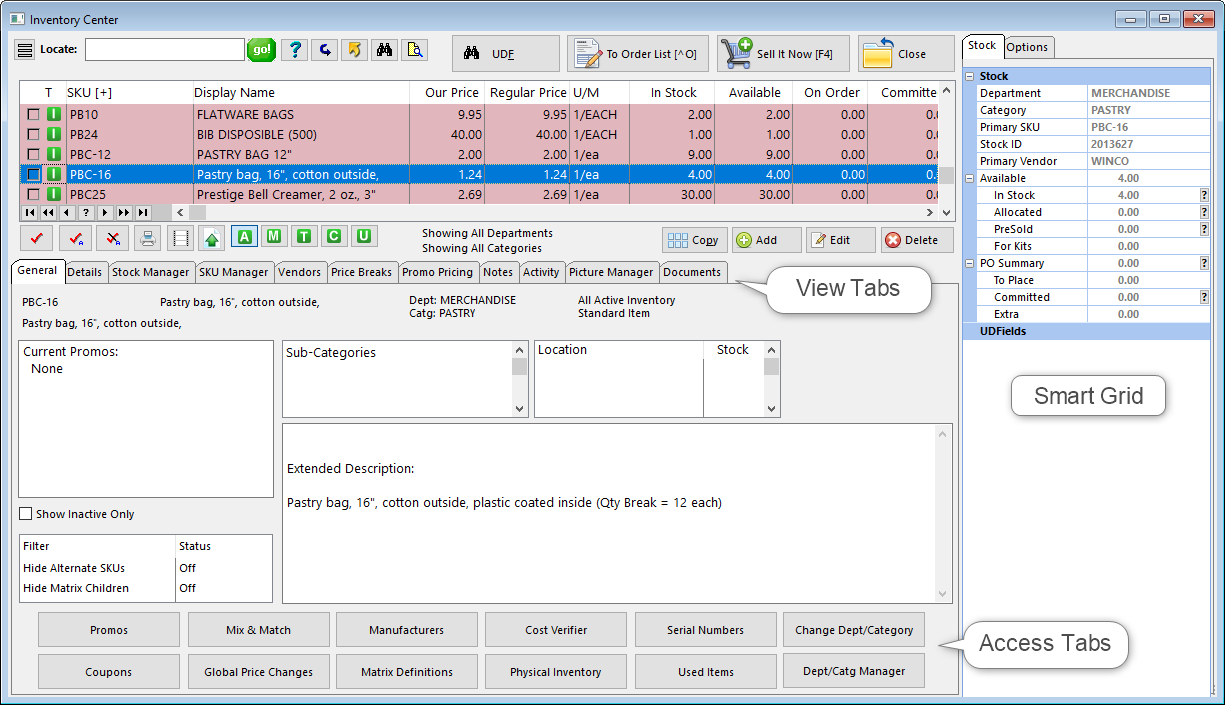
The number of columns visible and the sequence of the columns can be changed by Right-Mouse-Click and choosing Define Views. You determine a name for the view and what elements will be contained. This is useful not only for viewing but for exporting some or all of your inventory.
SELECTION OPTIONS |
||
|
The InfoBar shows the following information about the highlighted inventory item. You may leave the InfoBar screen open and highlight a different inventory item and the screen is updated for the selected item. |
|
Locate |
1) Select the column to be sorted by clicking on the column title. •Press Enter - will find the first item beginning with the search characters •Press CTRL-Enter - will find all items with the search characters anywhere in the field. TIP: If you cannot find a specific item, use the option "Show Inactive Only" before attempting to create a new item. It could be that the item was made inactive. (see Inactive Inventory) |
|
|
This starts the search for the information in the "Locate" field. Instead of clicking on "Go!" you can save time by just pressing Enter or Control-Enter after entering something in the Locate field. |
|
|
Select from an unlimited number of saved queries or filters which you can create and modify as needed. |
|
|
Restores the list to show all records. |
|
|
Sends displayed listing to HTML, Excel, Word, etc. All visible entries in the Listing can be exported or copied out to some other destination. Make choices as prompted. Note: This function is not just for Inventory, but for any other type of list. (See Send To Window) |
|
|
Search and display all inventory items containing the characters in a specific field or combination of fields. (see Find) SKU Click the Quick Find button again to restore the full list. |
|
|
Display all inventory assigned to a specific category. (see Filter (Dept/Category)) |
|
Custom Views |
It is possible to modify the information shown in the columns. Please see Defining Custom Views. |
|
Inventory Types
|
Filters the list by type of inventory. TIP: use hotkeys in bold print. •All Inventory - CTRL-A shows all inventory •Matrix - CTRL-M inventory which comes in color/size and are viewed together in a matrix •Templates - CTRL-T groups of items being sold together; kits •Consignments - CTRL-C items being sold on behalf of another person or company •UnPosted - CTRL-U items added on the fly while creating an invoice; Incomplete Items |
|
Sell It Now [F4] |
Immediately creates an invoice screen and the highlighted inventory item is added to the invoice. This is a useful feature when a customer has simply inquired about an inventory item and you can immediately commit the item for a sale. |
|
Inventory Record (in yellow) |
Each line represents an inventory item. However
SORT ORDER: Click on the column title to set the sort order for the column. •Description - sorts alphabetically, ascending or descending (double click) •SKU - shows all primary and alternate SKUs of all items. Hence, you will see multiples of the same item. •TIP: You can choose to only show primary and no alternate SKUs, by clicking on Binoculars (Quick Find), click on Show Options, Click on "Hide Alternate SKUs'. PRICING: Click on the first Price title to scroll through the multiple price levels. HIDE INFORMATION: The columns of information displayed can be rearranged or hidden. Right Mouse Click on one item, choose Define View and select which fields to show. (see Inventory Record) |
|
|
Tagging items in the inventory list is a method for •adding multiple items to an invoice •adding multiple items to the inventory label printer queue •moving multiple items to a different category •..and other procedures. The easiest method of tagging items is to click into the box. Another option is to use a lookup or query to display all the items of interest and then use the Tag All button |
|
|
Checkmarks all displayed items. (Use: Locate, Query, Quick Find, or Category Filter to display desired items.) |
|
|
Unchecks all displayed items. |
|
|
Prints information about the highlighted inventory item including price levels, stock levels, cost, and the Internal Notes for the the item. |
|
|
Add tagged/highlighted to Label List. Clicking this option will prompt for the number of labels to be added the the Label List. By default, the current stock count is already entered (see Add To Label List) |
|
|
Force update of E-Commerce with this item. Generally, this is automated whenever changes are made to an internet inventory item, but you can force the item to the web. |
|
Filter Status "Showing All Departments" "Showing All Categories" |
As you use the "Category Filter" button described above you will see which filter is in place. Choose the "Reset" button to show All departments and categories, again. |
|
|
Makes an exact copy of the highlighted inventory item, with the exception of the SKU which must be different than the original SKU. (see Copy) |
|
Add |
You first select the type of inventory item, the dept/category to which it will be assigned, and then fill in the details for Description, SKU, Cost, Prices, etc. (see Add) |
|
Edit |
Change any details of the inventory record. (see Details) |
|
Delete |
You must confirm that you want to delete the inventory item. There is an "undo" feature. Go to Manager: Deleted Items in the Access panel at left (see Deleted Items) If the item has a stock count or is on a pending order you will not be able to delete the item, You must make a corrections or substitutions before you can delete the item. |
|
ON SUMMARY VIEW |
When first opening the Inventory Center |
|
Show Inactive Only |
Displays inventory which has been hidden or made inactive. Accessible only on the Summary view. (see Inactive Inventory) |
|
Price w/VAT |
This is only visible after selecting System Setup: Tax Options: Tax Inclusive: "Enable 'Display VAT Pricing' Option On Inventory Screen". Placing a check mark here will adjust the selling prices to include the Value Added Tax percentage to the normal price. |
|
|
Lists all inventory with User Defined Field contents. Accessible only on the Summary view. Sorts on a content field and then you can select the specific inventory item. |
See linked topics to learn specifics about each screen.
General - has no editable fields, but it displays much useful information controlled by other properties: current Promo, standard note, stock counts and locations, user defined fields, template contents, and picture of the highlighted inventory item. |
|
Details - Displays and allows editing of the inventory record's individual fields of information. |
|
Management - various tools for working with inventory List
|
|
View |
|
|
|
SKU Manager - allows an inventory item to have multiple part numbers and to define alternate names of inventory items based upon packaging |
|
Picture Manager - for assigning and controlling a picture of the inventory item |
|
Promo Pricing - discounted or modified prices for given time periods (choose the Button) Promo Manager - apply discount percentages to more than one product at a time for a given time period Open the Promo Pricing view and select Promo Manager at far right |
|
Price Breaks - automatic price changes when selling multiples of an inventory item |
|
|
|
Vendors - any company or individual who provides this product for resale. displays purchase order status and updates |
|
|
|
Documents - access to adding and reviewing documents attached to this item |
|
Actions |
|
To Order List - one method of ordering more product |
|
Change Dept/Catg - to reassign an item to a different department and/or category |
|
Verify Inventory - a procedure to compare inventory stock levels with reported stock counts. It also checks for proper assignment of SKUs, vendor inventory, and serial numbers. |
|
Cost Verifier - re-set the cost of an item sold on a specific invoice (also see Adjust Item Cost) |
|
Physical Inventory - change stock counts of a single item or multiple items, to review stock exceptions, and use a batch method of changing stock counts either from a file or direct scan of items. The list can also be printed. |
|
Global Price Changes - select inventory which match a particular requirement and then to apply a pricing change to those items only. |