| Show/Hide Hidden Text |
POSitive can print special data to pre-printed forms upon the completion of an invoice. This is a valuable feature if you have to complete government paperwork when selling items, like motorcycles or guns, that need to be registered.
Advanced printing is for those special situations when you need an extra piece of paper work completed when you finish processing an invoice, service order, layaway, etc.
This is a very versatile feature which can print labels, fill-in forms, print Gift Receipts, and warranty vouchers.

For example, you may set POSitive to print a Gift Receipt, or federal or state documents, or a raffle ticket, or planting instruction for an exotic plant you have just sold, or some other customized form in addition to printing your normal sales invoice. TIP
What if the Advanced Printing is seasonal? You do not have to delete the form to stop it from working. Simply change the printing condition so that it will not be printed. For example, just turn of the switches. Or make ITEMSKU = xxx, a non-existent SKU. |
Specifically, if you are selling motorcycles, you will likely have to complete Odometer and Ownership or Bank Lien forms before you are done with the sale. When you create an invoice in POSitive to sell the motorcycle, POSitive can then prompt you to insert the applicable government form(s) into a printer, and POSitive will complete the form with its database information and any prompted input required at the time of printing.
Advanced Printing can also be used for franking, validating, or cancelling the backs of checks tendered. However, you should consider the Check Validation feature of POSitive first.
Project Overview
Your advanced printing projects can range from the simple to the complex, but here are some things to consider:
Prepare A Form
Modify the Inventory Item Screen
Set the Criteria For Printing the Form
Prepare A Form
Most likely you already have a preprinted form that needs to be filled in. Consider the characteristics of the form.
| • | Is it multi-part paper which must be printed by an impact type printer or can the form be loaded into a laser or inkjet type printer? |
| • | What fields of information need to be printed on the form? Does POSitive have that information or is it extraneous to POSitive and hence will need to be typed in as the form is printed? |
| • | How will POSitive be able to recognize it? |
RESTOCKING LIST Some businesses have used Advanced Printing to print a small slip of paper to remind the staff of what items were sold so that replacements can be retrieved from the back room or below the counter. To create the form, clone the normal receipt, delete unnecessary lines from the Header and the Footer so that the Details section is printed. On the Advanced Printing setup screen, select this new form, leave the Condition field BLANK, and checkmark "Print All Items That Meet This Condition"
ABBREVIATED CUSTOMER SIGNATURE FOR STORE RETENTION Some businesses have opted to have POSitive print an abbreviated credit card signature receipt. After cloning and modifying the original invoice, create an Advanced Printing entry which selects the new form number. In the Condition field enter ChargeCard <>0 and checkmark "Print All Items That Meet This Condition"
|
You can choose to create a Windows Form (see Report Designer) or a "Direct To Port Form." (see Printer Forms)
If you choose to edit a Direct To Port Form (Go to Reports: Actions: Receipt Layouts) you will find a list of pre-defined forms. Choose one which is closest to the form you need and clone it. Once it is cloned, then you can edit the layout of the form to match the fields on your pre-printed form.
Modify Inventory Item Screen
Because advanced printing is typically activated by the sale of a particular inventory item, you may need to use some POSitive tools to enhance your inventory items. For example, a motorcycle inventory item may require using some fields for unique information such as odometer readings, previous owner information and licenses. To make the fields less confusing, POSitive allows you to rename titles of fields.
1) modify the special category Screen view. See Category Detail Form - Screen
2) design and format special form layouts
3) enter inventory which will trigger the advance form printing. These items should be assigned to the special category or have a standardized initial SKU character.
4) activate Advance Printing. You need to link to the form, printer, and set the conditions for printing the form.
Set Criteria For Printing The Form
Now you are ready to setup Advanced Printing.
Go to Station Detail and highlight Invoice (or the best suited type of transaction). Select the Advanced button.
Choose Add.
Fill in the appropriate fields.
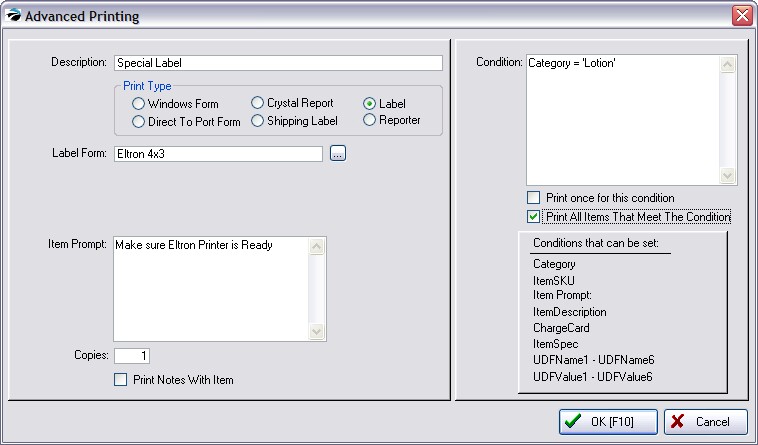
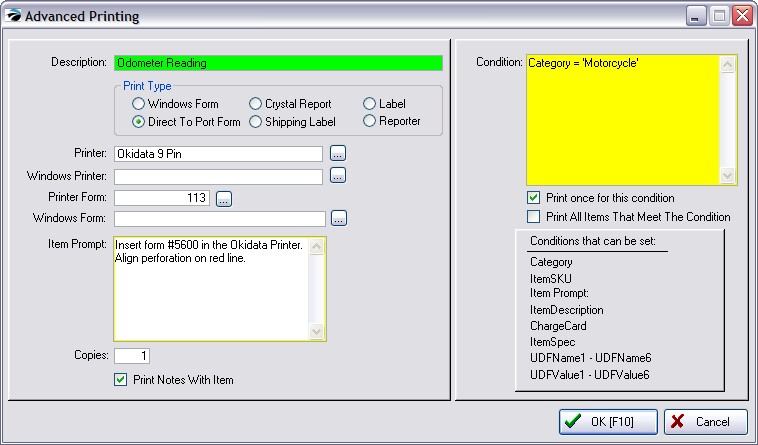
Description: A name for this project
Print Type: Choose one
| • | Windows Form - |
| • | Direct To Port Form - (as accessed through Reports: Actions: Receipt Layouts) |
| • | Shipping Label - |
| • | Label - an inventory item label. Selection of a Label Form is all that is needed. The Form knows which printer and layout to use.. |

Printer Choices:
If you are printing to a Laser or Inkjet Printer, choose Printer Type = Windows Form and fill in the following fields.
Windows Printer - choose the printer by name
Windows Form - choose from the list (Special Forms are created through Reports: Actions: Invoice/Reports Layouts)
If you are printing to a dot matrix printer, choose Printer Type = Direct To Port Form and fill in the following fields
Printer - choose the printer by name
Printer Form - choose the form number (as defined through Reports: Actions: Receipt Layouts)
Item Prompt: an Alert message when ready to start the printing project.
Be as specific as necessary. This message will be displayed to the cashier giving instructions for proceeding to print the Advanced Printing project. For example, "Insert form #5600 in the Okidata printer. Align perforation on the red line and choose OK to this message."
Copies: enter the number of copies to be printed.
Print Notes With Item: If the inventory item used as a trigger has notes, they can be printed with this option check on.
Condition: the "trigger" which will cause this Advanced Printing project to start.
IMPORTANT TIP: Leaving the condition field EMPTY will print the form for any SKU on the invoice. And activate "Print All Items That Meet The Condition" will make sure all items on the invoice are listed.
The Advanced Printing form identified above will be printed when an inventory item is sold which meets the criterion specified here.
Condition "Triggers"
There are three elements of the condition.
(1) (2) (3)
Field To Evaluate = 'Specific Item' (be sure to include apostrophes)
Type the Field name exactly as displayed. Set one space before and after the = sign. Use single quotes before and after the specific item.
Here are some examples
| • | ChargeCard: ChargeCard <> '0' (triggers printout if card number greater than 0. No other information is needed) |
| • | ItemSKU: 'SKU' (enter the specific sku number) |
| • | Category: 'NAME' (enter the specific name of the category) |
| • | ItemDescription: 'DESCRIPTION' (enter the complete description) |
| • | Item Prompt: 'ITEMPROMPT' (enter the title description of an existing selling prompt as defined in Category: Selling Prompts) |
| • | ItemSpec: 'T' (for triggering a category trade in item using the Invoice Button) |
| • | UDFName1 - UDFName6: |
| • | UDFValue1 - UDFValue6: |
Does Not Equal - instead of using the = sign use <> to exclude the following item in single quotes
for example 'SKU' <> 'Z' would print everything as long as a SKU named Z is not present.
MULTIPLE FIELDS
If you have more than one category, for example, which would qualify for Advanced Printing, then you can enter the criteria using OR to separate the options. There is no limit of how many items can be on one line.
Category = 'Lotion' OR Category = 'Soap'
Advanced commands you can use:
INSTRING(substring,string [,step] [,start])
This allows you to create a trigger for multiple inventory items based upon a common element. POSitive will search an entire description or SKU for the set information. This will save setup time. You can structure your inventory SKUs or Descriptions to contain the common element.
For Example: If you have the following SKUs:
ABC
BCD
CDE
Then INSTRING('B',ItemSKU,1,1) would work for: ABC and BCD
and INSTRING('E',ItemSKU,1,1) would work for: CDE
Print Once For This Condition - if more than one item on the invoice meets the condition, only one copy of the Advanced Printing project form will be printed.
Print All Items That Meet The Condition - if more than one item on the invoice meets the conditions, then a form will be printed for each item.
Trial and Error
Much of the work you will be doing will be trial and error as you determine the correct spacing, the correct criteria, and proper insertion of the form.
Because of the intense labor involved, your dealer or POSitive Software Company would need to charge a special fee to help you set up this project.