Basic Hardware For Workstations |
  
|
| Show/Hide Hidden Text |
Basic Hardware For Workstations |
|
| Show/Hide Hidden Text |
POSitive can work with many popular brands of point of sale hardware. The purpose of this chapter is to help you with the set-up of your POS equipment.
Other than a computer, the next most important piece of equipment in any POS system is a good printer, which can be used for printing receipts, reports and labels. POSitive can work entirely through your default Windows printer, but you may want to use other printing options typically available in point-of-sale software.
GET PRINTER DRIVERS FOR EACH PRINTER
Since POSitive can support different printers for different functions, the first thing you’ll need to do is make sure a Printer Driver is installed for each printer you’ll be using. You’ll need to download the appropriate driver from the manufacturer’s web site, or ask your dealer to provide it. Once all your printer drivers are installed and working, you can proceed with setting up printing in POSitive. |
Transaction printing is used for forms that are given to your customers and ranges from invoices to packing slips. On the Maintenance, Station Settings, Printers/E-Mail screen you select printers and forms for the following transactions:
Each workstation selects which printer will be used for each type of POSitive transaction:
Invoice Internet Orders Contract Pricing
Alternate Invoice Service Orders Recurring Invoices
Layaway Quotes Packing Slips
Orders Quotes with Costs Suspended Invoices
In addition, Printing Options allows for selection of packing slips, customer labels, and handling of purchase order.
Also from this screen, forms are selected for printing a deposit receipt, an accounts receivable receipt, and the consignment agreement.
We’re going to skip Printing Options for now and start with Invoice.
|
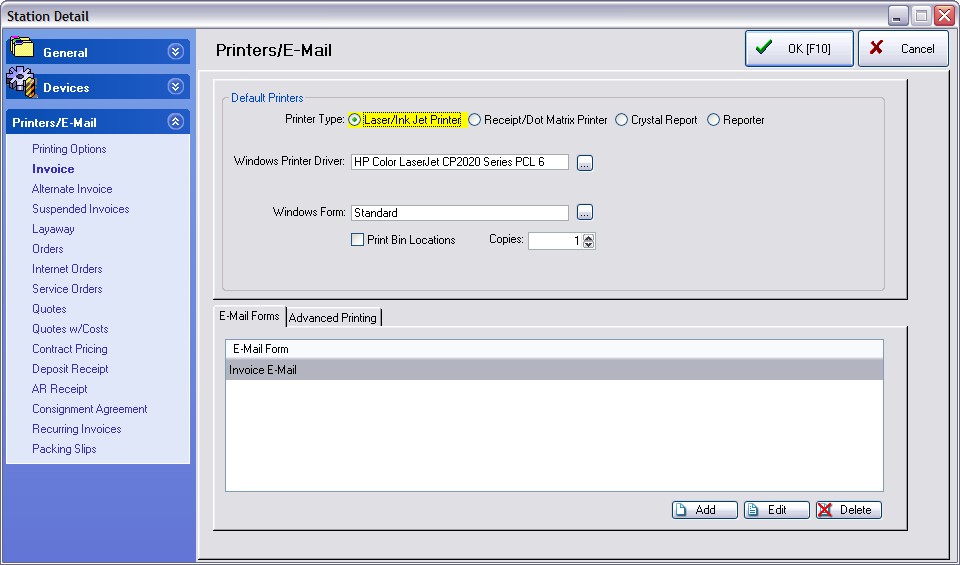
This screen is where you select the printer and form you wish to use for the transactions listed on the left. When you select a transaction for the first time, POSitive will automatically select your Printer Type as Laser/Ink Jet Printer, Windows Printer Driver will be your default Windows printer and Windows Form is Standard. If this is the printer you want to use, you’re already done! But what if you want to use a different printer? Well, let’s do some exploring.
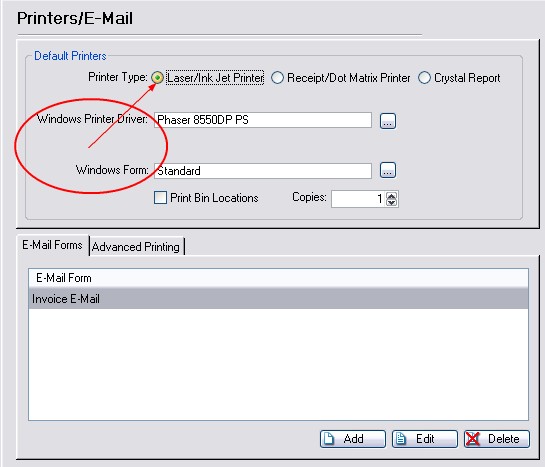
Printer Type determines what kind of forms you’ll be able to use for the transaction.
Laser/Ink Jet Printer uses a predefined Windows Form called Standard which can incorporate a company logo and looks very nice when printed on a laser or inkjet printer. It is possible to edit this form if you are an advanced user, but we don’t recommend it.
Go ahead and click on Receipt/Dot Matrix Printer and notice how your options change.
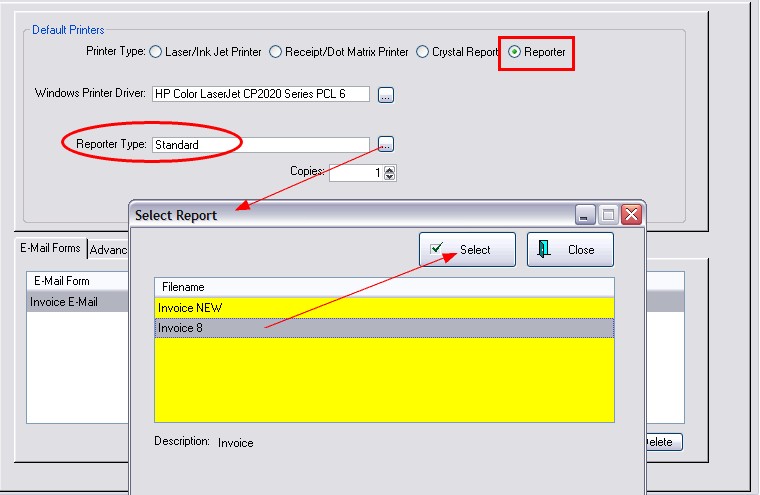
Report Writer and Crystal Reports Forms
Two other sources of invoice printing are POSitive's built-in Report Writer and 3rd party Crystal Reports. These are software programs for designing your own forms and reports. Reporter Report Writer is a built-in report designing program with great versatility. (see Report Writer) It can be used for designing your own invoice forms. Once the forms have been created, you select them by choosing the Lookup button, highlighting the desired form, and choosing Select. Some forms may be immediately available, however, you should contact your dealer or POSitive Software for more information.
This is a legacy feature and we recommend using Report Writer for custom transaction reports.. |
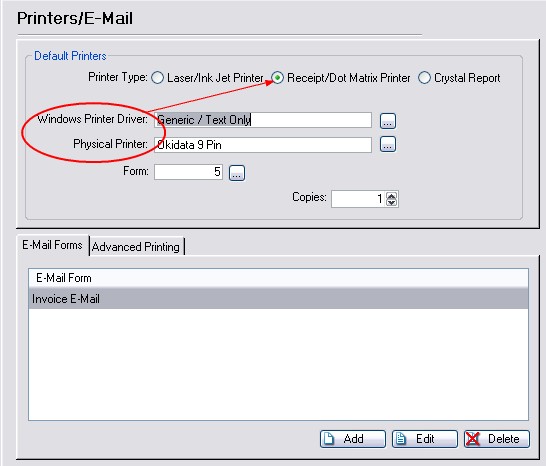
If you have selected Receipt/Dot Matrix Printer as your Default Printer you'll notice that you can now select a Physical Printer and Windows Form has changed to Form.
Click on the box next to Physical Printer to see a list of Registered Printers.
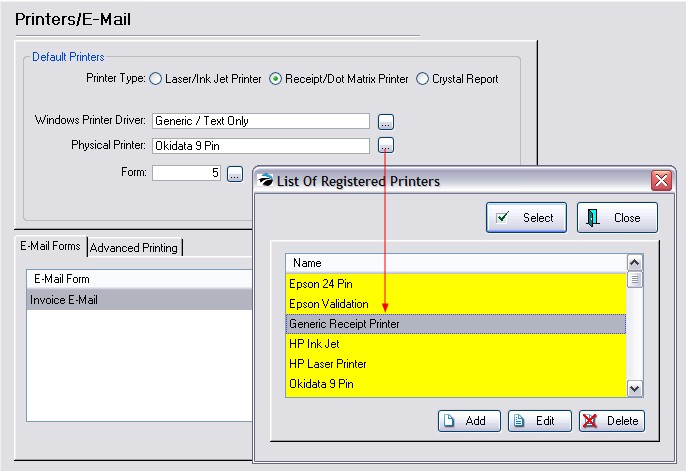
This is a list of pre-defined printers that are used primarily for receipt and invoice printing.
Epson 24 Pin - A standard printer definition for printing to most makes and brands of 80 column dot-matrix printers.
Epson Validation - A receipt printer which will print check cancellation information on the back of the check.
Generic Receipt Printer - A standard printer definition for printing to most makes and models of 40 column receipt printers.
HP Ink Jet - A standard printer definition for printing to most makes and brands of ink jet printers.
HP Laser Printer - A standard printer definition for printing to most makes and brands of Laser Printers.
Okidata 9 Pin - A standard printer which may not emulate the Epson printer.
Windows - (not shown) - POSitive will print directly to the Default Windows printer as defined under Windows.
You can edit the definition on all of them except the Windows printer, adding control codes for printer functions, font sizes and etc. You can also add your own printer definition for special applications, such as check validation or slip printing.
We’ll cover making changes to the printer definitions a little later in Station - Devices. Consult with your dealer who will be able to give you specific guidance if you need to make changes or additions to this list.
Remember, use the Add or Edit buttons only as necessary. Do NOT use Delete without having a good backup of the program and data files. The Select button will be active only when appropriate to the task.
40 Column Receipt Printer
The main reason for selecting a Receipt/Dot Matrix printer is to utilize a 40 column Receipt Printer (prints to a roll of paper.)
For this discussion, we have switched the Windows Printer Driver to GENERIC / TEXT ONLY and the Physical Printer to GENERIC RECEIPT PRINTER
Now we’re back to our set-up screen. Click on the box next to Forms to see our list of predefined forms.
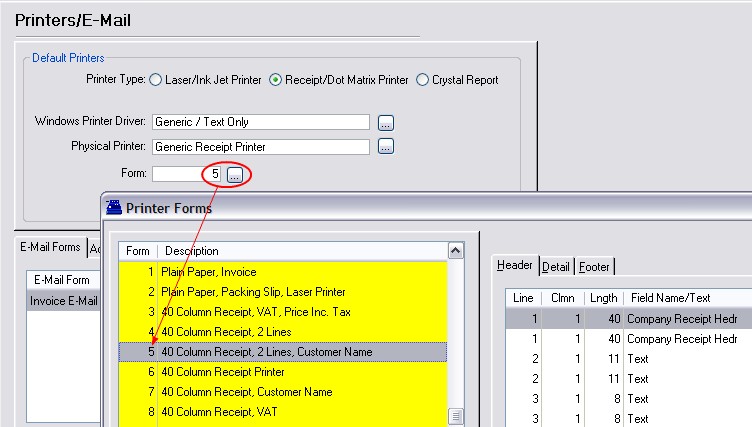
We’ve already created nearly 100 forms for you to choose from, ranging from letter size invoices to 40 column layaway receipts. We also let you edit these forms, which we’ll cover later. (see Printer Forms)
By the way, “column” is simply a way to measure the width of a form. A letter size sheet of paper is 80 columns wide and a small 3” receipt is 40 columns wide.
If you are using a Laser/Ink Jet Printer type, you will be able to choose to print Stock (Bin) Locations on your invoices and packing slips. Check mark the option. (see Stock Locations)
We’re back to the set-up screen again. Next, select the number of copies you would like to print. When you process an invoice, POSitive will automatically print the number of copies designated here.
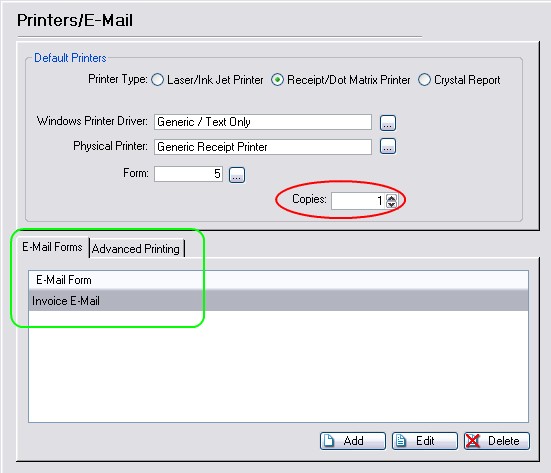
You’ll see tabs for E-Mail Forms and Advanced Printing. Don’t worry about these since they’re not needed by most of our customers.
If you plan to e-mail invoices, orders, or quotes, no changes are needed because POSitive comes pre-set with E-mail forms. However, you can use HTML templates and create additional e-mail titles and options. (see E-Mail Forms)
Advanced Printing is a special setup which allows printing of coupons, labels, or federal or state documents. (see Advanced Printing). Please, contact your dealer for more information.
Remember that each workstation selects which printer will be used for each type of POSitive transaction:
Invoice Internet Orders Contract Pricing
Alternate Invoice Service Orders Recurring Invoices
Layaway Quotes Packing Slips
Orders Quotes with Costs Suspended Invoices
Continue down the list on the left hand side and finish selecting your printer and form for the other transactions you’ll be performing. For an example of how to set up a typical receipt printer see Sample: Generic Receipt Printer Setup.
A typical POS system will have a cash drawer and this section will show you how to set it up in POSitive.
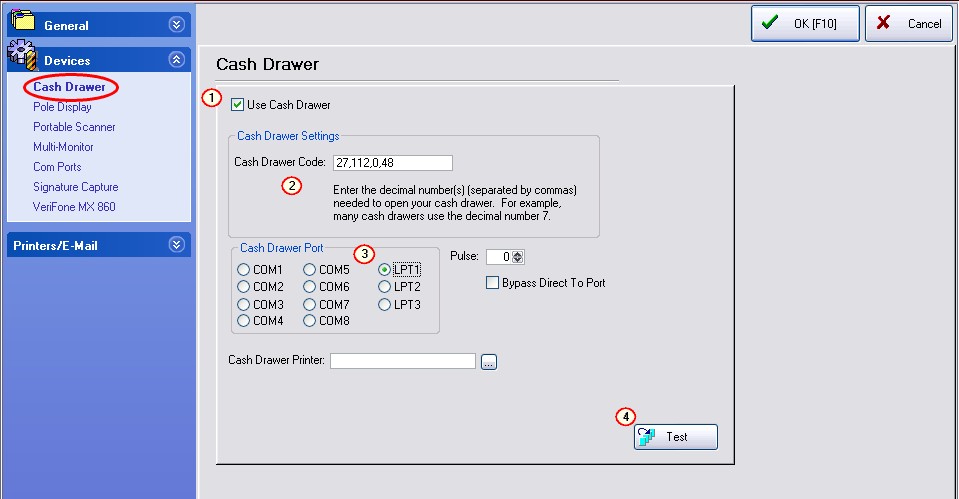
Go to Maintenance, Station Settings, click on the down arrow next to Devices and select Cash Drawer.
You should now see the cash drawer setup screen. The most common way to connect a cash drawer to a POS system is through a connector on the receipt printer, which we’ll discuss here. You can also connect a cash drawer directly to the computer through either a serial or USB port. (1) Click on "Use Cash Drawer" to activate this option. (2) Next, you must enter a Cash Drawer Code, which is the command POSitive will send to the printer to make it open the drawer. Different brands of printers use different codes and in our example we’re using a typical Epson control code of 27,112,0,64,240 . (3) Next, if your cash drawer connects directly to the receipt printer, select that printer as the "Cash Drawer Printer". This setting overrides any Cash Drawer Port selection. If the cash drawer connects directly to the workstation through a serial (COM) or parallel (LPT) port, you would select that port number as your Cash Drawer Port. Note: If your cash drawer connects to the computer with a USB cable, please contact your dealer or POSitive support for setup assistance. PULSE & BYPASS (Legacy feature) The Pulse and Bypass Direct to Port settings are used only with cash drawers that connect through a serial or parallel port. TEST THE DRAWER (4) Finally, if your cash drawer is connected and the receipt printer is turned on, click on the Test button and the drawer should open. If it does not open, it may be necessary to click OK to save your settings, then go back into Station Settings and try the test button again. If the drawer still does not open, review the hardware connections and/or contact your dealer. At this point you can continue on down the list of Devices in the blue area, or you can click on OK to close this window. |
A pole (or customer) display is a device which allows the customer to view the products and prices being purchased. POSitive supports several brands of pole displays. Check with your dealer for a current list and choose one which will best suit your purposes. Pole displays are typically connected to either a serial or USB port and for our example, we’re going assume the display has a serial interface.
You should first test to make sure the pole display is functional. Turn off power to the pole display and turn power back on. Most models will run through a self test and display its standard setup. If it does not look like it is functioning properly, check the manual and or manufacturer. If the pole checks out, you may continue. |
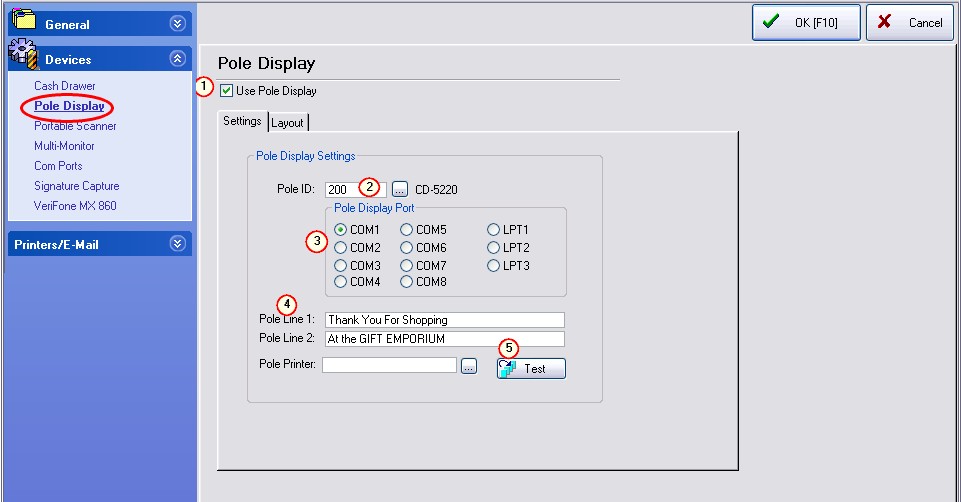
To setup your pole display, go to Maintenance, Station Settings, edit the station, then Devices, Pole Display. (1) Click on Use Pole Display to active the other settings.
(2) Next, you need to select a Pole ID. You’ll notice some predefined ID’s, such as CD-5220 (Partner Tech), Logic Controls, Epson and UTC, which cover most popular poles. You’ll also see Undefined, which is used if you need to create a custom ID. In our example above, we selected Pole ID 200, CD-5220. (3) Next, you will need to select the Pole Display Port, which in our example is COM1. If your pole uses a USB interface, please contact your dealer for instructions. (4) Next, you’ll need to enter the message to be displayed between sales transactions on Pole Line 1 and 2. Since a typical pole display can only display 20 characters on each line, make sure your message takes no more that 20 spaces on each line, as shown in our example above. Leave Pole Printer blank for now. (5) Click on Test. Your message should appear on the display. |
Portable Scanner (Legacy feature)
This is a legacy feature that does not work with modern portable scanners (data collectors). Contact your dealer, or POSitive Software, for more information.
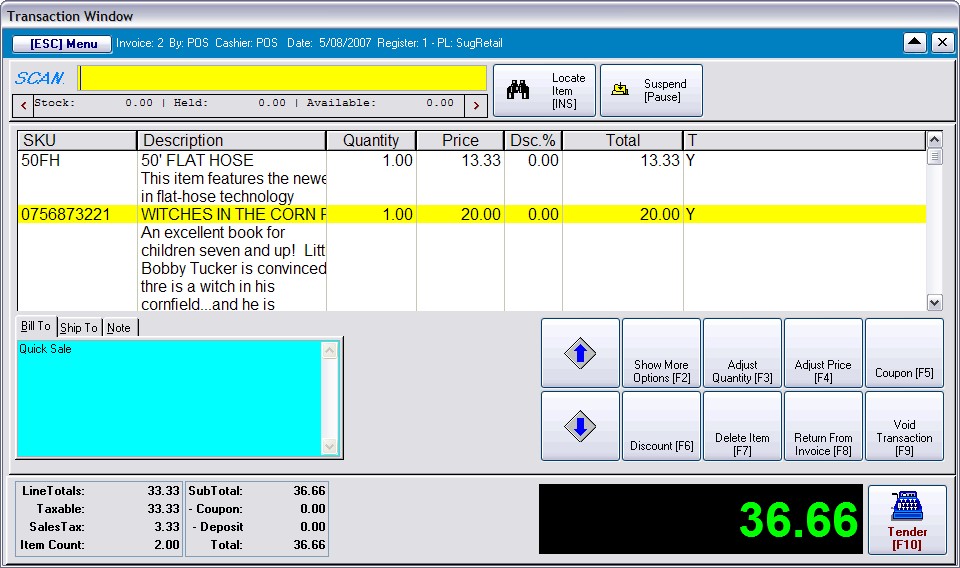
Instead of using a Pole Display, as described above, POSitive can support two monitors; one that faces your cashier for ringing up the sale, and one that faces your customer.
The customer display acts like a pole display, yet it displays much more information. Each individual item is displayed as the sale is being rung up, plus the tax, total, and tender are displayed at the end of the sale.
This is what your cashier sees.
|
Multi-Monitor allows you to use a second, customer facing monitor to display transaction information and advertising messages. The information displayed to the customer has a maximum resolution of 1024 x 768 pixels, so the monitor needs to be capable of supporting this resolution. Most current LCD monitors exceed this resolution and will leave a blank space around the display unless you go into your Windows settings and set the resolution to 1024 x 768.
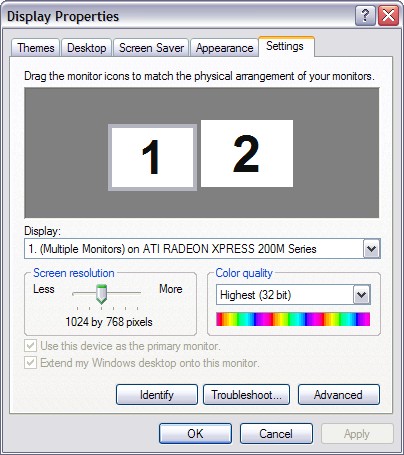
Once you have installed your second monitor, it is important that POSitive is running on Monitor 1, and the customer display is on Monitor 2. To see which monitor is which, right-click on your desktop and select “Properties” and then “Settings”. You should see a screen similar to this:
In the example above, when you run POSitive it should display on the monitor on the left. Your second monitor should be set at 1024 X 768 resolution. |
Image Requirements - Resolution and stored location
Next, you need to create a directory in your POSitive data directory called MIMAGES (typically, C:\POSitive\(POSitive Product)\DataX\MIMAGES where X is the data number). This is where you will store graphics that will be displayed on the second monitor. When the register is idle (you are not creating an invoice), full-screen images will be displayed. We use Dots per Inch (DPI) as our unit of measure and full-screen images should be set at 1024 X 768 resolution. When an invoice is being created, a picture (or banner) at the top of the screen is displayed and should be 1024 X 265 resolution. |
Finally, you need to turn on multi-monitor support.
(1) Under Maintenance, Station Settings, Devices, Multi-monitor, check the “Activate Multi-Monitor Mode” switch. Alternate Method: Go to Maintenance: Station Setup: and select Multi-Monitor. (see Monitor Manager) (2) Select the Station. It is recommended that you setup only 1 station initially for testing purposes. Then you can clone the settings to other stations and make further modifications per station. (3) Select the Layout (see Monitor Manager) (4) Select the Static Display picture you will use for the top of the customer display (the Default Picture). (5) Add pictures that will be displayed when the register is idle. Remember, these pictures should be stored in the C:\POSitive\(POSitive Product)\DataX\MIMAGES (where X is the data number) directory. (6) Set the default time in seconds for the pictures to change. Five seconds is recommended. (7) Show Inventory Picture On Second Monitor - Your customer will see the picture of the item being sold. When you click on APPLY, the second monitor will be activated. |
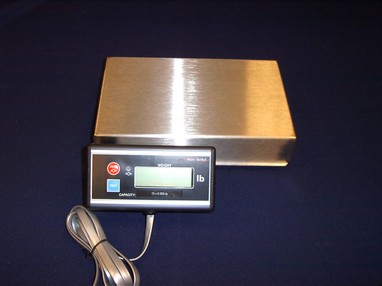
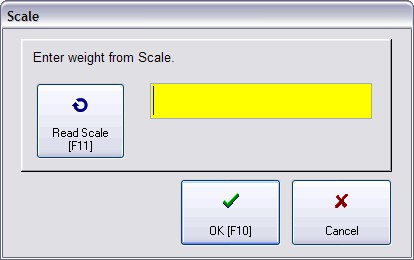
POSitive is compatible with CAS, NCI, Toledo Mettler and other brands of scales, when used with an appropriate interface, such as the xWedge serial to keyboard conversion software. The reading of the scale is triggered by a specific or “hot” key on the keyboard, such as F11 or F12. Contact your dealer for specific information on the interface included with your system.
IMPORTANT: When creating an inventory item sold by weight, make sure you select Prompt To Read Scale. This setting can also be automatically included by category. Whenever you sell an item by weight, you will be prompted to place the item on the scale and then to press the designated hot key [F11] to read the weight.
|
POSitive works with most barcode scanners that use USB interfaces. USB interfaces must be HID (Human Interface Device) compatible and not POS or OPOS compatible. No special drivers are required, just connect the barcode scanner to your computer.
POSitive works with most magnetic stripe readers that use either USB interfaces. USB interfaces must be HID (Human Interface Device) compatible and not POS or OPOS compatible. No special drivers are required, just connect the magstripe reader to your computer. NOTE: Standard magstripe readers are now ONLY used for gift/loyalty cards and employee login cards. They do not meet current credit card payment security requirements.
POSitive has several pre-defined inventory and customer labels. However, you may create more and define them to suit your needs. (see Advanced Inventory Label Printing Tutorial)
Printing Inventory Labels
POSitive prints prices and barcodes on labels and there are several pre-designed sizes included with the program. You can even create your own labels with our built-in designer. A label can include special pricing, colorization (if supported by the printer), and can even include a picture of the product.
And you can choose to print shelf tags, print labels as inventory arrives, reprint missing labels, and promotional labels, and much more. (see A Demonstration of Label Printing)
All reports are printed to your Windows Default printer. You will need a standard letter size (80 column) printer. A laser printer is recommended, however an inkjet printer or a dot matrix printer can generally give suitable results.
Most reports are hard coded into the program and cannot be changed.
The following Windows reports can be edited using Editors:
•Invoices - a smart form used for all windows printing of invoices, orders, service orders, quotes, etc. You may clone and design the form for each type of transaction. •POHistory - a reprint of a received purchase order •Purchase Order - a printout of a current purchase order •WorkOrders - a service department printout for on-site repair work •ServiceWorkSchedule - printout of service work assignments •CustomerList - customer listing •ARStatement - statement for accounts receivable •Inventory Price List - a catalog for customers •Physical Stock Count - report of inventory stock levels •Print Promo Pricing - a list of items with promotional dates •Balance Cash Drawer Reports - When balancing the drawer, the following reports can be printed automatically. You can reprint the reports at any time on demand. Invoice Transactions Tender Summary Credit Card Summary Category Summary Note: The Invoice Transactions report is too detailed for printing on a 40 column printer. But the other reports can be printed to a 40 column receipt printer. This is activated by selecting Print End-Of-Day Report To Receipt Printer on the Station Detail: Register Balance. (see next topic "End Of Day Reports - 40col Printer) •AR Statements - POSitive prints AR Statements with or without reprints of invoices. Reprinting of invoices is determined on a per customer basis. There is an option to consolidate the invoices as line item details on the statement rather than print full page invoices. This can save paper and is activated on the POSitive Setup Form: Accounts Receivable. |
As a rule, all reports in POSitive will print to a full page printer. But some businesses would like some reports to print to a 40 column receipt printer, especially when you balance the cash drawer at the end of the day.
Go to Station Settings: Register Balance Highlight Register Balance Choose which reports you want to print. Tender Summary Credit Card Summary Category Summary Note: Invoice Transactions Report will never print to the 40 Col printer because of its excessive detail. It may be printed later to an 80 column printer. Activate "Print End-Of-Day Report To Receipt Printer" In field Receipt Printer, select a Generic / Text Only Printer. If the Generic / Text Only Printer is not in your listing of Windows Printers, follow these steps. Go to the Start Button Choose Settings Choose Printers Click on Add Printer From the list, select Generic / Text Only Printer and follow the instructions for installation. Note: Do NOT set this as your Windows Default printer. |