Printer Forms |
  
|
Printer Forms |
|
This is a listing of "Direct To Printer" forms which is one of three types of designable forms. The other forms are Windows and Report Writer. Windows forms are designed to be printed on inkjet or laser printers. Direct To Printer forms are designed for receipt printers and legacy full-size dot-matrix printers. (see: Legacy Windows Forms)
These pre-designed forms should meet most of your needs. They can be modified to a degree to customize them for your business use. The forms listed here are layouts for invoices, orders, service orders, and quotes. These forms are selected on a per workstation basis on the Printers Tabs of the Station Settings window.
Select Receipt/Dot Matrix Printer as your Default Printer, from the choices of printers allows you to print directly to the printer You must choose the Windows Printer Driver, Physical Printer and the form number appropriate to the task and the printer.
POSitive allows you to modify these forms to include or exclude specific details, reposition information, and enhance the look of the form. This will require some work and you may prefer to have your dealer do this customization for you.
You will not be allowed to edit any forms numbered 1 to 100. These forms are reserved for standardized use of POSitive. These forms will be altered from time to time by POSitive Software and will be available to you in future updates of POSitive.
You may create or customize your own forms numbered from 101 to 255. These forms will remain untouched by future POSitive updates.
Be advised that creating or customizing your own forms requires close attention to detail and that it is not a quick project. The simpliest method is to make a copy of an existing form which is close to your desired end product and then make modifications to this cloned form.
At the bottom of the Printer Forms screen are some buttons or tools to help in editing and creating your own froms.

Tools for Editing Forms
Select - Only active when linked to another entry screen.
Add Edit Delete - For editing existing entries. This will NOT create a new form for you.
Import - Export - Strictly for copying in or out the fields and positions of POSitive forms. This will not be able to read other types of files. These tools are used mainly for generating reports to be transferred to other installations of POSitive. These are also used for Advanced Printing. For more information, contact your dealer.
Detail - Hides or Opens the panel at right.
Clone - Copies the highlighted form to a new form number. This is a required step when creating/editing forms. It is recommended that when cloning forms you number the new form to show the originating form layout. For example, if I clone form number 5 I would name my new form number 105.

You will then be given the option to clone all or parts of the form. TIP: It is best to clone the Entire Form and edit elements until you become more proficient at designing your own.
•Entire Form
•Header Only
•Body Only
•Footer Only
Your new form will be highlighted and you can proceed making changes to it. See below.
Print Grid - used for Advanced Printing to understand the elements being printed and how they will line up on your form.
Header, Detail, Footer
The positioning of and links to contents of the highlighted form are displayed under each tab.
Add, Edit, Delete - for editing positioning and contents of line items. NOTE: you will not be able to modify forms 1-100. These are locked. You may clone the form and then edit your cloned copy. Contact POSitive support for more information.
Edit PCL Objects - (contact your dealer for assistance)
Print - prints a text form of the assigned row contents
1) Go To Reports and on the far left select Receipt Layouts
2) Highlight a form which is "close" to the form you want. TIP: The Print Grid button is designed to print a grid or row and column numbers over a copy of a pre-printed form and may help you see how things are currently designed.
3) Click on the Clone button.
4) Enter a form number. It is suggested that you name it as a variation of the form being cloned for example, if you clone form 11 then name your new form 111.
5) Enter a title which readily defines the purpose and format of the form. Note the names of POSitive forms 1-100 include the paper type, module, and printer type.
6) Click OK. Choose Entire Form. (When you become expert at form design, you may wish to use the other options.) POSitive will save your selection and highlight it.
Important Note: You are now ready to edit the Header, Detail and Footer sections of the form. After you have finished the edit, you need to assign the new form number as appropriate on the Printers Tab of each Station Detail.
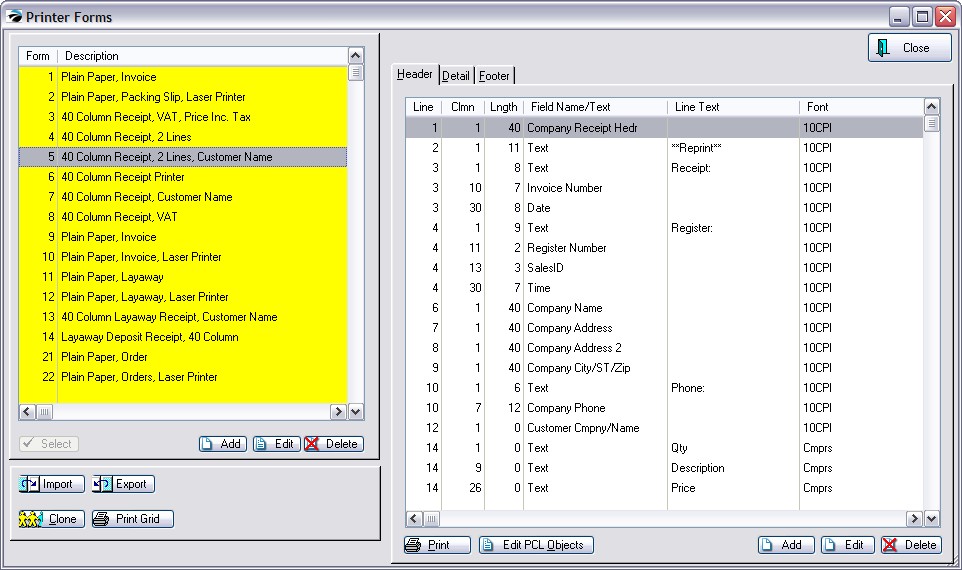
On the left hand side is a listing of all existing forms. Each has a unique form number. The Description field defines as precisely as possible the design and purpose of the form. You may not edit forms 1-100, but a form can be cloned and the copied form can be edited.
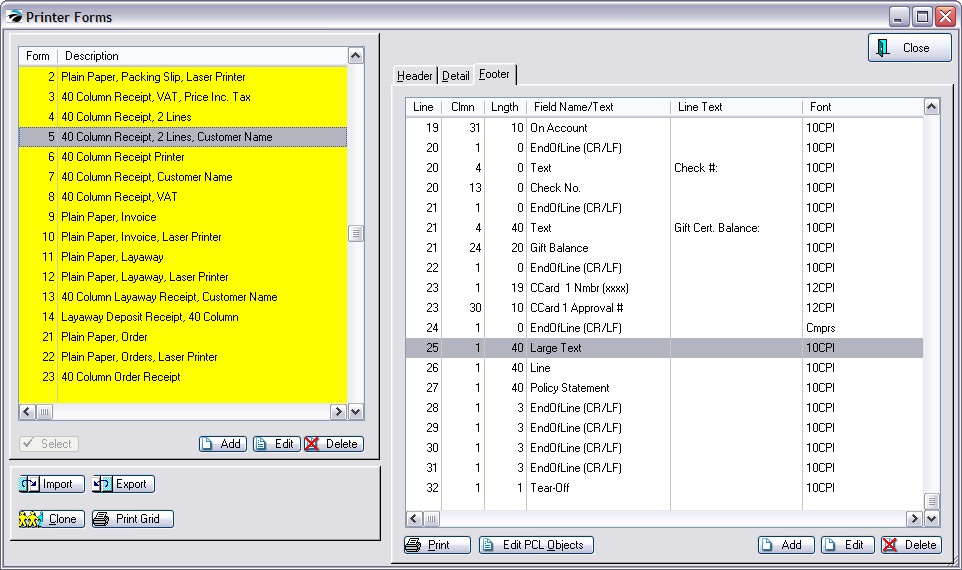
The right hand side displays the components of the invoice form and their positioning on the form. The three tabs provide access to the main sections of the form.
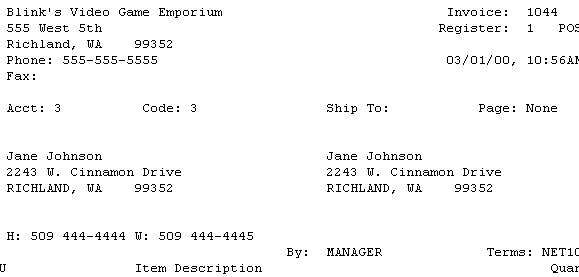
•Header - This is the top of the form. This section typically includes the customer name, invoice number, date of invoicing, and shipping information.
•Detail - This is the body of the form. This section lists the inventory line items, notes, and prices of items on the invoice.
•Footer - This is the bottom of the form. This section totals the purchases, reports how payment is made and includes policy statements.
All forms consist of components which are positioned on lines and columns of the paper print out. A component is either text, a calculated field, or a specific POSitive field.
For easy reference, the display on the right side shows the following elements of the form.
Line - All forms have printable lines which are counted from the top of the form. Line numbers start with 1 as the first line of the section of the form. When you are designing or editing a form, the line number positions the component from the top of the section.
A line number can and should be used more than once. Depending upon the length of the line, more than one form component can be positioned on it by setting well spaced column numbers.
Clmn - Each line has a set number of columns or number of characters per line. A standard 8 1/2 wide sheet of paper has 80 printable columns or characters. A 40 column receipt printer has only 40 columns. When you are designing or editing a form, the clmn number positions the component from the right margin of the form.
Lngth - Each component has specific number of characters required to print the contents of the component. When you are designing or editing a form, the Lngth will reserve a set number of characters for the component. If you choose a length which is shorter than the component, only the first characters of the component will be printed.
Field Name/Text - POSitive has several pre-set field names which are components of all invoice forms. Some are appropriate to one project form and not appropriate to others. You will select field names as needed.
Line Text - This is a blank line wherein you type a word or phrase you want printed on the form. Not all Field Name components give you the option to type Line Text.
When you edit a component entry, you will see and be able to edit the Line, Column, Length, Field Name, and Line Text fields as described above as well as these additional settings
Justification - The component will be left, centered, or right justified on the column position.
Line Font - The component will be printed with the selected font.
Move Up If Space Above Blank - If checked, the component will be moved up to eliminate gaps in the form. For example, if a customer address does not have a 2nd address line, then the next component City/ST/Zip would be set to move up to fill in the gap.
Move No Higher Than Line - This limits how high a component will be shifted up if there are blank lines above.
Field Required - This controls conditions under which the component will be used. The Field Required is often defined as an equation.
The following fields can be added to a customized Receipt Form.
HEADER TAB OPTIONS
Begin Balance
Cashier ID
Company Address
Company Address 2
Company City/ST/Zip
Company Fax
Company Invoice Line
Company Name
Company Phone
Company Receipt Header
Consign Agree #
Consign Date
Consign Time
Current Date
Current Time
Customer Account
Customer Bill Addr1
Customer Bill Addr2
Customer City
Customer City/ST/Zip
Customer Cmpny/Name
Customer Contact
Customer Lookup (Code)
Customer Phones
Customer UDF 1
Customer UDF 2
Customer UDF 3
Customer UDF 4
Customer UDF 5
Customer UDF 6
Date
Date Due
Decimal Code
Drivers License
EndOfLine (CR/LF)
EndOfLine (LF)
Invoice Number
Invoice Prompt 1
Invoice Prompt 2
Invoice Prompt 3
Invoice Prompt 4
Invoice Prompt 5
Item Description
Item Line Total
Item Long Desc.
Item Mfg. Code
Item Mfg. Number
Item SKU
Item Tax
Item UDF 1
Item UDF 2
Item UDF 3
Item UDF 4
Item UDF 5
Item UDF 6
Large Text (paragraph of static text)
Last Name, First
Line
PO Number
Page
Pause
Prompt
Quantity Shipped
Register Number
Sales ID
Sales Name
Service Serial Desc
Service Serial Nmbr
Ship Via
Ship-To-Line 1
Ship-To-Line 2
Ship-To-Line 3
Ship-To-Line 4
Ship-To-Line 5
Ship-To-Line 6
Tax Amount 1
Tax Number
Terms
Terms Description
Text
Time
Total (No Tax)
Warranty Labor (Y/N)
Warranty Parts (Y/N)
Work Done: Heading
Work Done: Line 1
Work Done: Line 10
Work Done: Line 2
Work Done: Line 3
Work Done: Line 4
Work Done: Line 5
Work Done: Line 6
Work Done: Line 7
Work Done: Line 8
Work Done: Line 9
Work To Do: Line 1
Work To Do: Line 10
Work To Do: Line 2
Work To Do: Line 3
Work To Do: Line 4
Work To Do: Line 5
Work To Do: Line 6
Work To Do: Line 7
Work To Do: Line 8
Work To Do: Line 9
Work To Do: Heading
Yes/No Prompt
Instructions (Options)
Print Always
Spread
Reprint
DETAIL TAB OPTIONS
AR Balance
AR Date
AR Date Due
AR Discount Available
AR Discount Given
AR Invoice Number
AR Original Amount
AR Payment
AR Reference #
BackOrder Qnty
Consign Item Dsc.
Consign Item Qnty
Consign Net
Consign Sell Price
Consign Store Comm
Consignment Item #
Cost
Decimal Codes
Deposit Amount
Deposit Date
Deposit Time
Deposit Total
Deposit Type
Deposit VAT Amnt
Discount
EndOfLine (CR/LF)
EndOfLine (LF)
Invoice: Note
Line Item Tax Amount
Line Item Tax Rate
Line Number
Line Total
Line Total w/Tax
Long Description
Margin
Markup
Note - Date
Note - Sales ID
Note
Price
Price Based On Total
Price w/Tax
Prompt
Quantity
Regular Price
SKU
Separator
Serial Numbers
Service Serial Desc
Service Serial Nmbr
Service: Work Notes
Service: Other Left
Shipped Qnty
Short Description
Taxable Item
Taxed (Y/N)
Text
Transaction Note
Warranty Labor (Y/N)
Warranty Parts (Y/N)
Instructions (Options)
- Print Always
- Item Backordered
- Item Discounted
- No Price If In Package
- No Line Total If In Package
- From Service Order
- Item Is Part of Package
FOOTER TAB OPTIONS
AR Balance
AR Credit Balance
AR Owed Balance
AR Reference #
Balance
Balance Due
Balance Fwd.
*** NOTE: Credit Card Information is no longer an option because of PCI Compliance
CCard 1 Nmbr (xxxx)
CCard 1
CCard 1 Amount
CCard 1 Approval #
CCard 1 Expire
CCard 1 Name
CCard 1 Number
***
Cash In
Change Due
Check
Check No.
Company Address
Company Address 2
Company City/ST/Zip
Company Fax
Company Invoice Line
Company Name
Company Phone
Customer Account
Customer Bill Addr1
Customer Bill Addr2
Customer City
Customer City/ST/Zip
Customer Cmpny/Name
Customer Contact
Customer Lookup (Code)
Customer Phones
Date
Decimal Codes
Deposit Made
Discount Days
EndOfLine (CR/LF)
EndOfLine (LF)
Finance Amount
Finance Company
Form Feed
Gift Balance
Gift Cert. Balance
Gift Certificate
Invoice Number
Item Count
Large Text
Less Coupons
Less Credits
Less Deposit
Line
Non-Taxable Amount
On Account
Order Credits
PCL Place Marker
Points Awarded
Points Balance
Points Balance (Current)
Policy Statement
Prompt
Refunded
Reset
Round Net
Rounding Amnt
Settlement Disc Amnt
SubTotal
TaxAmount1
TaxAmount2
Tax Desc. 1
Tax Desc. 2
Tax Rate 1
Tax Rate 2
Taxable
Tear-Off
Tender Info
Tender Infor 40 Col.
Terms
Terms Description
Terms Full Desc.
Text
This Payment
Time
To Account
Total
Total Non-VAT Sales
Total Paid
Total Shipped
Total VAT Sales
VAT Amount
You Saved Amount
Instructions (Options)