Advanced Inventory Label Printing Tutorial |
  
|
Advanced Inventory Label Printing Tutorial |
|
This tutorial should give you all the essential information you need to successfully print the most commonly used barcode labels, such as hang tags or 1.25" x 1" adhesive labels. If you need to print jewelry (barbell) labels, please download this document: Printing Jewelry Tags
In POSitive the SKU field is what will be printed as a barcode if you print a label from the software. It is a common misconception that a barcode contains lots of information about the product it represents. For example we are asked all the time if the merchant wants to add a can of Pepsi into inventory can he just scan the barcode to create the inventory definition. Unfortunately it’s not that easy. The barcode does not contain detailed product information.
It’s simply a number – or alpha characters or a combination of alphanumeric characters represented by the familiar bars of various widths found on many products. When you scan the barcode the scanner converts the barcode into its characters and sends the converted information to the keyboard port. Scanning a bar code is the SAME as typing the number with the keyboard.
The majority of barcode scanners us a USB cable, or a wireless "dongle" that plugs into a USB port on a computer. POSitive does not support SERIAL scanners – they simply will NOT work with our software. Decoding of a barcode is handled by the barcode scanner, not POSitive or any other POS software. So, when you scan a barcode that represents 123456 the barcode scanner sends 123456 to the computer as if those numbers had been typed on the keyboard.
Try this experiment if you have a barcode scanner connected to your POS system: Open Notepad or Word, or other word processor. With that program active, scan a barcode and watch the screen literally type the barcode one character at a time (very quickly). Once the characters are entered the cursor will move to a new line – that is a Carriage Return that takes it to the new line. The scanner is programmed to add the carriage return at the end of the scanned characters. Out of the box, a barcode scanner will usually work well with POSitive without the need for changes to its programming.
Most scanners come with a booklet of barcodes and you don't want to lose this book! You will rarely need it, but when you do there is no substitute. The book is full of programming barcodes. If your scanner is adding additional characters or is NOT sending the carriage return the scanner can be reprogrammed using the codes in the book. These codes can also be used to reset the scanner to factory defaults.
A Note About Barcode Symbologies
Symbology is a fancy word for “symbol type”. More specifically the Symbology represents not only the type but also the rules that must be followed in printing the barcode.
There are three barcode symbologies that allow both numbers and letters (Alpha- Numeric) SKU’s. Since POSitive allows Alpha-Numeric SKU’s we have found that most merchants choose to use them. If you choose to use an Alpha-Numeric SKU you must limit your Barcode type to either:
Code 128
Code 3of9 (aka code 39)
2.5 Datalogic
Each of the above symbologies has rules to follow. There are illegal characters that will cause your label not to print – or to print without the barcode. Generally don’t use the shifted number keys (!@#$%^&*()) punctuation keys ({}[]|\:;”’<>,.?/~`). It’s OK to use a DASH (-). But avoid using the slashes (\ / ). If you find you have an illegal character, simply edit it in your Inventory List.
There are perhaps some other more obscure rules but these cover the typical problems that most people have with barcode symbologies.
We have sometimes seen a merchant design a new label for each inventory item, “hard-coding” the SKU and description directly into the label. The flaw in this is that you only have 100 labels that you can design. If you make a label for each item then you can only have 100 inventory items.
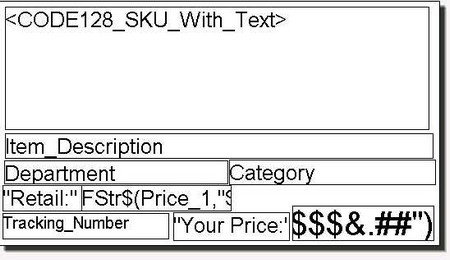
Instead, you should generally make just ONE label. You use FIELDS like “DESCRIPTION” and “SKU” in the layout. Then you assign the label layout to the inventory item. When you print a label POSitive will substitute the FIELD NAME with the corresponding data in the inventory item’s definition.
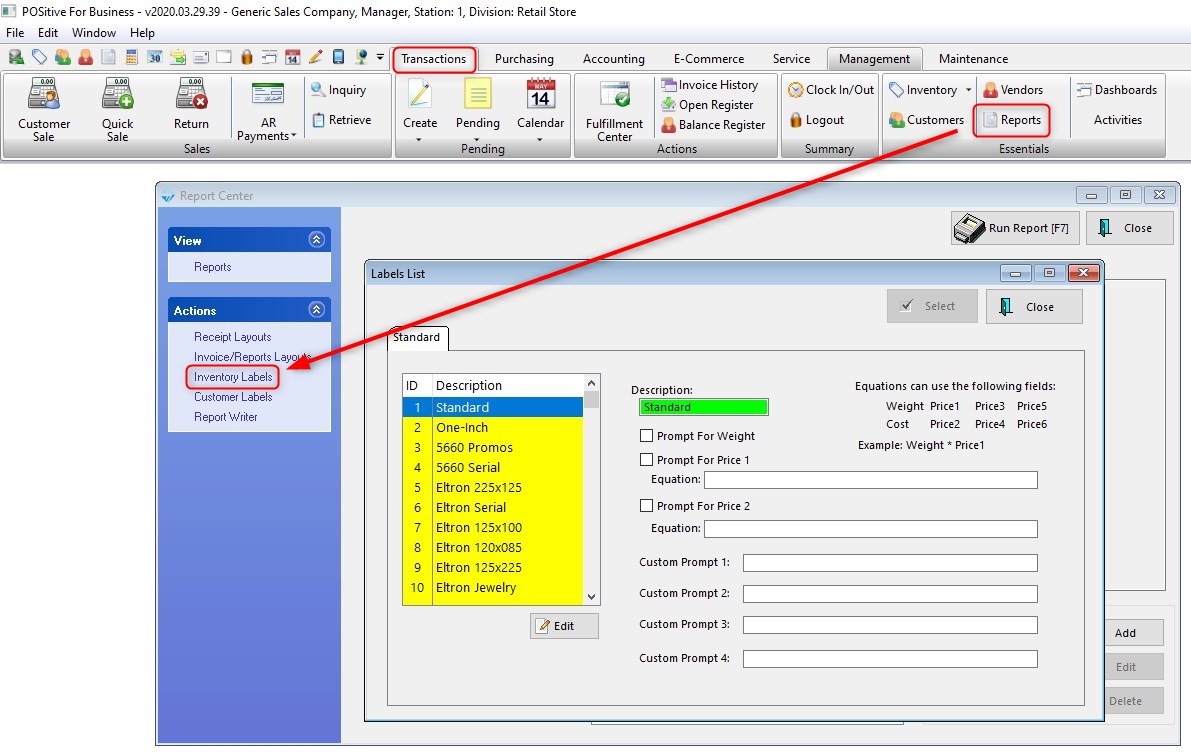
You can access the label editor by clicking on Transactions, Reports and selecting Inventory Labels. Select a label and click on Edit.
TIP: By default all inventory items will be assigned to label design #1. If you design your label for label #1 then it won’t be necessary later to re-assign your inventory items to your new design.
The label editor is flexible enough to accommodate any label size you would care to use. The only real limit you should be aware of is that the smallest label size you should plan to use is at least 1.75 inches long. Alpha Numeric SKU’s print larger barcodes than numeric SKU’s and a smaller label will “scrunch” the bars too closely together and thus be unreadable if you choose a shorter label.
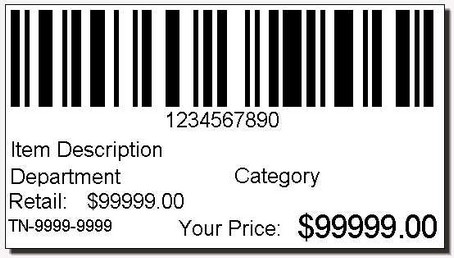
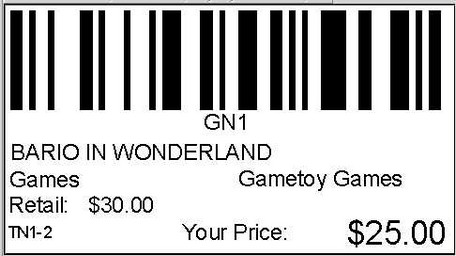
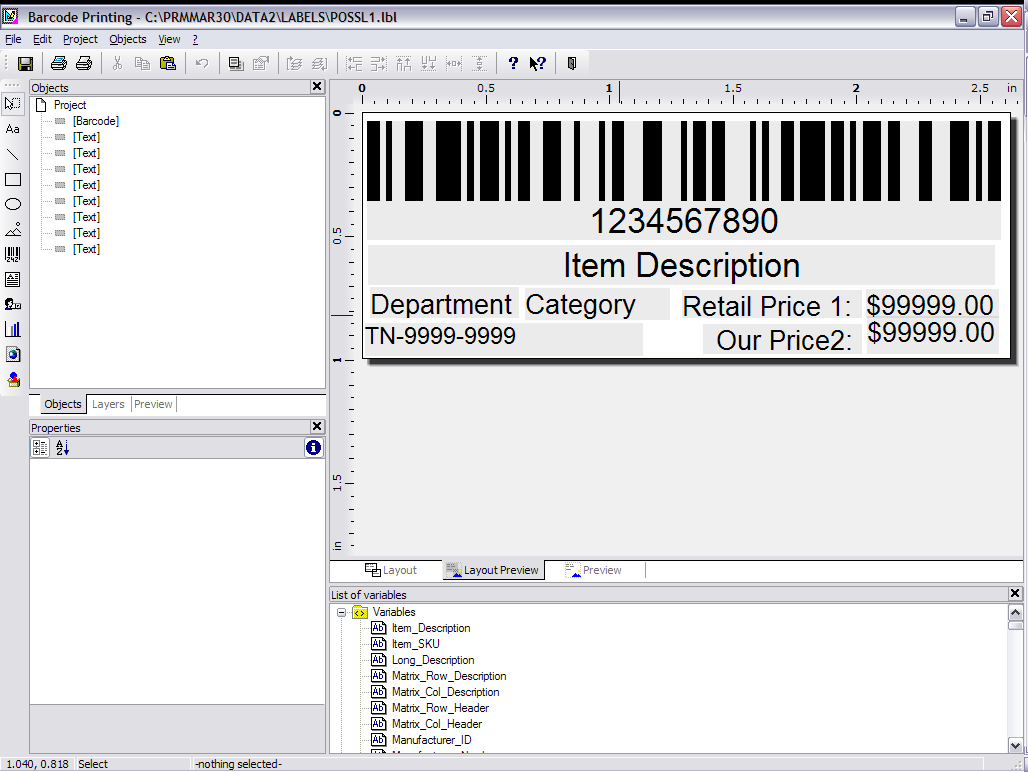
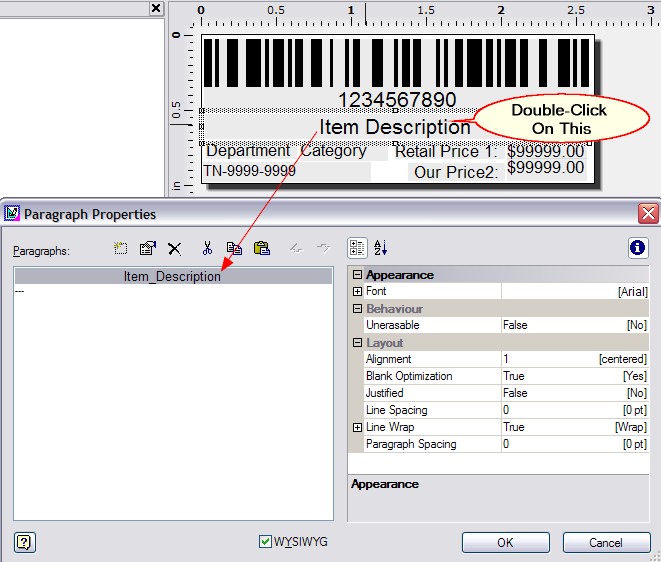
This is the label layout of a typical barcode label. The boxes are DATA FIELDS that will be filled in by the inventory item when the label prints.
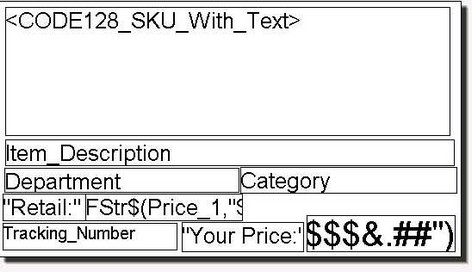
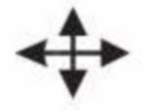
You can re-arrange the fields, you can re-size them, and you can change the font style and size. You can add new fields and remove unwanted fields. Notice the <30f9_SKU…> field is highlighted. The hashed line (1) is the “highlighted field” indicator. You can resize the field by grabbing the black dots (2) at the edges. Top and bottom dots allow you to re-size up and down. Those on the left and right edges allow left to right re-sizing. Finally the corners allow you to enlarge or reduce the size both up and down and left to right. Hover your mouse over the dots and when the cursor changes from an “open arrow pointer” to an icon like these (3), you can resize the field. Hover just over the hashed line and the cursor changes to a four-point arrow (4). When that happens, you can move the field.
1. ![]()
2. ![]()
3. 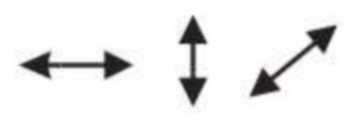
4..
Delete a field by highlighting it and pressing the delete key on your keyboard.
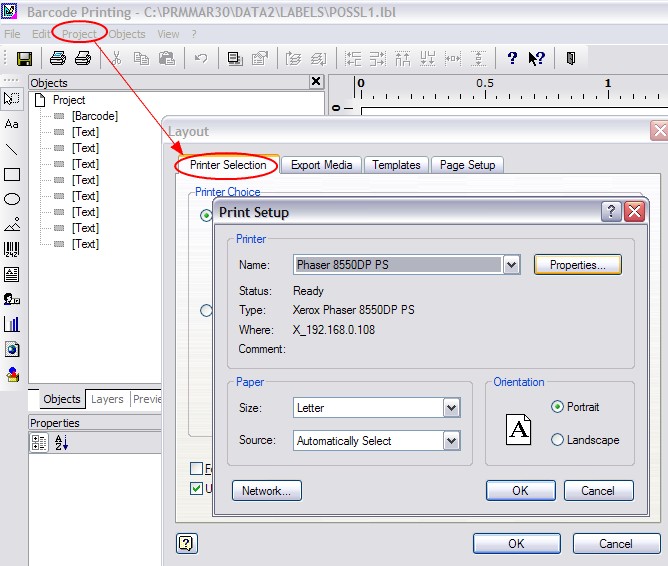
Access the Layout screen by Choosing PROJECT MENU: PAGE LAYOUT. Review the printer setting tab and click the CHOICE button. Be sure the correct printer driver and PAPER SIZE is selected. Barcode Printers like the Eltron printers recommended by POSitive will have a variety of label sizes to select in the paper size setting. Inkjets and laser printers will generally want the 8 ½ x 11 letter size selected.
You need to use a Windows Printer to print barcode labels. You’ll need to install the correct driver for your printer. See your printer’s user guide for details.
POSitive supports laser printers, inkjets and dedicated barcode printers. Basically any of them should work. We are most familiar with the Zebra line of barcode printers.
Inkjets are colorful but it will be expensive to print labels on an inkjet. The most economical are the dedicated Zebras. The label stock costs much less than sheet labels. Since the Zebra printers are thermal printers there are no ink cartridges or toners to buy.
The Page Setup Tab makes it EASY to custom define any label you wish. Grab a ruler and a calculator and let’s break this down to its simple form.
First, it’s critical that you set up the printer as described in the previous section. Do it now if you haven’t already.
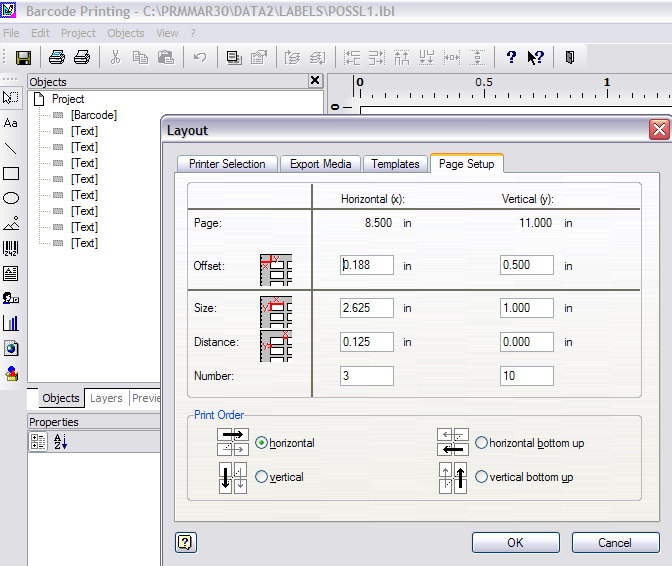
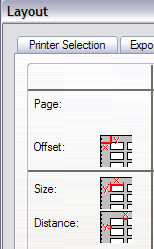
Next, look closely at the icons. They describe the measurements the program is asking for.
The OFFSET fields want to know:
Y: how far it is from top edge of paper to top edge of first label.
X: how far it is from left edge of paper to left edge of first label.
TIP: Take your ruler and measure the distance from the top of the label sheet to the top of the first label. ½ inch (1 divided by 2) would be expressed as .500. 5/8 (5 divided by 8) would be .625. (POSitive will accept 3 decimal points.) The main thing to remember is you are converting the ruler measurement to a decimal number. Generally, if you are converting a fraction you divide the top number by the bottom number.
The SIZE fields want to know:
Y: how tall is the label?
X: how wide is the label?
The DISTANCE fields want to know the distance between labels.
Finally the NUMBER fields want to know how many labels across the page by how many labels down the page.
Once you have these settings entered click the OK button to save and close the window.
If you are creating labels on an inkjet or laser printer the most common labels are 3 across by 10 down - 30 labels to a sheet of labels. So in this case the NUMBER fields would be X=3, Y=10
If you are setting up labels on an Zebra Label printer use these settings:
X |
Y |
|
Offset |
0 |
0 |
Size |
(Measure Width) |
(Measure Height) |
Distance |
0 |
0 |
Number |
1 |
1 |
Here’s a fraction to decimal conversion chart for your convenience
Fraction |
Decimal |
Fraction |
Decimal |
Fraction |
Decimal |
1/4 |
0.25 |
1/8 |
0.125 |
1/16 |
.063 |
3/4 |
0.75 |
3/8 |
0.375 |
3/16 |
.188 |
5/8 |
0.625 |
5/16 |
.313 |
||
7/8 |
0.875 |
7/16 |
.438 |
||
9/16 |
.563 |
||||
11/16 |
.688 |
||||
13/16 |
.813 |
||||
15/16 |
.938 |
In brief review you should now understand how to move fields around in the label layout, how to define your Page Setup including printer setting, paper size, and label page setup. If not, review the previous sections.
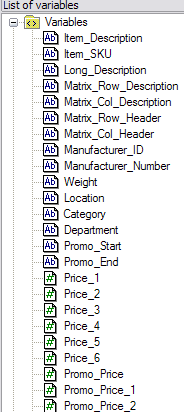
In the Label Editor you can add fields to a layout in a couple of ways. The main way to add a database field from POSitive is to go to the VIEW MENU: WINDOWS: POPUP VARIABLES: Click on the VARIABLES folder.
Here you have all the data fields available to put into a label. To add a field into the layout just DRAG and DROP it into the layout. Then resize it and move it where you want it.
You can control the text size, justification, font, and more. To edit the text just double click the field.
The following screen appears giving you incredible formatting control from one screen.
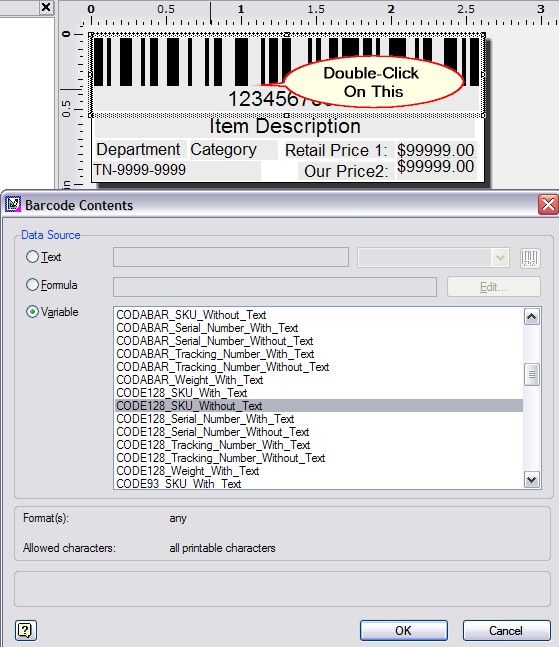
Simply double click on the barcode field to edit the details. Remember that Alpha Numeric SKU’s will require 3OF9 (Code 3 of 9), CODE128, or 2.5DATALOGIC symbologies.
The Tool Bar gives you other options for adding Text, Lines, Squares, Circles, Pictures, and Barcodes. Just click the icon in the Tool Bar and draw a square in the design layout. Double click the field and edit as necessary.
![]()
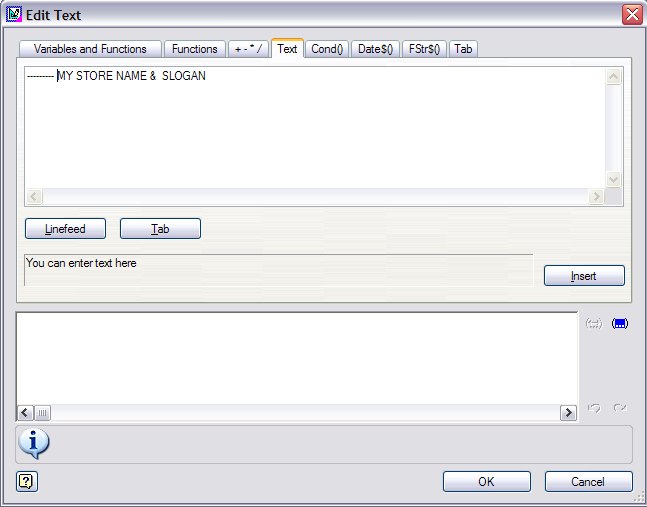
Add some “hard coded” text (That is to say text that is NOT a data field which will be replaced by data from the software) by clicking the Aa icon and drawing a box in the layout. The box will be empty. Now Double click the box. A BLANK text Properties screen appears. Double Click the “---“Add a line icon.
Click the TEXT tab. The next screen shows the process. Edit the text size and move the text field into place.
Ideas for this hard-coded text field include… Store name and City/State, a Slogan, The word “PRICE:” just before a field that fills in the price. “Our Price”, “Your Price”
FILE MENU: PRINT SAMPLE –
“Without frames” for roll label printers (Zebra).
If you are printing on a laser or Inkjet printer choose “with frames” to show a reference frame on plain paper. Hold the test page over a label sheet to see that the data lines up correctly on the labels.
When you exit the label layout program be sure to save your work. Of course you can always go to the file menu and choose SAVE every 5 or 10 minutes.
Now that the label is defined you can assign the label design to any or all of your inventory items.
Assigning one item at a time –

In POSitive, edit an inventory item. Choose the OPTIONS [F7] Tab. The following screen gives you a “Label Form” field. Type it in or choose it from a list.
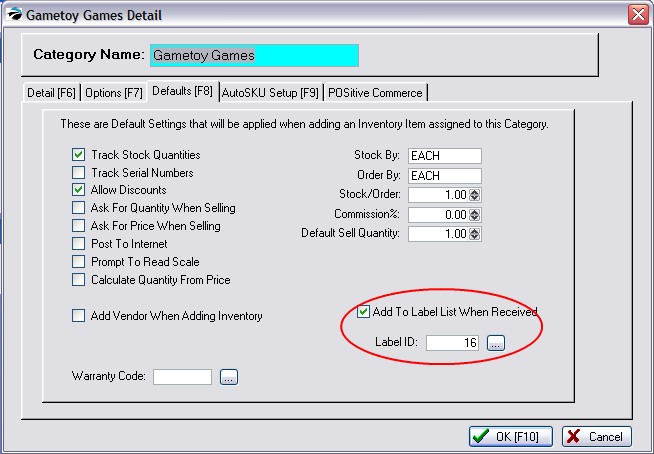
In POSitive, choose Maintenance, Categories, highlight a category and click the Defaults button. Edit the Label ID number and choose whether to add this item to the list of labels to be printed when the item is received on a PO. Finally you can re-assign all products in this category to the new label style by clicking the RESET INVENTORY button in the lower left corner. Repeat for each category to re-assign.