| Show/Hide Hidden Text |
The primary purpose of the "Receive" purchase order screen is to confirm quantities of products being received. Then POSitive will update your inventory stock counts.
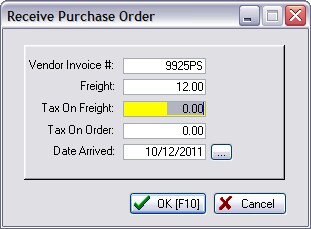
When receiving a PO you will be prompted to enter the Vendor Invoice information. (Note: If you are just reviewing the PO, you may leave the fields blank.)

Vendor Invoice # - If you only have a packing list, enter the number of the packing list and the final invoice number can be entered later.
Freight Invoiced - Charges to be paid the vendor. If the freight charges are not known, they can be added later.
Freight COD - the amount charged by a Third Party shipper or for entering Broker fees. (This will be filled in while editing the purchase order.)
Tax On Freight - (optional international setting)
Tax On Order - (optional international setting) This would be used to record any duty taxes.
Date Arrived - Today's date is automatically entered.
Third Party Shippers
QUESTION
When we receive product with freight we add the freight charges to the PO as Landed and that adjusts our prices. However, it shows the freight as being owed to that same vendor when in fact we pay the freight bill to an entirely separate company. How can we land the freight but have that freight be billed in A/P to a different vendor?
ANSWER
Add the Third Party Shipper in the Vendor Center. Then go to Accounts Payable and add the shipping charges to be paid this vendor. Reference the original purchase order.
Option: In the lower-right corner of the purchase order is a field called Freight COD. Enter the amount charged by the third party shipper if you want these charges calculated into Landed Cost of each inventory item received. (see Handling Freight COD)
Options On the Purchase Order
There are several "Properties" and "Actions" available when editing a Purchase Order which varies slightly when the Purchase Order is in the "To Be Placed" or "To Be Received" mode. (see Tools On The PO)
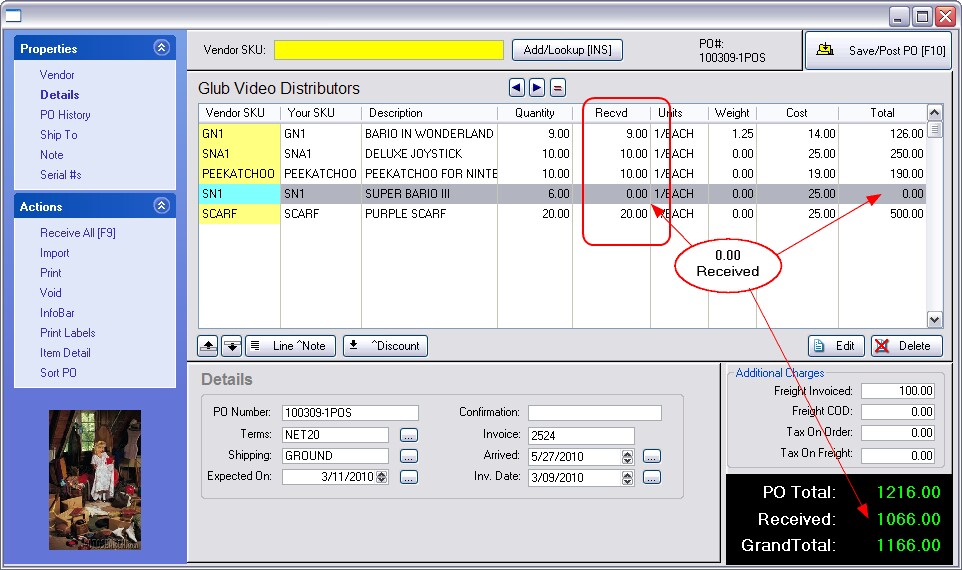
One of these additional fields is called Recv'd.
Recv'd - It is IMPORTANT to enter actual quantities of items received into this column. It is this value which will add stock to your inventory items.
If Recv'd = 0.00
Items with 0.00 Received will have no stock count updates and are flagged as Vendor Backorders. The totals on the purchase order do not include the item. When the purchase order is processed, these 0.00 received items will be retained on the purchase order for later processing.

Enter The Quantity Received
The Objective: To record actual counts of items received. There are several methods used to enter the received quantity. Choose the method which serves your needs best. (see PO Details)
Option 1 - Highlight the item and press Enter (or the Edit button). The Received value will equal the order value.
Option 2 - Choose the "Receive All [F9]" option under Actions at the left. This will set all items on the PO as being received in full. Items not actually received will then need to be manually edited to 0.00.
Option 3 - After selecting "Receive All [F9]," choose to Print Labels for the items before processing the PO. When you apply labels to the products as they are removed from their boxes, you will be able to confirm that all products have been received. If you run short or have extra labels, then some adjustments need to be made to the purchase order.
Option 4 - Choose the Import option at the left. There are several useful tools in the importer. (see Importer - PO).
How To Handle Vendor Backorders
If the vendor does not ship the entire order, POSitive will track what has not yet been received.
1) When prompted, enter the ACTUAL quantity received even if it is less that the quantity ordered.
2) The PO extended total will only calculate the cost the items received.
3) Complete and process the PO in the normal fashion.
4) Inventory items with received quantities greater than 0.00 will be posted to your inventory stock counts.
5) The items which were received for 0.00 or a quantity less than the Ordered value will be retained on the PO for later processing. Go To Receive PO. OR If you know the items will never be shipped, you can choose to delete the item. Any purchase orders which will never be received can be Voided.
Manually Editing The Item (Option 1)
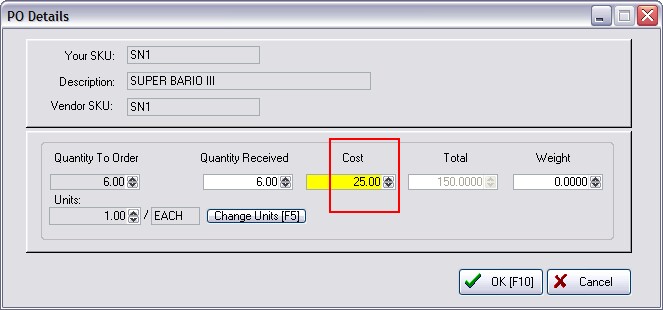
Enter The Cost of Received Items
Normally, the Cost field will be automatically filled in with the "last known cost" of the item. You have several options. (see PO Details)
If the Cost is correct then choose OK [F10].

When using System Setup: Tax Options: International: "Goods Received On PO Have Tax" the purchase order displays a Cost and a Cost With Tax column. By default the tax for the item will be calculated automatically and the combined total will be displayed in the Cost w/Tax field. A running total of taxes is shown in the bottom right. Some inventory may be exempt from PO Tax. Use CTRL-X to toggle tax on or off as needed.
|
If The Cost Has Changed
If the cost from the vendor has changed since the last time it was ordered, you should enter the new cost (or your best guess) on this purchase order. POSitive is a FIFO (First-In First-Out) program and will track the cost changes per individual item as it was received. (see PO Details)
When you process the purchase order, you will be warned of Cost Changes on the Purchase Order Summary screen (see PO Receive Summary)
Or you may even be given alerts as each item is processed so that you can review and change your selling prices as needed. (see Verify Pricing)
| • | Consider your options in System Setup: Purchase Order Defaults. This can warn you when costs have changed and alert you when items received are fulfilling customer orders. |
If The Number of Units Has Changed
If the packaging of the product has changed the number of units being received there are options to "Change Units [F5]" to make adjustments. Be sure to read PO Details before attempting any changes.