|
Purchase Order Center |
  
|
|
Purchase Order Center |
|
The Purchase Order Center lists all purchase orders for all vendors. These purchase orders were created either through the use of the Order List or by choosing "Add New PO" to create purchase orders while on this screen.
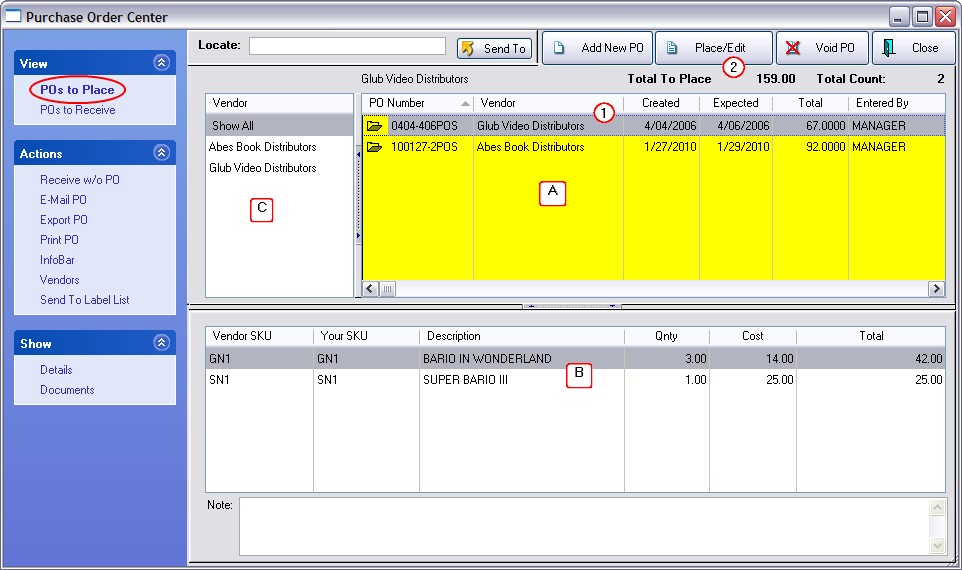
The Basic Layout
(A) Purchase Order Header - shows the name of the vendor, the PO number, dates created and expected, and the estimated total amount.
(B) Shows the specific inventory items on the highlighted purchase order. Use the InfoBar for sales information about these items.
(C) Lists the vendors with purchase orders. Highlighting a specific vendor will show only purchase orders for that vendor in the A section.
Two Types of Purchase Orders
All purchase orders have been grouped based upon the status of the purchase order and by vendor name.
POs To Place - they have been created, but the vendor has not been notified.
POs To Receive - they are nearly complete, just waiting for the shipment from the vendor to arrive.
POs To Place
Purchase orders listed here are those which are still being created; the order has not yet been sent to the vendor. You may edit these POs until you are ready to submit them to your vendors.
(1) Highlight the PO to be edited.
(2) Choose the Place/Edit button.
(Note: Add New PO button will create a new purchase order without generating one from the Order List.)
While editing the Purchase Order you may add new products, contact the vendor, and make adjustments to existing inventory item. (see Place PO Screen)
When you are finished editing and finally ready to submit (place) the PO, it will be removed from this section and transferred to the "POs To Receive" list.
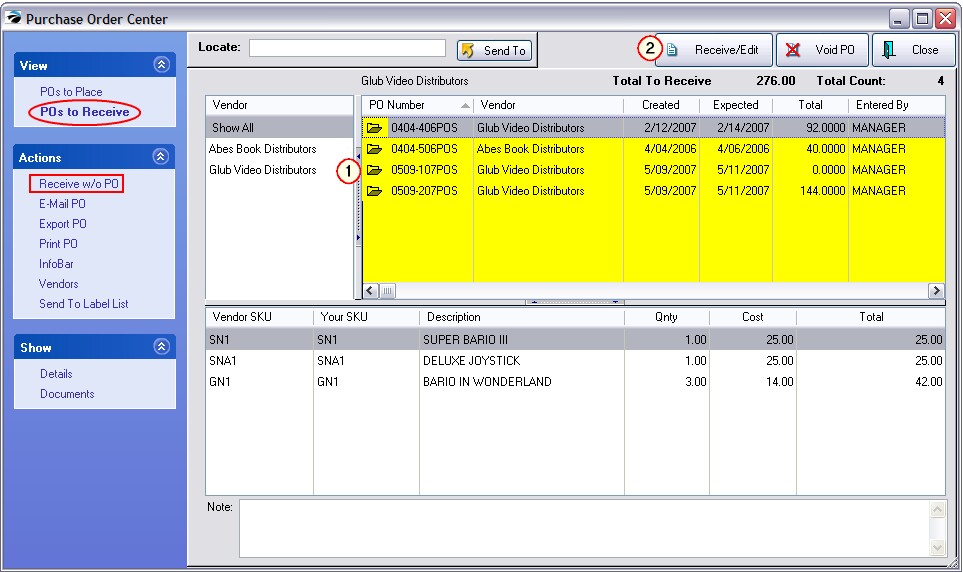
POs To Receive
Purchase orders listed here are waiting for product to arrive. The vendor has already been notified either by e-mail, fax, phone call, or special transmittal.
(1) Highlight the PO to be edited. Use the Vendor Filter if necessary.
(2) Choose the Receive/Edit button. (See Receive/Edit PO)
NOTE: If you have received a shipment and a purchase order does not already exist, choose the Receive w/o PO option on the left. This will create and process the PO all at once.
TOP OPTIONS
Locate - find a specific purchase order based upon the the search information. First, select the column for sorting. Then type the search information and press Enter or Ctrl-Enter.
Send To - exports the inventory line items of the highlighted purchase order to an Excel spreadsheet or some other file type.
Receive/Edit - make changes to the highlighted Purchase Order and receive products to stock.
Void PO - erases the purchase order, items on the order can optionally be sent to the Order List for re-ordering.
Close - closes this screen
Total To Receive - total value of purchase orders for highlighted vendor
Total Count - number of purchase orders for highlighted vendor
Actions
Receive w/o PO - Creates a new PO and allows you to receive product to inventory all at the same time. (see Receive Without PO)
E-Mail PO - This will copy the contents of the highlighted PO into an e-mail message addressed to the vendor. There are various layouts for e-mailed purchase orders which are defined by going to Maintenance: System Setup: E-Mail.
Export PO - create a comma delimited file of the contents of the PO to be sent directly to the vendor
Print PO - Prints a copy of the PO which can then be faxed to the vendor.
InfoBar - Displays sales information about inventory items on the highlighted PO. (see InfoBar)
Vendors - Opens the Vendor List for review or editing of vendor information (see Vendor Center)
Send To Label List - Places all items on the purchase order in the Label printing queue. (see Labels List)
Show
Details - The bottom section lists each inventory item on the purchase order.
Documents - Creates and/or accesses documents linked to this purchase order. (see Document Manager)