|
Inventory Labels (Printing) |
  
|
| Show/Hide Hidden Text |
|
Inventory Labels (Printing) |
|
| Show/Hide Hidden Text |
This is a listing of inventory for which labels need to be printed.
How Items Get To This List
| • | Automatically - When receiving inventory from a purchase order. An option, "Add To Label List," of the inventory item or of the category defaults to which the items is assigned, will automatically add received inventory quantities to this list. |
| • | Manual Selection - Individual items can be manually added or sent to this list from a variety of screens. On this screen, choose the Add button. On the Inventory List of all inventory lookup, the Menu [F12] offers a "To Label List" option. |
| • | The Import Items button on this screen creates a query to select groups of items to be added to this list. For example, you could import all items from a specific vendor or all items belonging to a category.. |
| • | Re-selection from the Processed Labels view of this screen can re-print labels. |
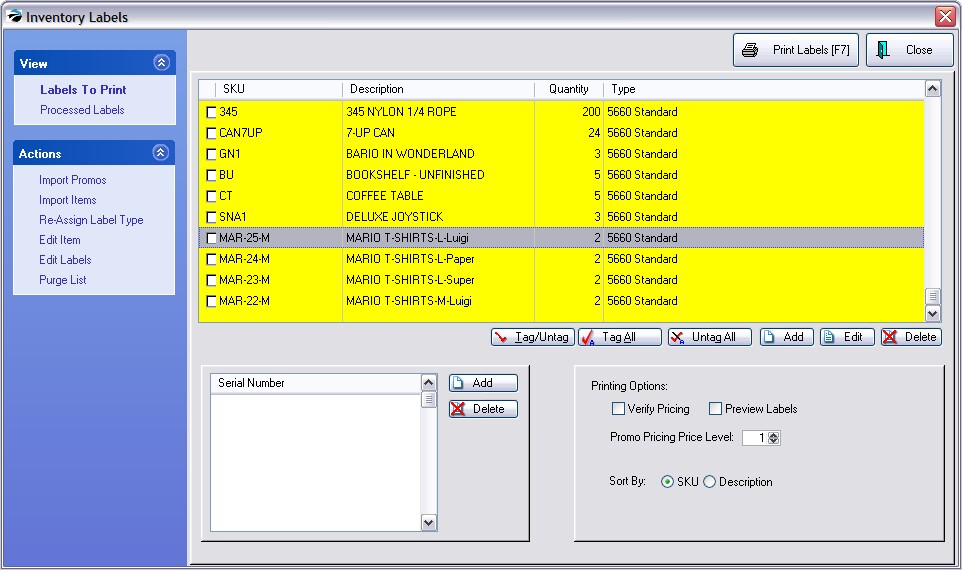
VIEWS
Labels To Print (view) - Labels waiting to be printed either en masse or selectively.
Processed Labels (view) - Labels which have recently been printed. You may choose to reprint specific labels from this list.
Steps For Printing Labels
1) Add items to list as needed. Add items per piece using the ADD button or use the Import Items and/or Import Promo Action buttons.
2) Mark items to be printed at this time by using the Tag/Untag buttons.
3) (Optional) Assign Serial Numbers. (See Serial Numbered Labels.)
4) Select Printing Options in the lower right section as needed for
| • | Verify Pricing - Before printing the labels, you may want to Verify Pricing or review the current prices of each item. You will see the cost, current price and markup. You can edit the cost and/or pricing or accept it as is. |
| • | Preview Labels - Print the labels to the screen. If you want to be sure the labels will be printing the correct information you may first preview them. Then from the preview screen, you can send the list to the printer. |
| • | Promo Pricing Price Level - When choosing to print labels for inventory on special promotional pricing, choose the price level (1-6) to be used. Note: First purge the current list. Then Import Promos and set the promo pricing level. |
| • | Sort By SKU / Description - If you are printing a large number of labels, you may want them to be printed in sequence by SKU or Description so that you can match them to product readily. |
5) Click on Print Labels [F7] in the upper right and follow the prompts.
ACTIONS
Import Promos - If you have set promotional pricing for some inventory, you may import those inventory items and print labels which will reflect the promo prices.
Import Items - Activates a query for selecting inventory to be added to this list. If you have considerable inventory for which you wish to print labels, you may use the Import Items option to select groups of items based upon category, stock counts, SKUs, vendors, or any other listed means of identification. This is especially useful if you are in the initial stages of POSitive usage. Note: POSitive will only import items with a stock count of one or greater.
1) Click on Import Items 2) Choose Create a New Query 3) Select a field to evaluate. Some of the possible options are In Stock Quantity, Department, Item Category. Click Next. 4) Select an operator. For example, if you want all items with a Stock Quantity then choose Is Greater Than. Click Next. 5) Enter a value. For this example, enter a zero (0). Click Next. 6) Choose Finish. 7) You may choose to save the query if you anticipate using it again. |
Re-Assign Label Type - You can change the label form for an inventory item in the list. First, highlight the item, then press Re-Assign Label Type. Choose from the list of available labels. If you are unsure of the format of a label form, choose to Preview the label on screen before printing the labels. See Label Forms. Security
If you are unable to use this feature, make sure that the following security options have been activated: |
Edit Item - Allows you access the inventory edit screen of the highlighted item.
Edit Labels - Opens the Label Editor.
Print Labels - Prints only the tagged labels.
Purge List - Removes all items on the list.
Tag/Untag, Tag All, Untag All - checkmarks entries in the list. This is a filter or confirmation process so that subsequent actions such as Print Labels or Delete will be applied only to those items checkmarked. Note: To Print Labels you MUST tag the items first.
Add - add another item to the list of labels
Edit - edit quantity of labels to print for highlighted item
Delete - inventory items in the list.
TAGGED & EDIT
If you tag multiple labels and choose the Edit button you can change the number of labels or the type of label of each tagged item globally. This is especially useful if you want to print one shelf label for each item. At the same time, you can select the new label type.
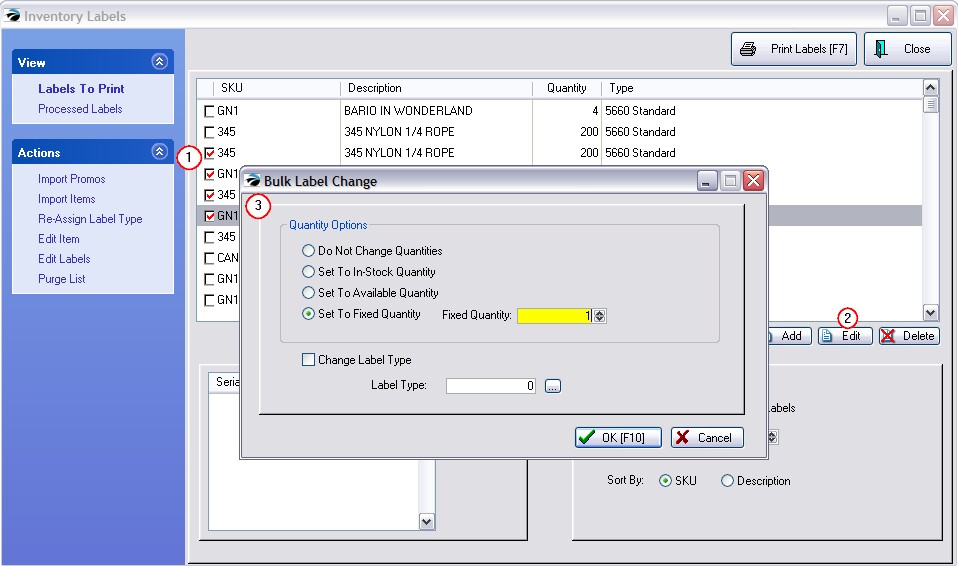
| • | Do Not Change Quantities - used when only changing the Label Type of tagged items |
| • | Set To In-Stock Quantity - used for printing labels for currently in stock items |
| • | Set To Available Quantity - used for printing labels for currently in stock items which are not part of customer orders |
| • | Set To Fixed Quantity - used for printing just a shelf label or a catalog sheet. You can determine how many labels to print. |
Change Label Type - used for temporarily selecting a label type. (TIP: To make permanent label assignments, edit the item, or use Category - Reset Inventory To Defaults.)
Processed Labels
This view displays all labels which have been printed in earlier batches. It is recommended that you open this screen and purge the list frequently. The main function of the list is to quickly recover labels to be re-printed because of a print jam or some other error. Keeping the list streamlined will make this process easier.
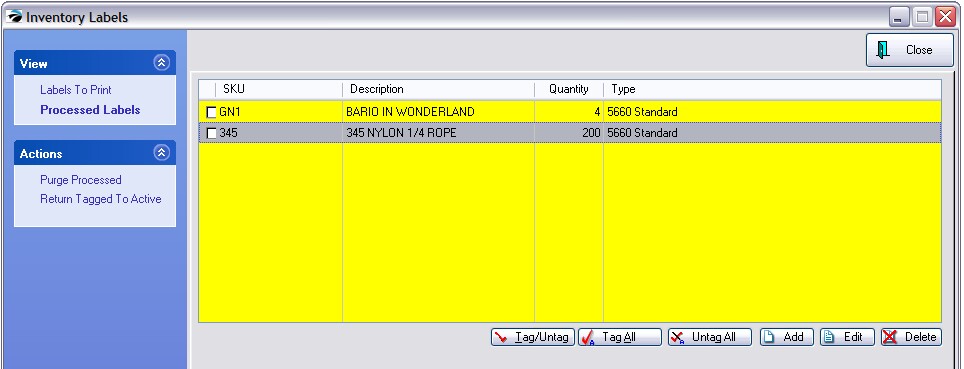
How To Re-Print Inventory Labels
1) Choose the Processed labels view
2) Tag the items to be re-printed.
3) Choose "Return Tagged To Active" The items will be removed from this list and will appear back on the Labels To Print List.
4) Return to the Labels To Print view and follow the steps for printing the labels again.
Purge Processed List [F2] = If these labels do not need to be reprinted, you can remove them all. Choose Tag All, then select Purge Processed List.
Return Tagged To Active [F3] - After labels have been printed, you can choose to re-print some or all by, first marking items, then selecting the Return Tagged To Active button.
Add - Although unusual, you can select new inventory labels to be printed. They will not appear on this list but rather in the Labels To Print screen.