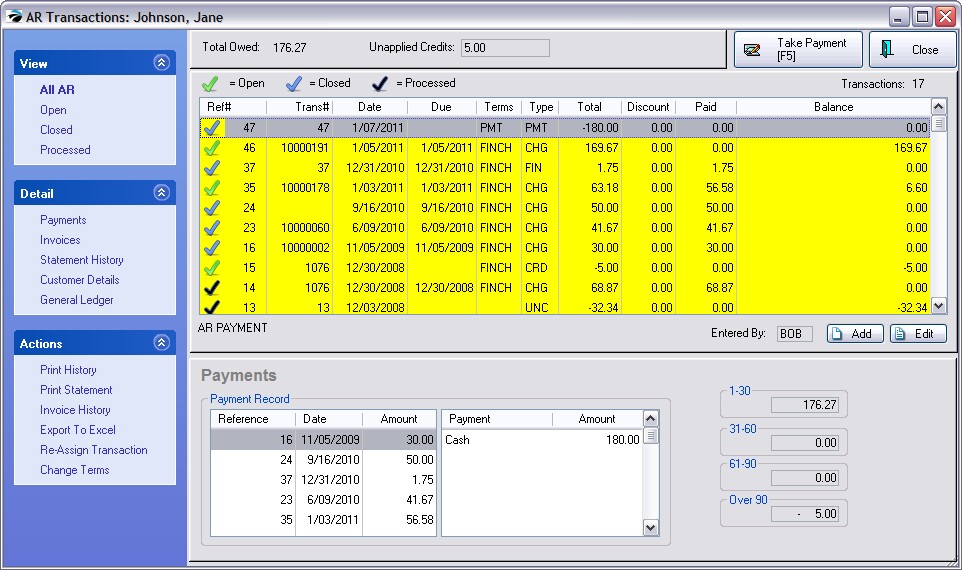
To display the AR transactions for a specific customer. Access to this window is from the Summary: AR Detail button of the customer record.
Total Owed - The sum of outstanding invoices.
Unapplied Credits - The sum of accrued store credits.

Transaction Table
A listing of all transactions relative to Accounts Receivable. The following data is automatically entered based upon the transaction type. You may add transactions manually or edit transactions, if needed.
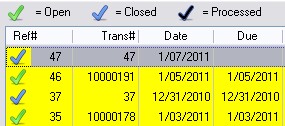
Status - An entry in AR Detail is cycled automatically through open, closed, and processed. An entry on an AR statment will remain for one month after being closed to show the customer that payment has been received for the item.

| • | Open - A balance is still pending. |
| • | Closed - The balance has been paid or offset but the 30 days has not expired. (IMPORTANT: Be sure to choose Close Month Statements when running Accounting: AR Statements.) |
| • | Processed - The balance has been offset and will no longer be included on the AR statement. Processed transactions are never printed on AR Statements. |
Ref # - A number generated to uniquely identify this transaction record.
Transaction - Generally the invoice number, to which this transaction is related, but it could also be a number generated by POSitive to uniquely identify some payments and other types of transactions.
Date - Creation date of the transaction.
Due - Calculated Date as set by the Terms of payment.
Terms - Customer terms applicable to the transaction. When the invoice was created this is the payment term selected for that particular invoice.
Type - Every transaction is classified as one of the following.
| • | CHG - Charge - invoice |
| • | REF - Refund - Usually related to payouts for consignment items. Will display the check number. |
| • | ADJ - Adjustment |
| • | CRD - Credit |
| • | PMT - Payment |
| • | FIN - Finance Charge |
Total - The amount of the transaction.
Discount - A dollar amount applied as a discount when taking a payment towards AR.
Paid - An amount applied towards an open charge payment. There may not be an obvious correlation between the amount paid and the amount reported as being paid. Remember that POSitive is setup to pay off oldest invoices first and will then distribute payments accordingly.
Balance - The amount still due on the transaction.
INFORMATION BELOW THE LISTING OF TRANSACTIONS
(Detailed description) - text will appear in the border below the Ref# column describing the source of the highlighted record.
Entered By - Sales ID of the staff member creating the transaction.
Add - You may add a transaction manually. This is usually only done if you need to make an offsetting entry. You are limited to entering a date within the current AR Statement Period. In other words, you cannot enter a date which is prior to the current month. (see AR Detail)
Edit - Generally, editing a transaction is not possible. It is only available if attempting to correct a manually entered transaction before closing the AR Transactions screen.
VIEW Note the total number of Transactions in the upper right corner.
| • | All AR - displays all transactions in reverse chronological order |
| • | Open - displays only those transactions which are open. Open transactions will print on the AR Statement. |
| • | Closed - displays only those transactions which are closed. Closed transactions are closed because payment has been made in full. These transactions will also be included on the AR Statement until the next statement period at which time items flagged as closed will automatically be changed to processed. |
| • | Processed - displays only those transactions which have been processed. Processed transactions are never printed on AR Statements. |
DETAIL (the section below the listing of transactions)
Payments - displays cross-reference information of payments for a highlighted AR CHG or PMT type transaction.

Reference - A tracking number called Ref#
Date - date of payment
Amount - amount of payment
Payment - Tender type with check number
Amount - Amount tendered
Aging (in number of days) - As payment becomes overdue, POSitive will report the number of days of delinquency and the totals delinquent in increments of 30 days.
Invoices - when highlighting a CHG or CRD transaction, displays a summary of the source invoice and can Show Costs when the option is activated. Shows inventory line item detail and tendering information of the invoice. Show Costs switch to view profits.

With Show Costs Option

Statement History Tab - Shows a month-by-month summation of AR Statement totals. (see AR Statement History)
| • | Verify - this button will recalculate to confirm that statement history is up to date. (Note: to verify Statement History for all Customers go to Maintenance: Data Utilities: Verify Data: Receivables: and choose "Verify Customer AR History [F9]) |

Customer Details - displays the customer account, name, address and phone

General Ledger - Only if the highlighted transaction above has been Posted in General Ledger will the chart of account entries be visible.

ACTIONS
Print History -- Prints a listing of all transactions. The report is named Customer Accounts Receivable Transactions. You may wish to preview the report before printing and print only selected pages.
Print Statement - - Print an AR statement for the customer to reflect current transactions. You will have a choice of various options depending upon the System: System Setup: Accounts Receivable options you have activated. (see Accounts Receivable)
Invoice History - - Review all invoices for the customer.
Export To Excel - send data to an Excel spreadsheet. (see Export To Excel)
Re-Assign Transaction - transfer an incorrectly applied charge to the correct customer account. You will be prompted to select either a Customer or Finance Company account. Confirm that the information is correct and choose Process. (see Re-Assign AR Transactions)
Change Terms - Change the term of payment
How To Make Adjustments To the Customer AR
From time to time you may find occasion to edit or add transactions to a customer's AR records. POSitive will not allow you to delete a transaction, but you could enter an offsetting transaction or even edit an existing transaction to better reflect what arrangements you have agreed to.
1) Go to the Customer List.
2) Highlight the Customer and choose Edit
3) Go to the Terms tab
4) Click on AR Detail.
5) Choose the ADD button.
Export To Excel
AR History can be exported to a file in spreadsheet format so that you can more closely analyze the data.