Receive Without PO |
  
|
Receive Without PO |
|
Choose "Receive Without PO" whenever you have accepted delivery of inventory without having prepared a POSitive purchase order in advance. This is a common occurrence in many businesses when items are ordered over the phone or pre-arranged from a vendor.
You will still be creating a PO, then receive the items into inventory, and perhaps create new inventory items in the process.
Go to Purchasing: Purchase Orders and select Receive W/O PO. This opens a Receive Without PO screen.
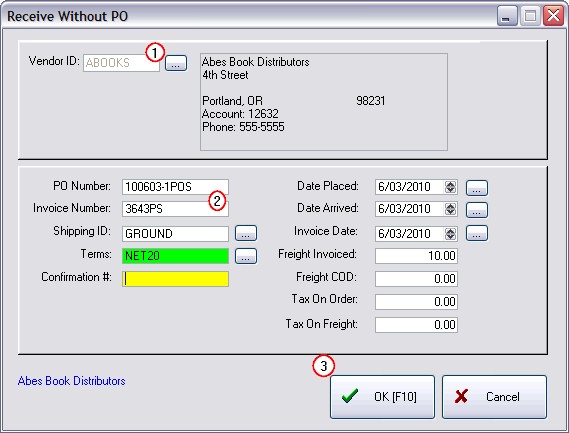
1) Either enter the Vendor ID or choose the lookup button and select the vendor from the list of vendors. If necessary, Add a new vendor. (see Locate Vendor)
2) Fill in the appropriate fields:
•PO number - This number is automatically generated by POSitive. The type of number is defined in System Setup: Purchase Orders. You may overwrite the generated number.
•Invoice Number - The vendor's invoice or packing slip number.
•Shipping ID - (required) Tracks the means and number of days required for shipment. Automatically calculates the expected due date..
•Terms - Tracks method and terms of payment. (see Vendor Terms)
•Confirmation #: - (optional)
•Adjust dates - (optional)
•Freight Invoiced - Enter the Total Freight charge, if any, which was added by the vendor. POSitive can evenly append the shipping charges to the cost of the items being received. (see PO Receive Summary)
•Freight COD - Enter the Total Freight charged by a 3rd party, not by the vendor.
•Purchase Order Taxes - (see System Setup: Tax Options: International Settings)
Tax On Order - Used for duty or brokerage fees or other International charges are required
Tax On Freight -
3) Choose OK. If the essential fields above have been entered, POSitive now opens a blank purchase order. (For detailed information about this screen see Purchase Order Screen.)
4) Add inventory items to the purchase order as described. Note that you will be entering both the Quantity to order as well as the Quantity Received.
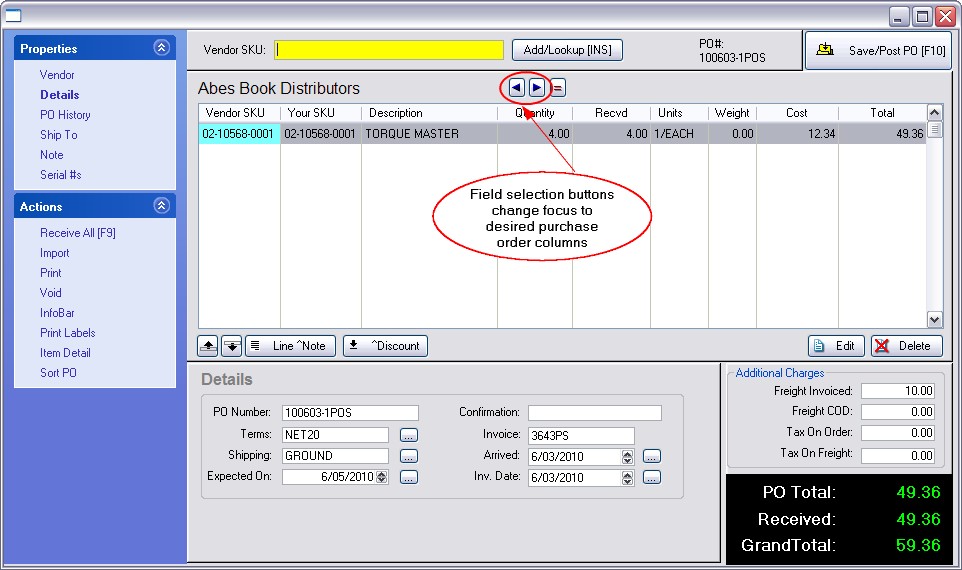
How To Add Inventory To The Purchase Order Screen
First, select the method of product identification by using the "Field Selection Buttons" (two arrows at the top center of the screen). You may choose to focus on the Vendor SKU or Your SKU.
By Vendor SKU
At the top center is an active field named Vendor SKU. Scan or type the vendor's product number or SKU of the item and press Enter.. The next step depends upon one of three situations:
•a) If the item is in the Vendor List - you will be prompted to enter quantities and confirm the cost value.
•b) If the item is not in the Vendor List, but is in the POSitive Inventory List you will be prompted to either Create or Lookup. Choose Lookup and search the inventory list and select it. Confirm the cost. You will then be prompted to enter quantities.
•c) the item doesn't exist in POSitive at all choose Create. Go through the steps of creating a new inventory item.
By Your SKU
After pressing the "Field Selection Buttons" and highlighting the Your SKU column, scan or type the product number or SKU of the item and press Enter.. The next step depends upon one of two situations:
•a) the item is in the POSitive Inventory List - you will be prompted to enter quantities and confirm the cost value.
•b) the item doesn't exist in POSitive at all - choose Add on the Locate Item List, Go through the steps of creating a new inventory item.
For full instructions on handling each of these cases see Purchase Order Screen.
Process the PO
When you have finished entering all items to be received you may process the items now or save them for later.
•Press F10 Save/Post PO.
•Choose Receive Now - All items on the PO which have received stock counts will update your individual inventory items. Items left as unreceived will be retained for future processing.
•OR choose Save For Later if there are still corrections or additions to be made to this PO. It will then be accessible from Receive PO.