| Show/Hide Hidden Text |
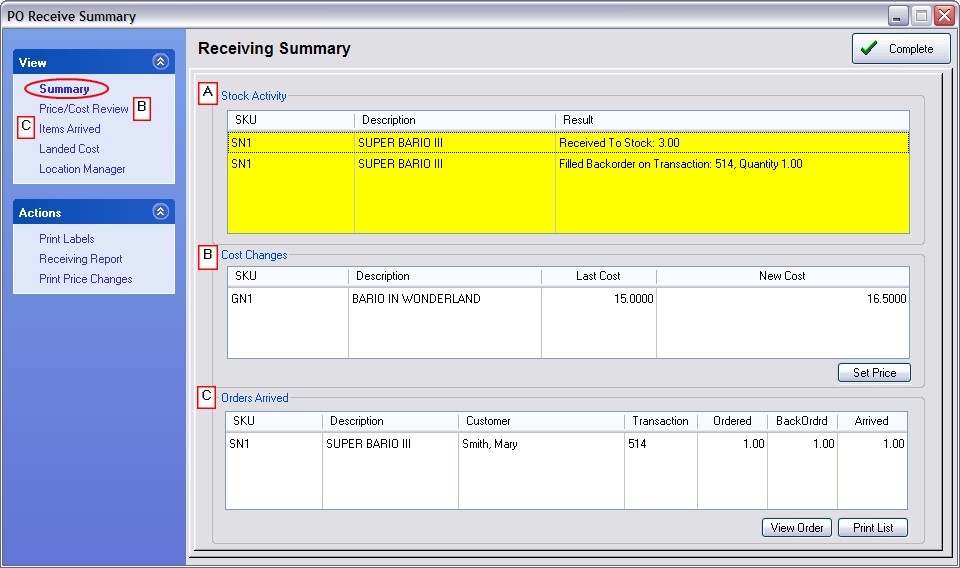
As one of the final steps when receiving a purchase order, the PO Receive Summary will appear with valuable information. This screen should not be skipped.
Summary
A) Stock Activity - confirms that stock was received and how the stock was allocated to fill customer orders and Pre-Sold items.
B) Cost Changes - displays items which have a new cost. The Set Price button allows for editing of selling prices.
C) Orders Arrived - identifies the customers whose orders have been fulfilled by the incoming purchase order. The Print List button will print a report of phone numbers for contacting all customers that their order has arrived. The View PO button provides direct editing of the order.
D) Landed Cost -
E) Location Manager -
F) Site Transfer - (MultiSite Only) -
Print Labels - Print inventory price labels for the items received, especially for those with new price changes.
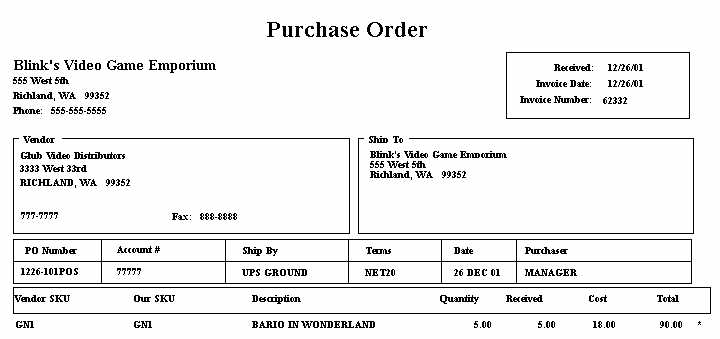
Receiving Report - Prints a copy of the purchase order with Quantity Ordered and Quantity Received information.
Print Price Changes - When a Cost Change entry is edited and new selling prices are created, a full summary report of all Price Changes can be printed.
When receiving a purchase order, you are immediately alerted to the fact that inventory received has a cost change. If there are changes, you should consider re-pricing your inventory and printing new inventory labels with the new prices.
A) By default, only items with cost changes will be visible to make them more apparent. Unchecking the option "Show Cost Changes Only" will display both types, those with and without new costs. The focus is rightfully on items with new costs because they will change the profit margin if sold using the old pricing.
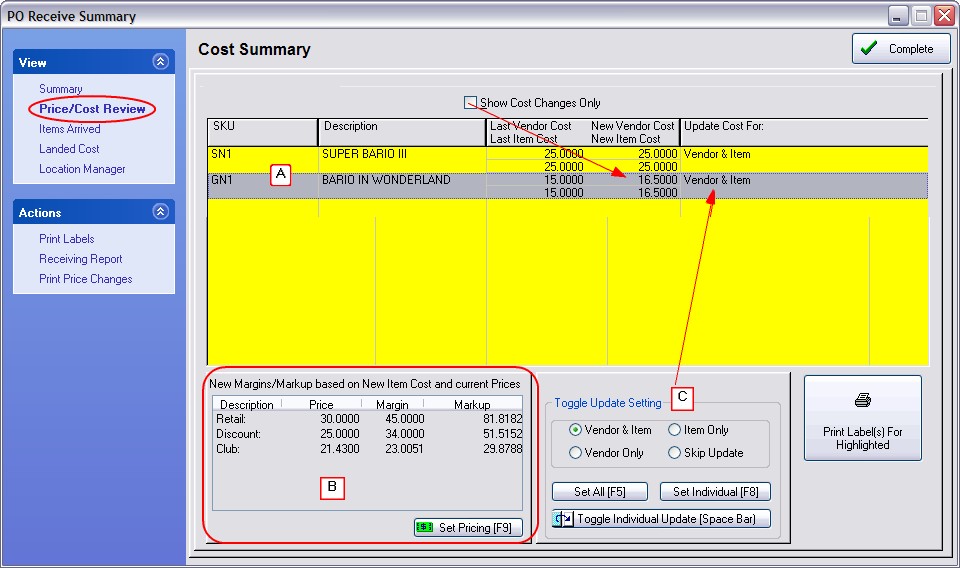
B) When an item cost has changed, you will likely want to change your selling prices so that you maintain your profit margin.
Highlight the item and choose the Set Pricing [F9] button. (see Verify Pricing)
On the right you can see the new cost and a new margin if you leave the current selling prices as they are. You may change the selling prices by •clicking in the price field and typing a new price. Press Enter to continue down the price column. •clicking in the margin field and enter a new percentage. Press Enter to continue down the margin column. •clicking on Re-calc Markups [F3] to apply category default percentages. |
IMPORTANT: If you have changed pricing, you will want to Print Labels and Print Price Changes, a special report showing changes made.
C) Only rarely will you need to make changes to Cost Updates. POSitive normally passes cost changes to both the Vendor Inventory List and to the Inventory Item Last Cost field. This feature allows you to receive trade show and special offer inventory at reduced costs from your vendors without POSitive assuming the special pricing should be used in the future.
•Vendor & Item Costs - (suggested setting) the cost of the product is recorded in Inventory Detail Last Cost and Vendor Inventory
•Vendor Cost Only - only recorded in Vendor Inventory List
•Item Cost Only - only recorded in Inventory Detail: "Last Order Cost" field
•Skip Update - not recorded at all
1) Highlight the inventory item.
2) Highlight the desired update option
3) Choose Set Individual [F8] button
TIP: just press the Space Bar until the inventory item is updated with the desired setting.
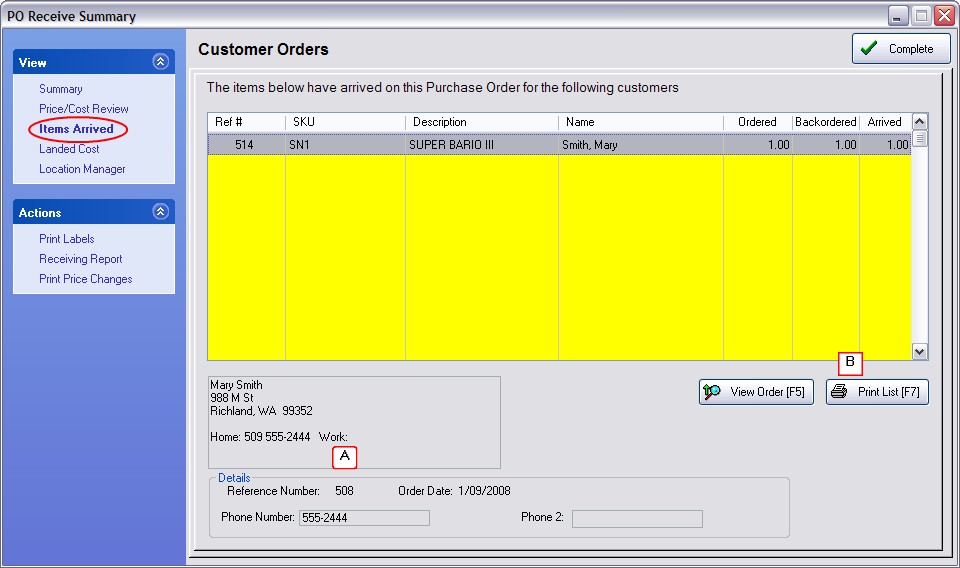
This section lists the items which have been received which were specifically for filling of customer orders.
A) When an item is highlighted you can see the order number, date the order was placed and phone numbers so that you may contact the customer and inform him or her that the product has arrived.
TIP: Before phoning, you should view the order to make sure that everything on the order is now in stock so that the customer does not have to make an extra trip to your store.
B) You may choose to view the customer order [View Order F5] or [Print List F7].

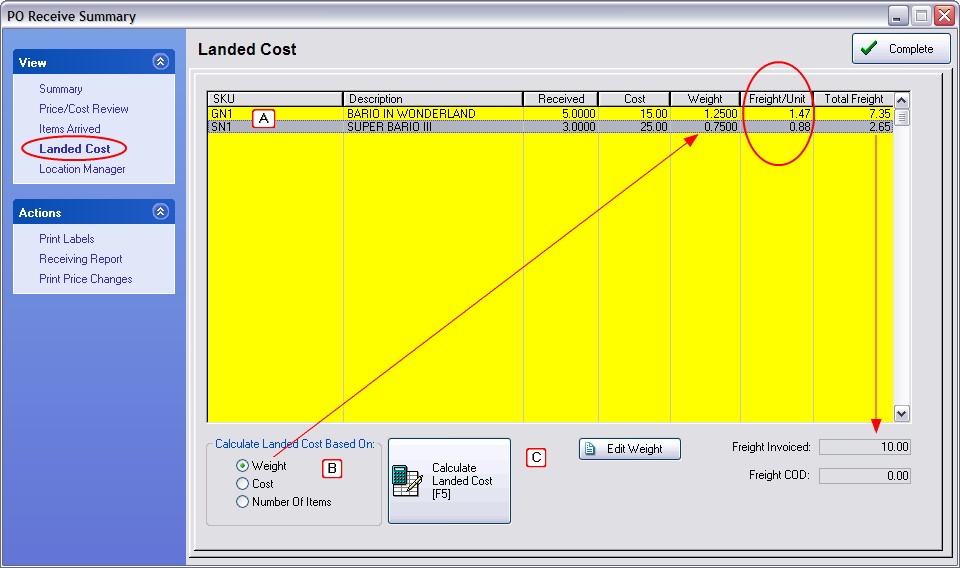
Freight charges on a purchase order can be distributed proportionately on each inventory item to create a more accurate cost, called a landed cost of the item.
A) The items received on the purchase order
B) The method for calculating landed cost as per the System Setup. However, you can manually select and apply any of the methods for this purchase order.
C) Tools for recalculating freight
Freight Invoiced - the freight charges assessed by the vendor and recorded on the PO before receiving inventory. You cannot edit this value at this stage, but it can be edited once the purchase order is completed.
Freight COD - this is for additional freight charges which will not be paid to the vendor, they are the broker fees or third party charges for shipping.
Calculate Freight [F5] - after selecting a method at left, this button will calculate and apply the charges to each item.
Edit Weight - if you have not pre-defined the weight of an item, you can enter the weight at this point. This can also be a relative number, not an actual weight, so that items with a larger number will carry more freight charges than those with a smaller or even no number. If Weight is 0.00
Note: When calculating Landed Cost by Weight and if the weight is 0.00 for all items. The last item in the list will carry the full Freight Charges.
|
Inventory items using the Stock Locations feature of POSitive, will be listed here. (see Inventory Center: Stock Manager: Stock Location)
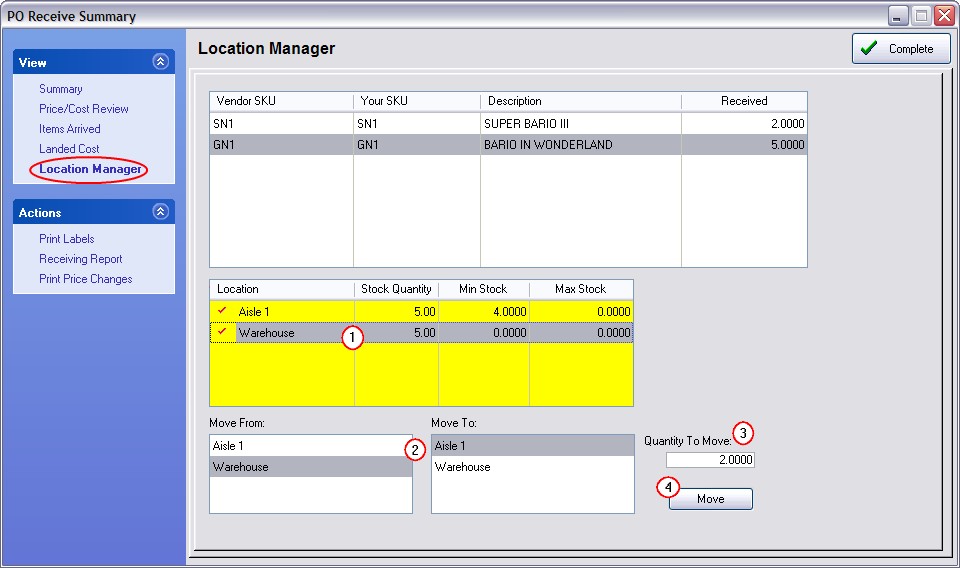
You may manage stock counts in those locations by moving newly received inventory from the Default location to other locations.
1) Highlight the Default receiving location
2) Select the "Move From" and "Move To" locations
3) Enter a Quantity to Move
4) Choose the "Move" button to complete the process.
ACTIONS
Print Labels
An option to print inventory labels immediately for these received items. Prints labels for all items received, not just those with price changes or which were received for a specific customer order. If there was a price change, the new prices will be printed on the labels. (See Inventory Labels)
Prints a copied of the purchase order to show quantities ordered and received
Prints a list of items which have had a change to the retail pricing
