Verify Pricing |
  
|
| Show/Hide Hidden Text |
Verify Pricing |
|
| Show/Hide Hidden Text |
This Verify Pricing screen can be opened manually or can open automatically when receiving inventory which has had a price change. The intent is to inform you of current costs and pricing and then alert you of adjustments which might need to be made. Most commonly, you will see this screen when receiving inventory on a purchase order. However, you may choose to verify prices at other times.
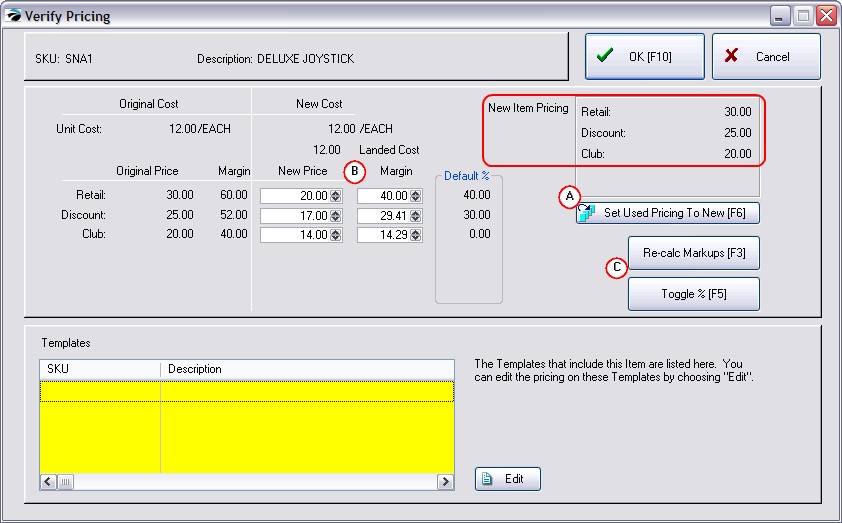
(Also see Used Items Pricing) (Sample)
If you are taking "Used Item Trade-Ins" the Verify Pricing screen shows what a new item would sell for and provides various methods for setting pricing.
|
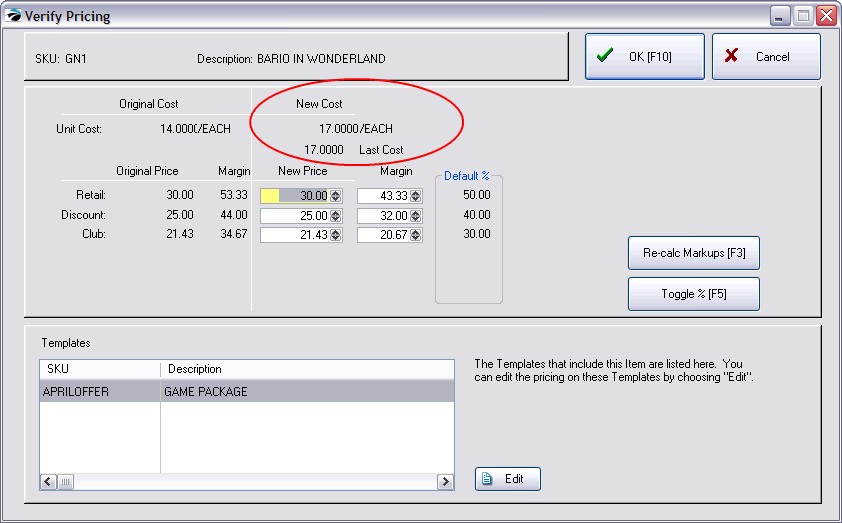
In the above example, the cost of the item increased from 14.00 to 20.00.
On the left you can see the original cost, original selling prices, and margins.
On the right you can see the new cost and a new margin if you leave the current selling prices as they are.
You may change the selling prices by
•clicking in the price field and typing a new price. Press Enter to continue down the price column.
•clicking in the margin field and enter a new percentage. Press Enter to continue down the margin column.
•clicking on Re-calc Markups [F3] to apply category default percentages.
•IMPORTANT: Although you can change the New Cost manually to make it easier to recalculate new prices, you should not exit this screen until the new cost value is back to its original number. Permanently entering a different cost on this screen will skew your profit reports, will not change costs of existing inventory, and could cause confusion, because a change here will not affect other relational databases. There are other ways of changing vendor costs and costs for existing stock. (see Change Cost)
Re-calc Markups [F3] - Allows you to automatically re-set selling prices based upon the margin or markup. It will use the "Default %" listed at the far right to make the automatic changes. These percentages are coming from the category definition to which the item is assigned. (see Categories)
Toggle % - Switches between Margin and Markup pricing methods. Once you have the desired markup method, then choose Re-calc Markups.
OK [F10] - retains the changes and closes the screen.
Cancel - will exit the screen without applying any changes.
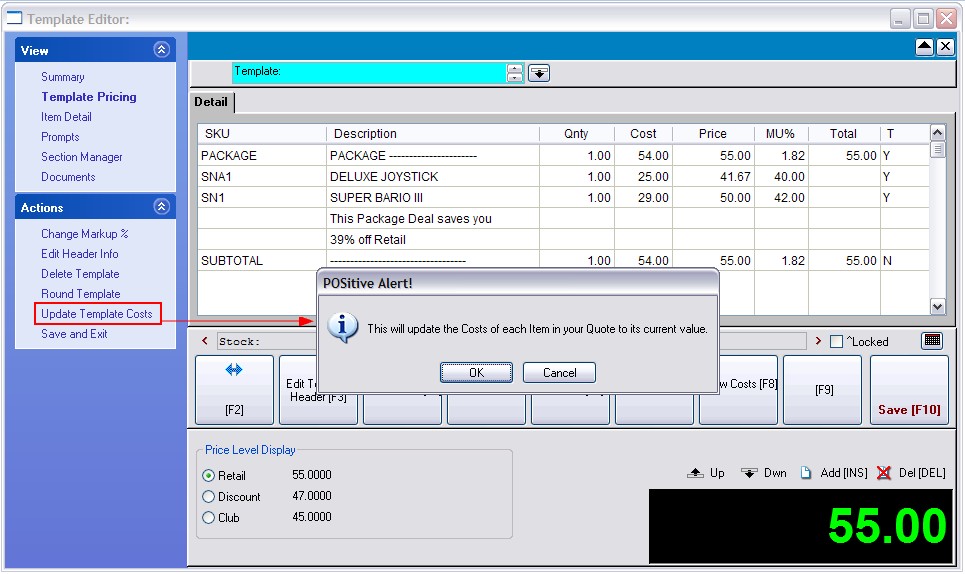
Edit - only appears if the item is part of a template. This button will open the template editor listed at left.
If the item is part of a template, you should open the template by choosing Edit, and make changes to cost and selling prices as needed.
Choose the "Update Template Costs" option under Actions. Answer OK and the cost will be applied. You will need to manually adjust the price.
You may be prompted to verify pricing when new inventory is received from a vendor at a cost higher or lower than previous costs. POSitive allows you to review and modify your current pricing of each item as it is being received.
SETUP: There is a switch to activate this. Go to Maintenance: System Setup: Purchase Orders: and under the Receive POs section choose "Prompt Immediately To Confirm Price When Receiving If Cost Has Changed."
(Note: If "Landed Cost" option on Maintenance: System Setup: Inventory: Pricing tab has been activated, then this option to be notified for price verification will not be valid and you will not be prompted.)
You may choose to verify pricing as you apply global price changes to a category or all of your inventory items. Before committing your changes, you can edit the highlighted item and overwrite the calculated pricing changes. (see Global Price Changes or go to Inventory: Maintenance: Global Changes)
By selecting the Verify Pricing option, as you prepare to print the labels, you will be able to make necessary changes.
For each inventory item being processed, you will see the original and the new costs and prices. You may change the cost and price fields as needed.
When you receive a purchase order, all inventory item prices can be reset by choosing the Set Pricing [F9} button in the bottom of the Price/Cost Review view. Uncheck the "Show Cost Changes Only" option at the top to show all inventory.
While viewing the matrix grid of a matrix group, highlight a matrix inventory item (child), and choose Edit Price under Actions. This will open the price verifier.
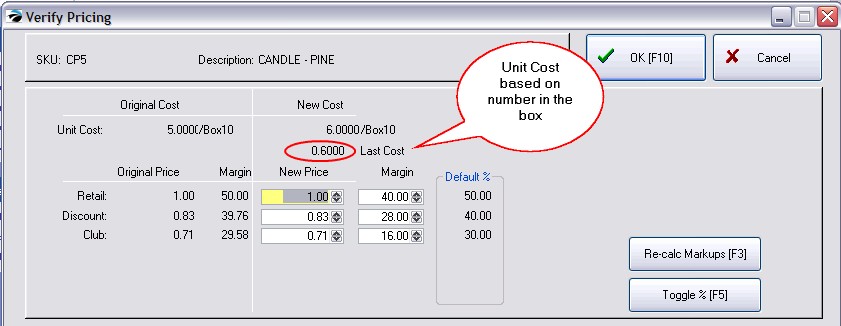
Items which you purchase in bulk, by the box or case, will display the old and new case cost and selling unit cost. The new unit cost is the calculation of the case cost divided by the number of units in the case.
STEPS
1) go to Purchasing: Print Labels Printing
2) tag one item in the labels list
3) activate "Verify Pricing" and "Preview Labels"
4) choose Print Labels [F7] at the top
5) immediately, the Verify Pricing screen is opened. You can enter a new cost and Re-calc Markup or manually change the Selling Prices
6) Choose OK [F10]
7) You are returned to the Inventory Labels screen and asked "Ready To Process: {label name}
8) Answer YES
9) On printer options screen choose START. (You may not be seeing this exactly, depending on your label printer selected in the label itself.)
10) The preview of or printing of labels will reflect the new prices.
NOTE:
Changing the Cost and/or Pricing while printing labels will update the inventory record so that the same Last Cost and each selling price will be identical to what you had entered while using Verify Pricing.
Choose Inventory Center:Stock Manager and you will see the ACTUAL cost of the items in stock are NOT changed because they are tied to the real purchase order from the vendor.