|
Transfer Manager |
  
|
|
Transfer Manager |
|
Multi-Site provides extensive inventory management. In addition to seeing stock counts at each site, one can re-allocate items among the sites.
Transferring inventory between sites is most easily handled in Transfer Manager on the Purchasing tab.
PURPOSES
| • | Selecting Products To Be Transferred |
| • | Processing The Transfer |
| • | Receiving Transfers To Your Site |
| • | Viewing Transfer History |
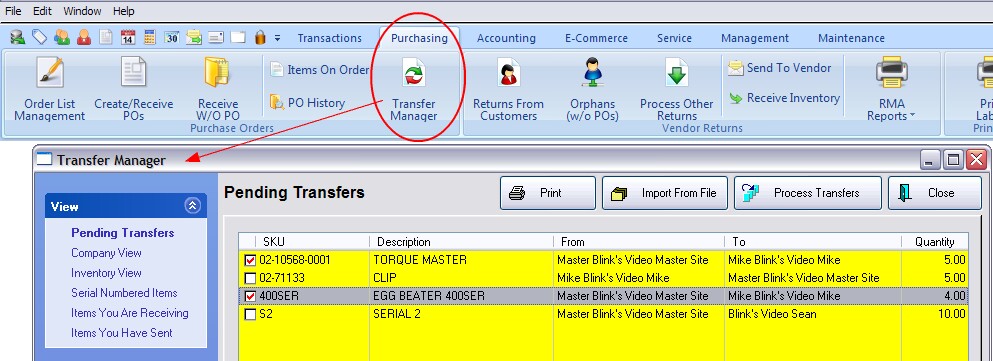
Pending Transfers
Inventory items to be transferred are listed individually.
In addition to the item's SKU and Description and Quantity, the source (From) and destination (To) indicates which sites will have changes to stock counts. (see Pending Transfers)
Note that multiple sites are listed.
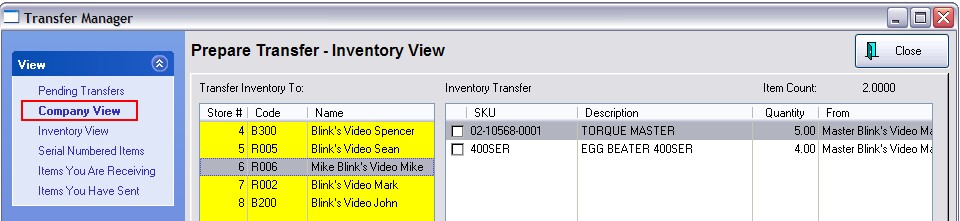
Company View
To focus on items being sent to a specific Site, choose Company View. Select a Site and you will see only those items being transferred to that Site. (see Company View)
Inventory View
The Inventory View is used mainly for adding items to the Pending Transfers List. The focus is on Inventory. Highlight an inventory item and you will see the current stock counts of each Site and you can choose how many items are to be transferred from one site to other site(s). (see Inventory View)
Serial Numbered Items
The Serial Numbered Items View focuses on serialized inventory. You choose the actual serial numbers of items being transferred to a specific site. (see Serial Numbered Items View)
Four Methods For Adding Items to the Transfer List
Selecting of items to be transferred is most easily done from the Inventory View and/or Serial Numbered Items screens as noted above.
A third method is to use the Import button at the top of the screen. This is a batch procedure to select multiple items to be sent to the same Site. You can choose to import a file generated by a data collector or some other method and only needs needs to contain SKUs and Quantities. Or you can use the Direct Scan method to add items to the list.
A fourth method is often used by the Master Site as part of the Purchase Order Receiving process. When a purchase order is received, the PO Receive Summary screen provides an option to allocate received products to different sites. (see PO Receive Summary: Transfers)
This can be done in two ways: 1) select inventory piece by piece as described below, or 2) use a data collector to scan barcodes and quantities into a file to be imported into the Pending Transfers tab.
Processing the transfer of previously selected items can be done one store at a time from the Company View screen and all stores at once from the Pending Transfer screen.
Once inventory items are processed, the receiving stores will choose Receive Purchase Orders. The items processed are removed from your store and a log is kept of the transfer. See Transfer History
Each screen's purposes and usage is described below.
Print [F7] A Transfer Report shows which items are being sent to which stores.
Import From File - If you choose, you can use a data collector to determine which items will be sent to a particular store.
Click on the Import From File button.
Choose Add in the upper left corner to define and select an import file which has been saved to the hard drive or directly cabled to the data collector. Match the SKU record to the corresponding field on the right. (For detailed information about Import Setups see Import Inventory From File.
Choose the Import F2 button to bring the items from the file into the bottom half of this screen.
Edit the list as needed.
When you choose the Perform Import button, you will select the store to receive the items.
The items will be cleared from the Import list and added to the Pending Transfers screen.