|
Print Customer Labels |
  
|
| Show/Hide Hidden Text |
|
Print Customer Labels |
|
| Show/Hide Hidden Text |
A common task is to print address labels for customers because you want to mail out catalogs or notices.
This can actually be done in several ways. Your options are described below.
| • | Customer Print Setup (see below) |
| • | Export Customer List - Uses the Gold Arrow icon on the Customer Center. see Exporting Customer Data and Send To |
| • | Marketing - Go to Management: Marketing. This provides the same functions as Customer Print Setup for both "Customer Labels" and "Export Customers" but also includes an option to "Print Customer List" which is simply a report on paper. |
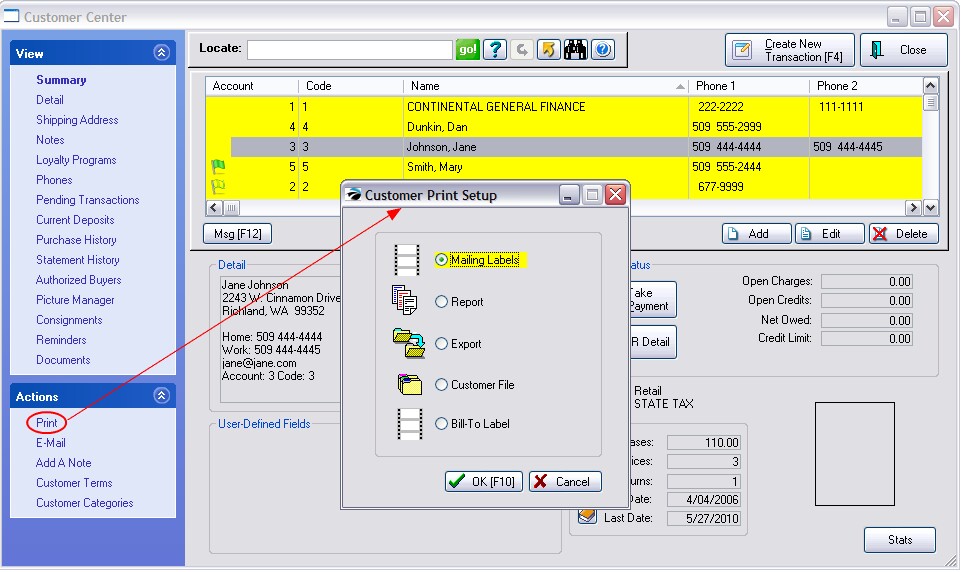
Customer Print Setup
Open the Customer Center and choose the Print option under Actions. You have 3 options relative to label printing.
| • | Select Mailing Labels to print labels for multiple customers - This requires some advanced setup |
It is assumed that you will be printing mailing labels to a laser printer and using a page of labels with 3 labels across and 10 labels down. It is a standard Avery form which can be purchased most anywhere. If this is the case, then your task is easy. If this is not the case and you are using a special label printer then you will need to customize the customer label. Go to Report Center, click on Customer Labels, and open the cuslabel.lbl file listed. (see Customer_Labels_Editor) |
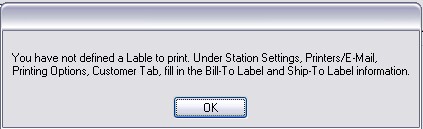
| • | Select Bill-To-Label to print just one label for the highlighted customer Setup Alert |
If you see the following alert, you will need to edit your workstation.
Go to: Maintenance: Station Manager: highlight your Station and choose Edit Select "Printers/Email: Printing Options On the Customer Tab, fill in the Bill-To Label and Ship-To Label fields. Activating Preview is optional. |
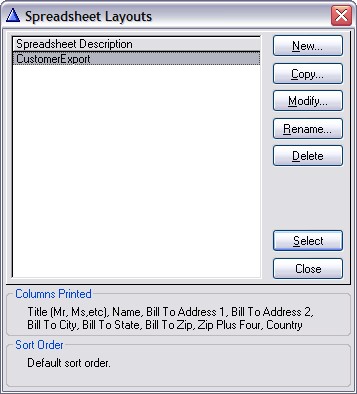
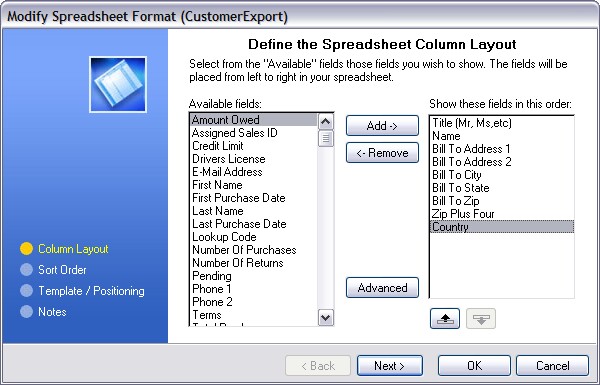
| • | Select Export to create a file. This allows for selection of specific customer fields and then sends the information to a spreadsheet or other file type. This allows you to give your customer mailing list to a third party, such as a printer, or advertiser to do the work of mailing. Typically, you would only export the Name and Address information, but other fields could be included. In addition to selecting Sort Labels, and Query Options, as described below, you will be selecting and saving to a specific spreadsheet file layout, which can be recalled as needed. Spreadsheet Layouts |
Once you have created a spreadsheet export, it can be named, modified, and reused.
|
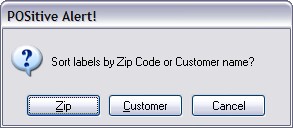
Sort Labels
Choose how you want the labels to be sorted when printed:
| • | Zip - prints all the labels in Zip Code order. This is useful if you are doing bulk mailing by locality |
| • | Customer - prints all labels alphabetically by customer name. This is useful when matching specific mailing materials with specific customers. |
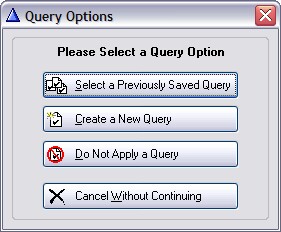
Query Options
If you do not want to print labels for your entire customer list, you will need to define a Query
| • | Select a Previously Saved Query - will list filters you have created previously. Contact POSitive support for more information. |
| • | Create a New Query - allows you to design a filter (see below) and then save it for re-use later. How To Create A Query |
To create a query, 1) choose Create a New Query 2) select a field which most closely filters your target list of customers 3) choose a Query Operation; a rule for matching 4) enter a value to search for 5) choose Finish 6) choose to Save your query for later use. Contact POSitive support for more information. |
| • | Do Not Apply a Query - proceeds without any filter; will print labels for ALL customers. |
| • | Cancel Without Continuing - cancels the process and returns you to the Customer Center. |