Vendor Inventory List |
  
|
Vendor Inventory List |
|
Purpose of the Vendor Inventory List
The purpose is to list only items carried by or available from the selected vendor. Highlight any vendor in the Vendor Center. Choose Vendor Inventory under Actions. These items are assigned to the vendor. When you create purchase orders you select items from this list. When you add inventory while editing a purchase order you are adding the item in two places 1) the general Inventory Center and 2) to the Vendor Inventory List.
An important concept that you should understand is that items in this list are NOT real inventory items. The real inventory item is the definition you created with Your SKU in the Inventory Center. The item in the vendor list is simply a Vendor SKU with a link to Your Item.
You cannot have a vendor inventory item independent of or not linked to an item in your inventory list.
If you choose to erase an entry in the Vendor Inventory List, you are simple removing it from that vendor. It will not be deleted from the Inventory Center.
Again, this list of items is separate from your complete listing of inventory. You will encounter this list whenever you create purchase orders for the vendor.
From this screen, you can:
•Print current inventory counts.
•Take that print-out, go to store room and make notes to actual inventory counts
•The order of items on that printout and the order of items on the screen are the same, so no searching is necessary to update inventory counts
•Vendor Inventory with Details shows current Sell-By (which is the units of entry) and Held, On Order, Committed, etc. for reference to get ready for ordering.
•To Order List link on left is available
•You can make manual adjustments to the stock counts as needed
•You may Add, Edit, and Delete items in this Vendor Inventory List.
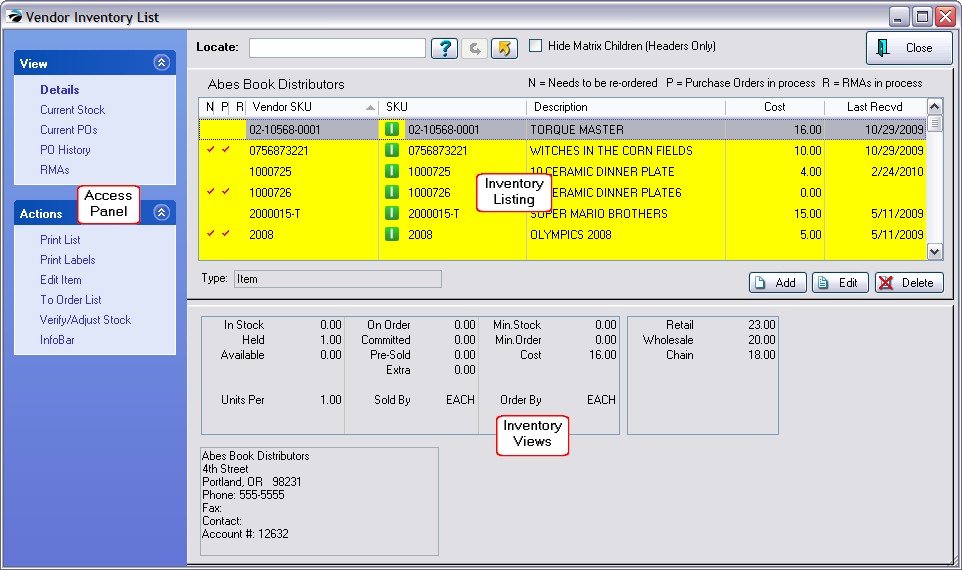
The Vendor Inventory List is divided into 3 main parts:
Inventory Listing |
The list of all of your inventory items can be sorted and searched.. FINDING INVENTORY ITEMS - Various tools such as Locate, Query, Find, and Filter quickly focus on the item(s) meeting certain criteria. (see below) |
Access Panel |
Lists various views, properties, and actions relative to the highlighted inventory item. (see Access Panel) |
Inventory Views |
Displays specific detail or other information about the highlighted inventory item. The contents of this section will change as various views and properties on the Access Panel are selected. |
Various tools such as Locate, Query and Show Matrix Headers Only quickly focus on the item(s) meeting certain criteria.
Locate |
First, select the column to be sorted by clicking on the column. Second, begin typing search characters. (You do not have to click into the Locate field.) Press Enter - will find the first item beginning with the search characters Press CTRL-Enter - will find all items with the search characters somewhere in the field. |
Query |
Select from an unlimited number of saved queries or filters which you can create and modify as needed. Contact POSitive support for more information. |
Reset |
Restores the list to show all records. |
Send To |
Sends displayed listing to HTML, Excel, Word, etc. (see Send) |
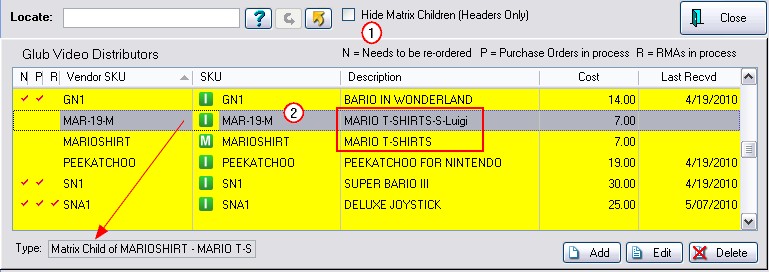
Hide Matrix Children (Headers Only) |
If you have created matrix inventory, you may choose to see just the matrix summary line (matrix header) instead of seeing all individual inventory items in the matrix. |
Vendor Inventory List |
Inventory items are listed with NPR Status (red checks) N = Needs To Be Re-Ordered (see Details) P = Purchase Order In Process (see Current POs) R = RMAs In Process (see RMAs) Vendor SKU Item Type: I = Item, M = Matrix Header Your SKU Description Cost - what the vendor currently sells the item for and could be different than the Last Cost value of the inventory item itself. Last Received - Date the product was purchased from this vendor |
VIEW |
Lists various views, and actions relative to the highlighted customer account. |
Details |
Shows a summary of In Stock, Held, Available; |
Current Stock |
Shows the Arrival Date, Purchase Order and Vendor Invoice numbers linked to the current stock count. Shows number received, number sold, number still in stock and when last sold date. At the bottom left is a tracking number which links the item to a specific purchase order. Click the View PO button to view and make limited changes to the original purchase order. |
Current POs |
Shows both Pending and Placed purchase orders for the highlighted inventory item. Choosing Edit opens the purchase order. (see Current POs) |
PO History |
Displays each time the highlighted inventory item was ordered and received on a PO. |
RMAs |
Displays any items in transit with the vendor. |
ACTIONS |
|
Print List |
Prints a customizable report which you can define, save, and use over and over. |
Print Labels |
Prints a label for the highlighted inventory item. You will be asked if you want to preview the label. (see Print Labels) |
Edit Item |
Opens the item editor so that description and tracking can be changed as needed. |
To Order List |
Sends the highlighted item to the Order List. You are prompted to enter the quantity to be ordered. (see Order List Form) |
Verify/Adjust Stock |
Make manual changes to your current stock count. (see Verify/Adjust) |
InfoBar |
Launches a floating window which displays status of the highlighted item, linked customer orders, purchase history, current open POs, and Sales History. (see InfoBar) |
This will add existing or new items to the list of products available from the vendor.
1) Select or enter Your SKU. (You may search or create a new inventory item.)
2) Enter a vendor SKU (F5 button automatically copies Your SKU to become Vendor SKU)
3) Enter the cost of the item from this vendor..
If you delete an item from this vendor inventory list, you are not deleting the item from the Inventory Center. However, if you delete the item from the main Inventory Center, then it will also be deleted from this Vendor Inventory List.
The matrix header is identified with an M and items belonging to the header (children) are of type "I".
Normally, all you need to deal with is the matrix header (the main matrix item) because all matrix children will be available from the same vendor. You can choose to view only the Matrix Header and hide the matrix children.
For example
1) If you activate the option to Hide Matrix Children, then
2) item MAR-19-M on this screen would be hidden from view.
Multiple Vendors
POSitive allows you to add an unlimited number of vendor SKU links to Your SKU items. That means that for any given inventory item, you can list as many sources for that item as you choose. When it is time to purchase more stock, you can pick from the list of vendors. Your choice will likely be swayed by costs, speed in delivery, or reliability of the vendor.
To add an item. Select the Add button.
1) Type in the Vendor SKU.
2) Type in Your SKU or use the [F2] Lookup option to find it.
3) Then enter the Cost of the item.
If Your SKU does not exist,
Most of the time, when you choose to add an item to the vendor list, it is highly likely that Your SKU does not exist. In this case simply type the SKU you would like to use. If you wish, the SKU can be the same as the Vendor SKU.
1) Press Enter. You will be greeted with a window to the effect that Your SKU does not exist. Choose YES to create a new inventory item. (Choose No if you know the item is already in POSitive and you just need to find it.)
2) Select a category. (You may add one, if necessary.)
3) You will now be at a blank Inventory Detail window. Fill in all the fields and change Options [F7], if necessary.
4) Select OK.
5) The Cost will already be filled in from the Inventory Detail window. Select OK.