Managing Employee Settings |
  
|
| Show/Hide Hidden Text |
Managing Employee Settings |
|
| Show/Hide Hidden Text |
You should add your employees to this list to enhance accountability and initiate program security. When POSitive is first installed, only one employee is included to allow you access to the program for setup and experimentation.
•Locate - Find an employee record or all records with common data. (Click on column to sort/search before using Locate)
•Query - define a filter preset for name, sales ID, or phone
•Reset - restores the list after query has been applied.
Display Status - choose to display: Active Only, Inactive Only, or Active and Inactive (all employees)
ID - Employee's Sales ID (up to 3 characters)
Employee Name - Default column for searching with Locate
Phone - (optional)
Status - either Active or Inactive
Add - This button will launch POSitive's New Employee Wizard to make it easy to fill in all necessary fields.
Edit - Change an employee's information and or security rights.
Save - Retain changes. Cancel - Discard Changes
Delete - Remove a sales person.
TIP: Rather than deleting an employee, just change the password and/or security options. Deleting an employee could exclude sales made by that employee from specialized reports. Generally, if you ask for a report on ALL employees, even transactions of deleted employees will be included.
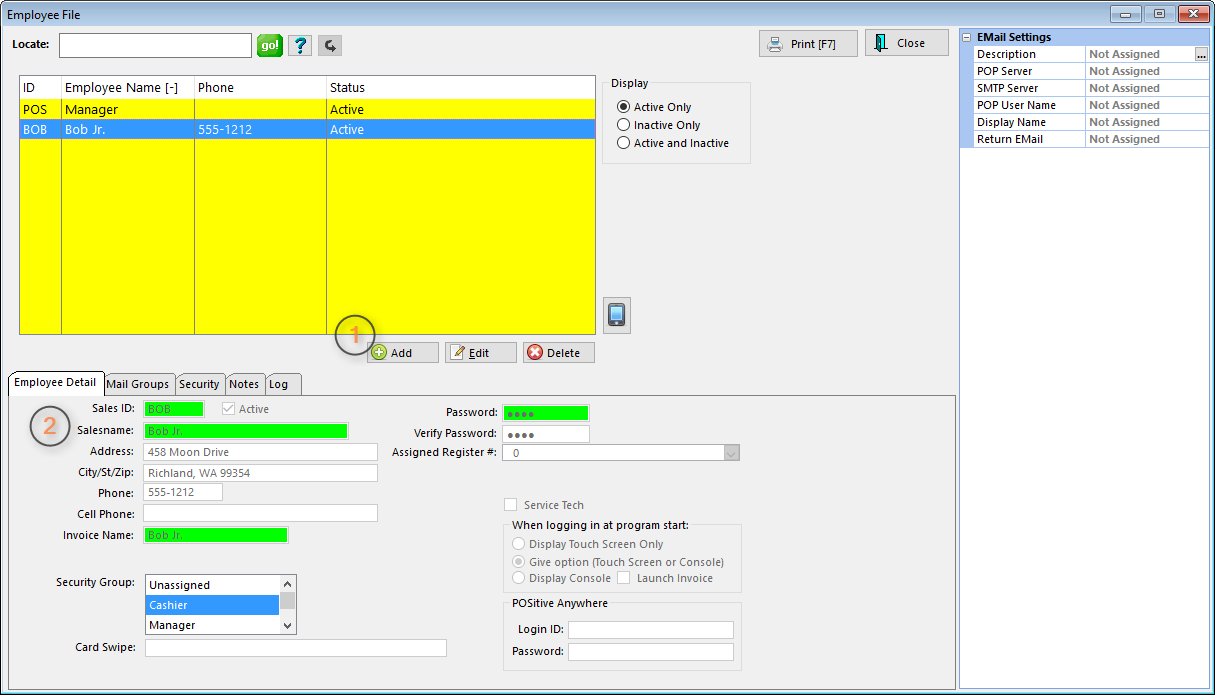
From the Employee File screen,
1) Choose the ADD button just below the Employee Listing
2) Fill in the Employee Detail information fields.
3) Be sure to complete all relevant views listed on the tabs:
•Detail - employee information
•Mail Groups - assignment to receive internal messages
•Security (automatically set by selection of Security Group, unless employee is set to "Unassigned"
•Notes - record specific hiring or other pertinent information about the employee
•E-Mail Settings - gives employee permission to e-mail to customers and vendors
•Activity Log (this will be filled in automatically in the course of operations)
Sales ID - A unique code of up to 3 characters in length. This can be any combination of letters and numbers. It is frequently the initials of an employee. If security is not a major issue, it could be just one character to speed up entry into POSitive.
Active - Currently able to use POSitive. If this is unchecked, then the employee will have no rights to use POSitive.
Salesname - Full name of employee: First and Last Name.
Address - (Optional) This will be used for internal purposes only. It can be a handy reference.
City, State, Zip (include full information)
Phone - (include area code)
Invoice Name - This entry will be printed on the customer invoice. For privacy reasons, you may choose to print only the first name or an employee number on invoices.
Security Group - A preset assignment of security settings. Select one of the presets or make the entry Unassigned. Security Group Settings (see Security Group Settings)
Card Swipe - This allows the employee to log in electronically by scanning a barcode or swiping a magnetic stripe card. The readable code on the employee badge can be anything that uses alpha-numeric characters. If using a mag-stripe card, the log in code should be recorded on track 1 and your mag-stripe reader needs to include a "carriage return" at the end of the swipe. If using a barcode scanner, it should also be programmed to automatically enter a "carriage return" at the end of the scan. To enter the number using the card, place the cursor in the Card Swipe field and scan or swipe the card. Then choose Save. Note: be sure to activate "Use Card Swipe To Login" under Station Settings: Transactions: Invoicing
Password - A code of up to 6 characters using any combination of letters and numbers. This code should remain confidential. If security is a major issue, it can be changed as often as needed. As you type, the code characters will only be displayed as asterisks.
Verify Password - Re-enter the password to verify that the original entry is correct. As you type, the code characters will only be displayed as asterisks.
It is recommended that employee passwords be changed frequently to avoid compromise. Simply overwrite the existing password and Verify Password again.
•Assigned Register # - This should always be set to 0 "Use Default Register". Only in rare instances would you want to use any other number.
If you have a number of cashiers and wish to track transactions "per employee" more closely, you can assign a permanent cash drawer number to that employee. Whenever the employee logs-in, the Station number you assign here becomes active at the computer being operated. IMPORTANT: Make sure that the station number being assigned is valid and in the Station Manager List (Maintenance: Station Manager) before assigning the number to the employee.
Advance Setup: You need to create a station number for each employee. Then assign the station number at this screen for this specific employee.
Benefits: A cashier can end his/her shift without having to count down the cash drawer before leaving the sales lane. The cashier would remove the drawer and carry it to a back office workstation and proceed with the count down and balancing of the drawer.
Potential Drawbacks: This creates more work for network administrators. Since All Station settings will be applied as soon as the cashier logs in, the printers and cash drawer settings need to be identical or accessible in the same way at all stations to be used by the employee.
•Service Tech - (Visible only if Service Option is active) If this employee will be serving as a service technician at times, then this box should be checked. The employee will then be included in the Service Order module and will be listed with in the Service Scheduler. If service work is not part of your business, then this can be left blank.
•Display Touch Screen Only - If this option has been activated, this employee will only be able to run the touchscreen.
•Give Option (Touch Screen or Console) If this option has been activated, this employee will be able to choose between running touchscreen or the standard POSitive based upon station settings and security options.
•Display Console - If this option is activated the sales clerk will never run touchscreen.
•Launch Invoice - If activated, when the employee signs in, the immediate prompt will be to create a new transaction. See station settings for options to make sales more fluid.
POSitive Anywhere is a stand-alone web server that runs at your store location, allowing you to view store sales data, inventory status, customer and vendor information, and internal office e-mails from your store from any web browser, It's easy to install if you know a little bit about routers, port forwarding, and static IP addresses. If you have no idea what any of those things are, don't worry; we can provide installation services for you. Complete documentation is available, and you can have your web server up and running in a matter of 10 minutes or less.
So what does it do? You can view invoices, customer data, sales summary, inventory, vendors, orders, and employees. Run Tender and Sales Tax reports. View sales summary graphs. In short, keep up to date on what's happening at your store as it happens.
Login ID - (not the normal sales ID but a more secure identification name or number)
Password - (not the normal password but a more secure identification string)
Select Mail Groups view at the far left. These are for internal classification of employees by job or location or team assignments. These groups are utilized for internal mailings and reports. An employee can be assigned to more than one group.
All Groups - a listing of common teams of employees such as Sales, Management, Techs, etc. These are defined under Maintenance | Definitions | Mail Groups (see Group Manager)
Groups Belonged To - This employee is automatically included in the ALL group and can be included as a member of any other available Mail Group. If groups have not yet been created, you may designate them now using Group Manager button below the All Groups list. (see Group Manager)
Security - If the employee is already assigned to a security group, the message "Security has been set using a Global Security Setting" followed by the name of the security group.
If the employee is not assigned to a security group, then a listing of security options can be reviewed and edited. Upon closing this window, any changes made will be saved. (see Employee Security Assignments)
To Create New Security Groups - go to Maintenance: Definitions: Security Groups
See List Of Security Options for details.
You can record the hire date, performance reviews, and any other useful information about this employee on the Notes tab at this time. You may keep multiple notes about the employee; they will be printed by choosing the Print option under Actions on the left.
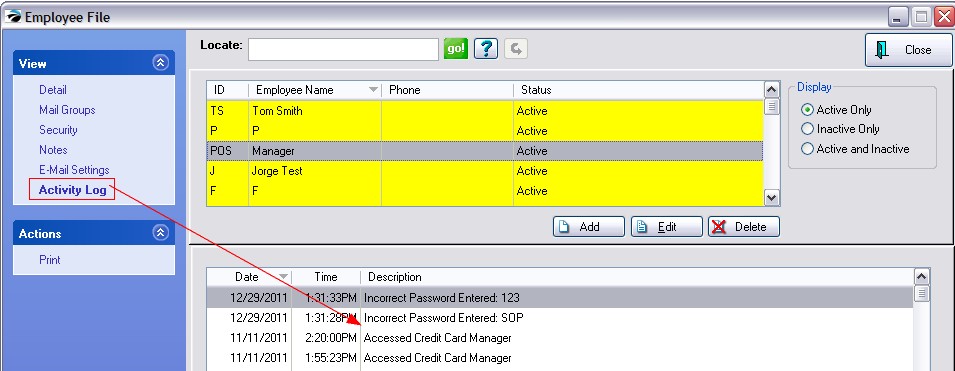
Displays exceptional problems with most recent activity at the top of the list: Incorrect Password Entered, Accessed Credit Card Manager, etc. (sample)
|
Print - Will print two types of reports:
•Print LIST - prints a listing of all individuals in the employee list.
•Print HIGHLIGHTED - prints the name and address of the employee along with any notes recorded on the Notes tab.
Employee E-mail