|
Importing Vendors |
  
|
|
Importing Vendors |
|
Source
An electronic list of your vendors could come from your current database program or from a listing you create yourself. Unless you have a very large number of vendors, you will probably do well to enter them manually into POSitive.
Importing Inventory with Vendor Data: If you have already imported your inventory which designated the vendor, a skeletal vendor list in POSitive was created automatically when doing the inventory import, but it will require additional editing to add addresses and terms, etc.
Advance Preparation
The key to successful importing of data lies in preparing the file to be imported in the following ways.
Consistent
The file containing the data to be imported must be consistent. It doesn't matter to POSitive what order the elements are in as long as every record is consistent in the content.
For example, if you are importing customers, their names must be consistently LAST, FIRST or FIRST LAST. There should also be a consistent format for CITY, STATE, and ZIP. A listing of importable fields below will help you determine what is needed.
File Type
The file containing the data to be imported can be either tab or comma delimited. Some people use Microsoft Excel or some other data-editing program to clean up the import file to make it consistent. Then they save the data as a text file in a comma or tab delimited format.
For example, in Excel choose Save As. Then under Save as type: choose Text (Tab Delimited) and give the file an appropriate name.
Data Fields
Assure that fields maintain proper characteristics. For example, an inventory file should make prices and costs a consistent decimal field with no dollar sign ($) symbols. SKU or barcodes must be formatted as text and not interpreted as numbers. The same is true for zip codes and phone numbers in customer files. It is best to not allow spaces in SKUs because future use of picture files with e-commerce will not support the spacing.
For example, some data editing programs such as Excel can cause complications for some types of data by converting large numbers of SKUs into scientific notation.
The following list should give you an idea of the elements you may want to include in the import file. Items in bold are mandatory. Items followed by an * are recommended.
Field Assignments tab: Importable Fields For Vendors
Account Number
Address 1
Address 2
AutoSKU
City
City, State, Zip
Contact 1*
Contact 1 Phone*
Contact 2
Contact 2 Phone
Country
Credit Limit
Current AutoSKU Number
E-Mail Address*
Fax Number
GL Payable Account
Phone Number
Return Days
State
Terms
Vendor Code
Vendor Name
Web Site Address*
Zip
Defaults View - settings to be applied to each imported vendor
| • | Default Terms - the payment method |
| • | Shipping ID - the method used by vendor to ship products |
| • | Shipping Days - the number of days required from date of shipment until it is received. |
| • | Default GL Payable Account - (optional) |
| • | Vendor SKU = My SKU |
Prepare Vendor List
Each vendor must have a unique Vendor ID. Before importing inventory, consider importing Vendors or creating a vendor list. The vendor ID can then be included in the inventory import file and direct links.
1) Go to Maintenance: Import: Import Vendors..
2) Choose Add.
Fill in the following for the Vendor Importer.
| • | Import Description. A text note to yourself describing the project. |
| • | File To Import - Include the full path and file name of the prepared inventory file. |
| • | File Type - Choose either comma or tab delimited as appropriate. |
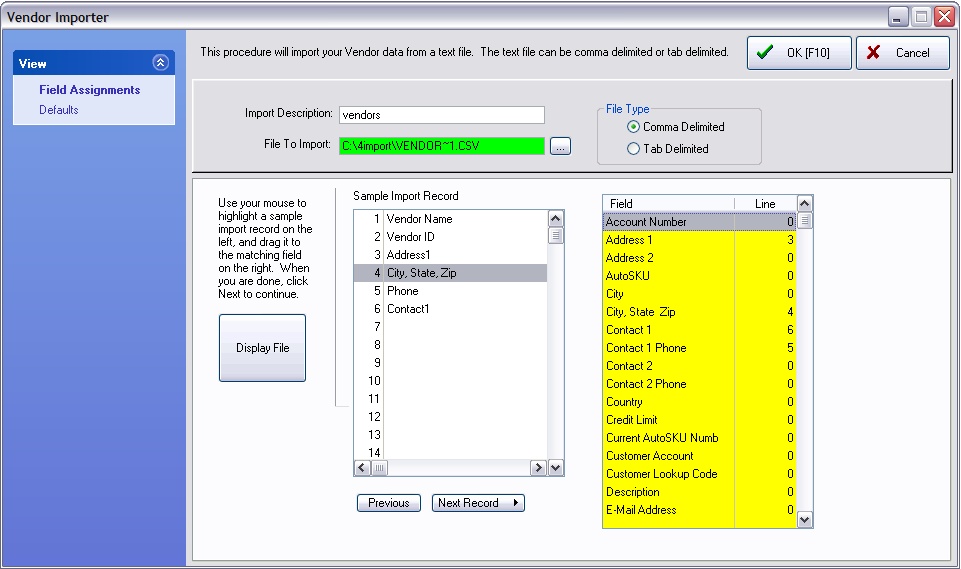
Field Assignments
Click on the Display File [F5] button.
Cross-match.your data with POSitive fields. Your data is displayed on the left-hand side. POSitive link fields are displayed on the right hand side.
Use the mouse to DRAG and DROP from your data to POSitive. Highlight the line in your data, hold down the left mouse button and drag it over to the matching field in POSitive. In the example above, line number 8 of the data is the State in POSitive.
Repeat the process until all necessary items are assigned.
NOTE:
| • | You may use a line number more than once. |
| • | To unassign a line, drag from POSitive to your data and the POSitive line number will revert to 0. |
| • | You may use the Next Record button to scroll forward through the data to assure consistency |
Defaults
Click on the Defaults view
Enter a Default Term. This will be a payment term to the vendor.
Enter a Shipping ID - method of shipping
Enter a Shipping Days - number of days in transit
Enter a Default GL Payable Account (this is optional).
Select Vendor SKU = My SKU if you want to use the vendor's product numbers as your SKUs.
Finished
Choose OK [F10] when you have finished. - This will add the setup definition to a list and can be used or modified in the future.
Import Vendors
VERY IMPORTANT - ALWAYS make a backup of POSitive before performing any imports or any other major changes. If errors occur, imports can not be reversed. You will need to restore your data.
1) Make a Backup of POSitive and its data.
2) Go to Maintenance: Import: Import Vendors
3) Highlight the desired import definition. You may choose to Edit the setup for review or modification first.
4) Click on the Import button.
5) A data line will be displayed to show that the importing is in process. You will be notified when it is finished.
6) Check the imported data for accuracy.