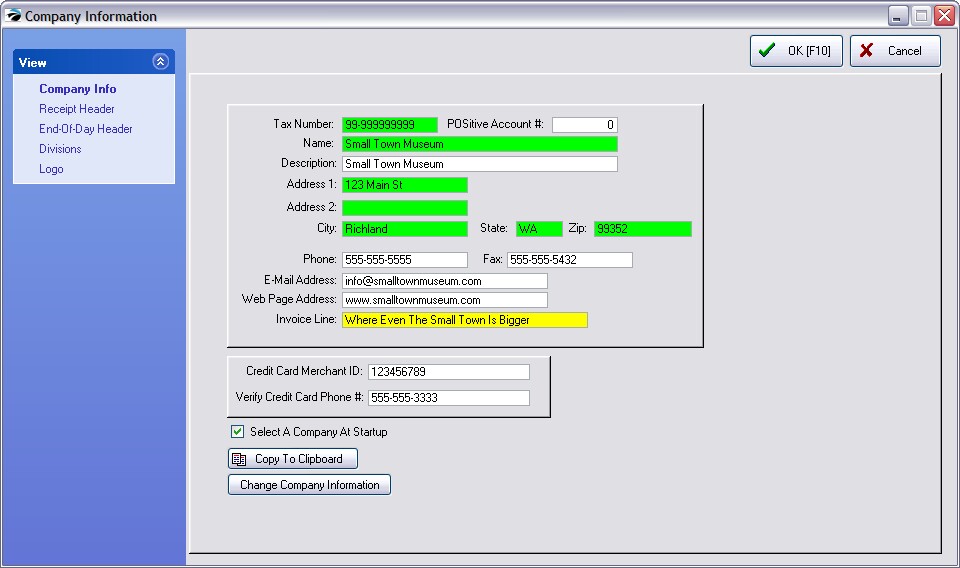
When you create your own company, POSitive runs a New Company Setup Wizard. You may edit your company information on this screen.
Some of the information entered here will be used to create your registration or unlock codes. Your company name and address will be printed on your invoices as it appears here.
Making Changes
Once POSitive is registered or unlocked the name and address information will be grayed out and cannot be edited. You may need to get new unlock codes before you can make changes to this information. Call your dealer or POSitive Software Company.

Company Info
Tax Number - Your Federal ID or ANB number. This will be printed on invoices and purchase orders.
POSitive Account # - For technical support reference. When calling for technical support you may be asked for this number.
Name - The name and address of your company, as you want it to appear on your invoices.
Description - A restatement of your company name or an identifier to help you distinguish between multiple stores: such as 12th Street Store, Store #1, Dallas Store, etc. NOTE: this should not be left blank because this field appears on the Choose Company screen to aids in the selection of the correct company data.
Address Block - a free-form field for international use.
Address 1
Address 2
City, State, Zip
Phone - (include area code)
Fax - (include area code)
E-Mail Address - (Optional) This should be a general e-mail address.
Web Page Address - (Optional) If you have a web page, enter it here. If you do not yet have a web page, ask your dealer of POSitive Software how you can get one very economically.
Invoice Line - (Optional) This is a "teaser" line which will appear directly below your company phone numbers on an invoice. You could enter your company slogan, "Greatest Deals On Earth," or list your e-mail and web page addresses, or anything else of your choosing.
Credit Card Merchant ID - (Optional) Strictly for reference only. If you are using a credit card processing program, this is a handy place to record such information with easy access when you need it.
Verify Credit Card Phone # -(Optional) Strictly for reference only. Enter your credit card processor's voice phone number. If you had been trying to process a credit card which is unable to be verified via modem, this is the number you have been told to call to get voice verification of the card's acceptance.
Select A Company At Startup - Displays the Choose Company screen on startup of POSitive. One option available to you from the Choose Company screen is to select a company from the list and always launch the company data automatically, thereby skipping the Choose Company screen. From time to time, you may find it necessary to restore the Choose Company screen. By placing a check here, and then exiting POSitive, it will be restored.
Software Registration
Registration - Shortly after installing POSitive and creating your company data, you will be prompted to register your software. When you have an internet connection choose Register Now or go to Maintenance: Registration
Copy To Clipboard - Registering your software is an automated process. However, if there are problems with the registration, you may be asked by technical support for the company information listed here. As a convenience, click on this button and the relevant information will be placed on the Windows clipboard, which can then be pasted into an e-mail or or word processing document to fax to your dealer. Note: You will not see any indication that it has been copied to the clipboard; just know that it has been done.
Change Company Information - (please contact your dealer) for un-registering POSitive to correct misinformation CAUTION: Changing your Company Information can invalidate your registration. Your program may revert to Demo mode. Are you sure you want to do this?
Company Headers (OPTIONAL)
Two tabs on the Company Information screen allow you to add extra information to your invoices and end of day reports such as Tax Numbers, VAT, etc. to conform with governing requirements.
Receipt Header
Open the tab and type the information you would like at the top of your 40-column invoices.
End-Of Day Receipt Header
Open the tab and type the information you would like at the top of your 40-column End-Of-Day Report.
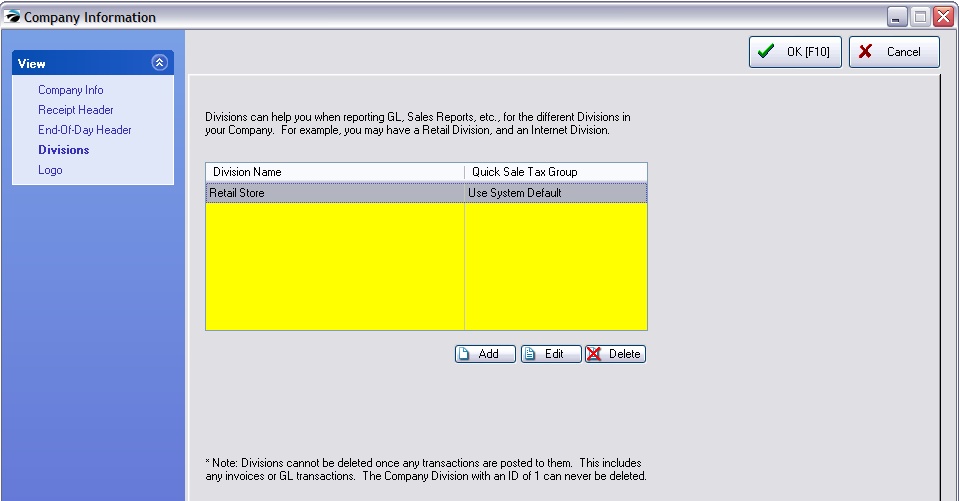
Divisions (OPTIONAL)
This optional setting allows the company to monitor sales based upon internal accounting organizations (Divisions) within the company: Retail, Wholesale, Internet Sales, Service, etc. If the Division is in another sales tax jurisdiction, you can select the appropriate tax rate for Quick Sale invoices in that division, otherwise choose "Use System Default".

After naming the various divisions, be sure to review the GL Chart of Accounts and make appropriate changes for each division. (see General Ledger Management Center)
The use of a Division is controlled by the Station. A computer will be designated to function as a Division point of operations. Transactions made at the computer station will be logged under the selected Division. (see Station Settings)
Delete Division - Once any activity has been recorded for a Division the division cannot be deleted.
Logo
How To Add Your Company Logo Into POSitive Invoices
Load Pic - A company logo would be an appropriate picture to load here. It will be printed on your "windows" invoices and purchase orders.
Delete Pic - Remove the picture loaded as a company logo.
1) Click on Load Pic
2) Select the proper folder and company graphic. You may need to change the picture format filter to find your specific logo. Note: For best results the graphic should be small and if you are running multiple computers, the graphic must be saved in the C:\POSitive\PRM\IMAGES directory so that all computers will have access to the file.
3) Choose OK.
Guidelines:
The logo in POSitive will auto size to about a 1.5 x1.5 inches. You can use bmp, wmf, and perhaps jpg. GIF may work also.
In any event if you make a logo about 1.5- 2 inches square and use a WMF format, your logo will definitely print on your invoices. And in color, if you have a color logo and printer. You can always experiment with different designs and file types.
Obviously the smaller the file size the better. My logo is a color WMF file and is about 7k I created it in Corel Draw and saved it as a WMF.
Final point to remember, our logo for invoice printing has no relationship to our POSitive Commerce system. If you DO get into e-commerce, the only file formats that are supported are JPG and GIF. WMF and BMP are not valid file types for web images.