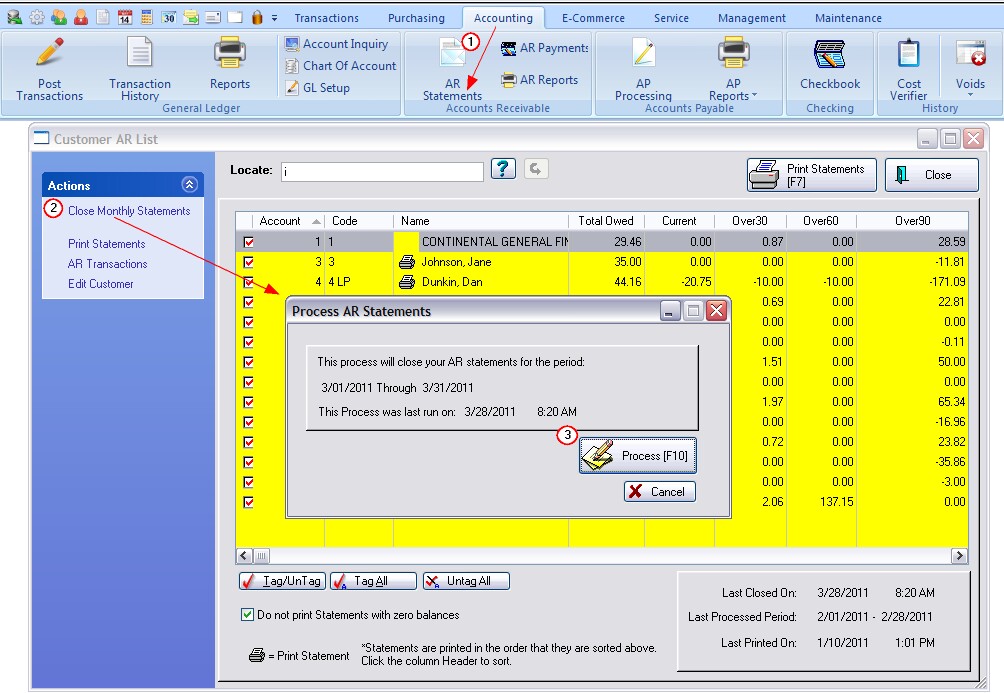
IMPORTANT: ONCE PER MONTH choose "Close Monthly Statements" even if you are not printing AR Statements.
When it is time to print AR Statements, this list will display all open AR accounts. You may choose to print all or only selected statements
--- Some Important Settings ---
| • | Do Not Print Statements With Zero Balances - saves time, paper, and postage |
| • | Printer Icon Before Customer Name - If there is no printer icon beside the name of the company or individual, then a statement will not print no matter if the box is tagged or not. |
| • | Close Monthly Statements [F9] This MUST be done on a monthly basis, even if you do not use all the Accounts Receivable features. |
| • | Tag/Untag - only checkmarked items will be printed, provided there is a printer icon preceeding the customer name. |
Important Monthly Activity - Close Monthly Statements each month.
Even if you do not use all of the features of Accounts Receivable nor plan to print AR Statements, it is important to close the statements at least once per month. This assures that relative databases are updated properly.
1) Go to Accounting: Accounts Receivable: and click on Statements button. This will trigger compilation of charges.
2) Click on Close Monthly Statements at the far left. You will be notified of when statements were last processed. (see the "Last Closed On..." information box in the bottom right)
3) Choose Process [F10]
When finished you may print statements.

This list will include customers with a Store Credit as indicated by a negative value in the Amount Owed column. These store credits are the result of returns, consignments, and advance payments.
How To Sort The AR List
Customers can be listed and sorted by Account Number, Lookup Code, and Name. To sort by any one of these, simply click on the column title. Double clicking on the column title will change the sort from ascending to descending order as indicated by the > and < characters beside the column title.
How To Filter the AR List with a Query
Next to the Locate button is a blue Question Mark. This will launch a Query list. You may create as many Queries as you wish and save them for future use. (see AR Query)
How To Print AR Statements for Multiple Customers
1) Go to Accounting: Accounts Receivable:and select Statements
2) Tag customers for whom you wish to print statements. Use the buttons for tagging All or Some.
3) Click on Print Statements under Actions at the left.
How To Preview A Customer's Statement
This can be done only on an individual customer basis. On this screen,
1) highlight the customer record
2) choose AR Transactions at the far left. This will open the AR Transactions screen for the highlighted customer.
3) In the lower left corner, under Actions choose Print Statement and choose Preview.
The AR Statement
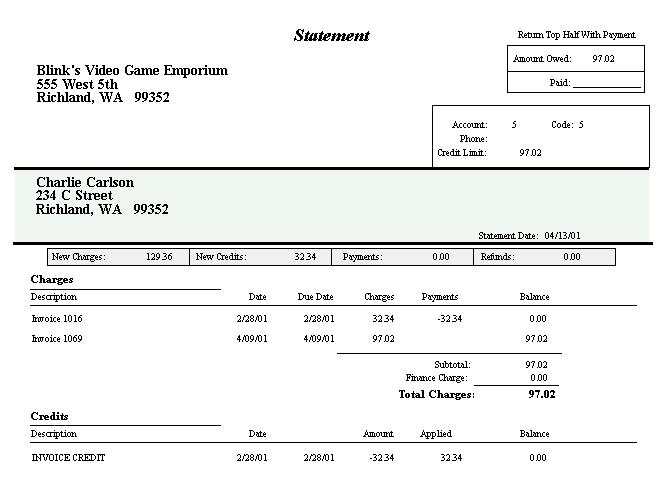
Here is a sample view of an AR Statement. If you choose, you may edit the design of your AR Statement.

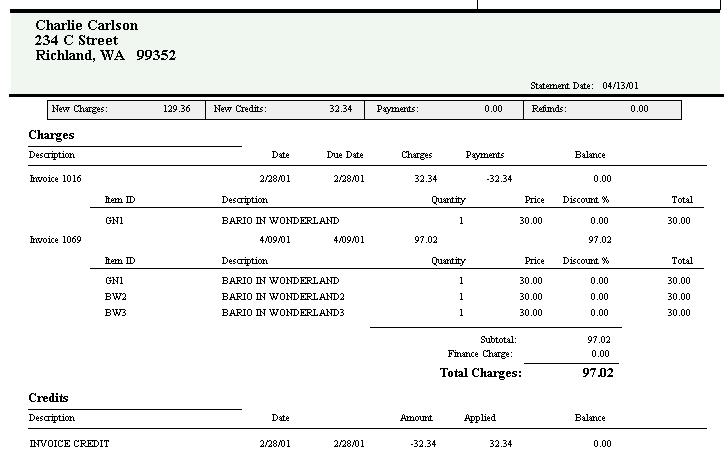
The same statement above WITH INTEGRATED INVOICES shows the line item detail of the invoice.
