|
1.5 Edit a Button |
  
|
|
1.5 Edit a Button |
|
The characteristics of a button can be changed in several ways: color, size, location, and image.
1) Click on the first tab, Properties, of the Tool Panel at the right.
2) Click on the Discount button in the second row on the left. This is now the "Selected Button" and an image of it appears on the Properties tab.
You may have noticed that when you hover over a button it will have the same white square as a position indictor. It requires a click to actually select the button and make changes to it. Always keep an eye on the "Selected Button" image on the Tool Panel.
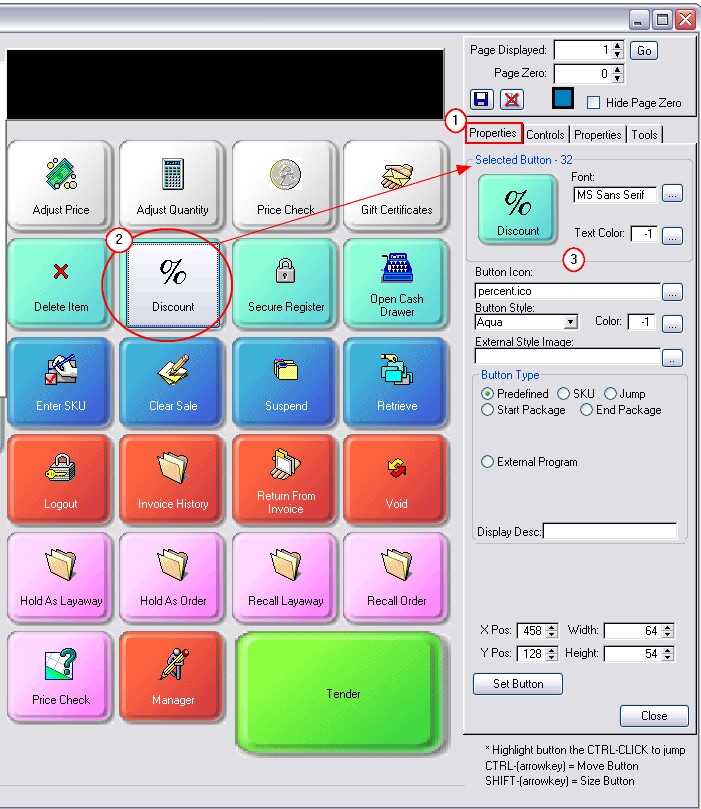
3) There are multiple button characteristics which are defined on this Properties tab. You are encouraged to experiment with each one.
Font
The word "Discount" on the button is currently using the MS Sans Serif font. Click on the lookup button to the right and you can change the Font, Font Style, and the Size. Click on OK to see the changes.
Text Color
The color of the word "Discount" is black. By using the lookup button, you may select a color from the palette. Choose OK.
Button Icon
The icon assigned to this Discount button is a percent sign, %. Choose the lookup button to find a listing of other icons. Open the folder named Icons. Highlight a desired icon and choose Open.
You can find additional icons on the internet and save them in this C:\POSitive\PRM\icon folder for use as needed.
Button Style
The color of the Discount button is currently Aqua. Choose the drop down arrow and choose a different color. If you choose None, notice that the button no longer has the dimensional effect. These buttons will change their look when actually running the Touchscreen program. They are "raised" when dormant, but become "depressed" when clicked on.
Color
The button may use any color on the color palette. However, using one of these colors loses the "raised" style. First, change Button Style to None. Now, choose the lookup button and select a color.
External Style Image
This is an advanced feature of the touchscreen editor. Using a graphics program you can design addition styles of buttons of different shapes and access them for use with POSitive. Note: as you work with Button Style and Color options described above, this field may disappear temporarily.
Button Type
In short, each button has a function. This Discount button has a predefined function of prompting for a percentage and then applying the percentage as a discount value to an item or all items on the invoice. There are dozens of predefined buttons which will be discussed later. Other functions are SKU, Jump, Start Package - End Package, and External Program. These will also be discussed later.
Display Description
Each button has a default name. You may change the name displayed on the button by erasing the contents of the Display Desc field and typing in a name of your choosing. You should limit your name to less than 20 characters depending upon the font of you button.
![]()
Position
A button is always placed somewhere on the touchscreen work area. The exact coordinates of the Discount button are displayed in these fields. The X and Y positions mark the location of the upper corner of the button.
X Pos = 458 - this is the number of units from the far left of the touchscreen work area.
Y Pos = 128 - this is the number of units from the top of the touchscreen work area.
Width = 64 - this is the number of units from left edge to right edge of the button.
Height = 54 - this is the number of units from top to bottom of the button.
The primary function of these fields is to bring the buttons into alignment so that the screen looks attractive and professional.
Changing The Position
To best demonstrate this Position feature,
4) Click on the Tender button at the bottom of the screen. Note the Position:
X Pos = 535 Width = 136
Y Pos = 370 Height = 74
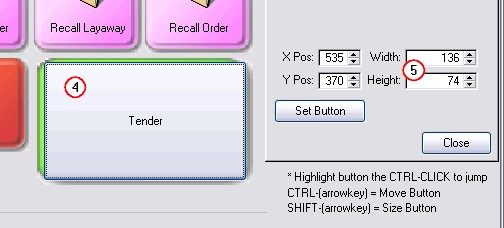
5) Leave the X Pos and Y Pos as they are, but click on 136 of the Width and change it to 74.
Notice that you now have a perfectly square Button.
Now click on the 74 of Height and change it to 54.
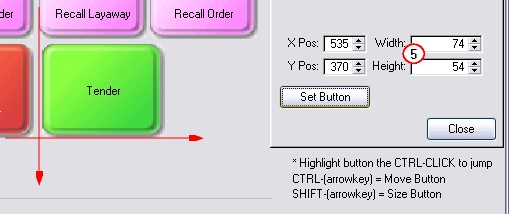
Notice that the bottom of the Tender button is aligned with the bottom of the red Manager button. However, the left edge is not yet aligned perfectly with the pink Recall Layaway button above it. The X Pos is the distance from the far left side.
To remedy this, click on the Recall Layaway button and note that it's X Pos = 533. Now adjust the X Pos of the Tender button to 533 and everything will be aligned perfectly.
Bigger Buttons
The Tender button was originally bigger than the other buttons to make it more dominant and easier to "touch." One can be very precise by using X Pos and Y Pos, but you can change the size and location of a button by using the keyboard arrow keys.
To Change Size
A) Click on the Tender button
B) Hold down the Shift key and use the Right Arrow key to expand the width of the Tender button. Use the Shift-Down Arrow key to expand the height of the button.
To Change Position (Move)
A) Click on the Tender button
B) Hold down the CTRL key and use the Right-Left / Up-Down arrow keys
Notice that you can control the general position and size of the button with these arrow keys. Then, for more refined work, you can enter values in the X Pos and Y Pos fields.
Set Button
We haven't needed this button yet, but we will later. In come processes, you need to choose Set Button to lock in the changes being made to a button, usually a new button, not an existing one.
Close
This button will Exit the Touchscreen editor and ask if you want to save changes. We will be discussing this topic soon, because there are some important things to know about what really happens when you close the screen.
In Summary
You now know that a button can be changed in many ways. The color, style, font, size and location are adjusted on this Properties tab. And there are hot-key controls for changing size and position of a button.