Matrix |
  
|
Matrix |
|
The matrix is a consolidation of all related inventory items into a simple and convenient screen for invoicing and inventory control purposes.
1) Choose Add from the Inventory Center
2) Select Matrix as the type. (far left side)
3) Select a Department/Category (or add new ones) and choose Continue.
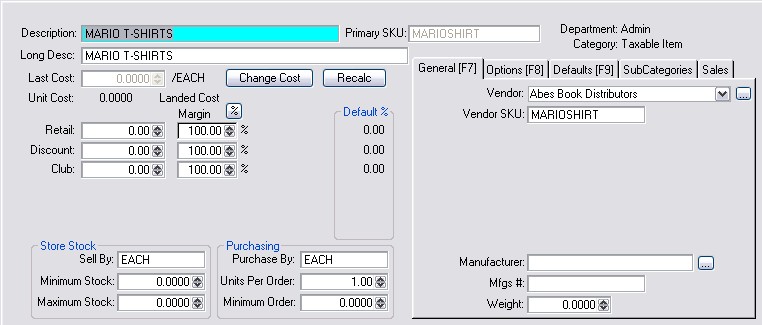
4) Define the "matrix header" item. This looks like any other inventory definition screen, but this item is the master item referred to as the Matrix Header. POSitive automatically generates all the individual matrix items based upon the settings and options of this Matrix Header. Once the individual elements are created, you can edit each item.
The first 3 to 5 characters of the Description or SKU are used as the prefix of the individual SKUs. Knowing this could be to your advantage. See Maintenance: System Setup: Inventory: Matrix settings
Also, the description is used as the basis of the individual product descriptions. It is recommended that you keep the description of the "matrix header" item as abbreviated as possible because the row and column titles will be added to it.
As you define this "matrix header" inventory item, you use much the same information as you would for creating a normal inventory item, but with these recommended exceptions:
-- Keep the Description short. Individual item descriptions are built upon it.
-- Enter a Cost and Selling Prices common to the majority of the matrix inventory items to be generated.
-- Set Minimum Stock counts common to the majority of the matrix inventory items to be generated. You will have the ability to change costs, prices, and minimum stock numbers of individual items as needed.
-- Select the Primary Vendor and Vendor SKU
TIP: Some articles such as shoes and shirts consist of a third element, color, which cannot be include in a two-dimensional matrix. This third element should be part of the Description of the inventory item. For example, the style number 2252 could be included to indicate the color of the shirt.
5) Press Save [F10] when done.
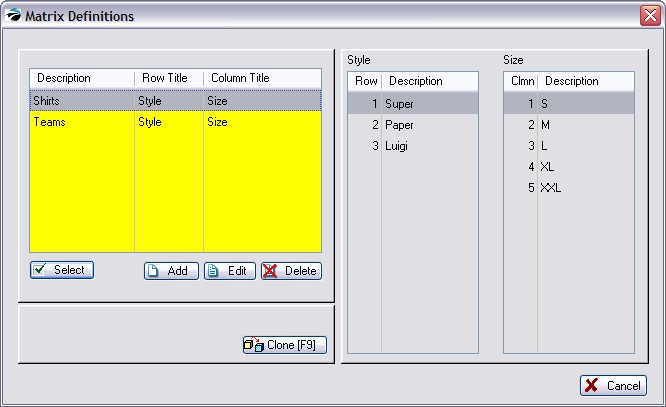
6) Immediately you will be prompted to select a Matrix Definition.
The matrix definition is a predefined list of grid sizes and content. It will be used for determining the titles of the many rows and columns to use for this matrix header. Highlight or Create a matrix definition and then choose the Select button.
See Matrix Definition for help on creating a matrix definition.
7) You will be prompted that a matrix is about to be created. Choose Process [F10] and you will see a progress bar as items are built.
Note: Please be aware that creating a grid of 50x50 items could take a little while. Do not interrupt. A progress bar is displayed during creation of the grid.
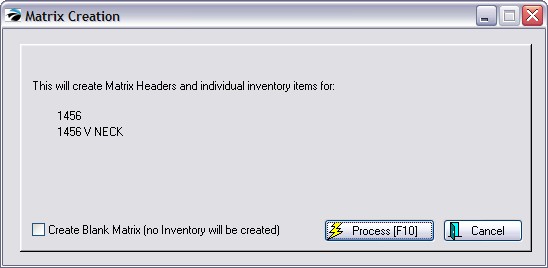
Create Blank Matrix - This option will create a grid with XXXXX in every field. This allows you to link or assign previously created inventory items into this grid. See "Assign Item" below
POSitive will automatically create all cells of the matrix. You may edit individual cells by first highlighting a cell and then choosing various views, properties, and actions.
Shows the Purchase information of the highlighted cell.
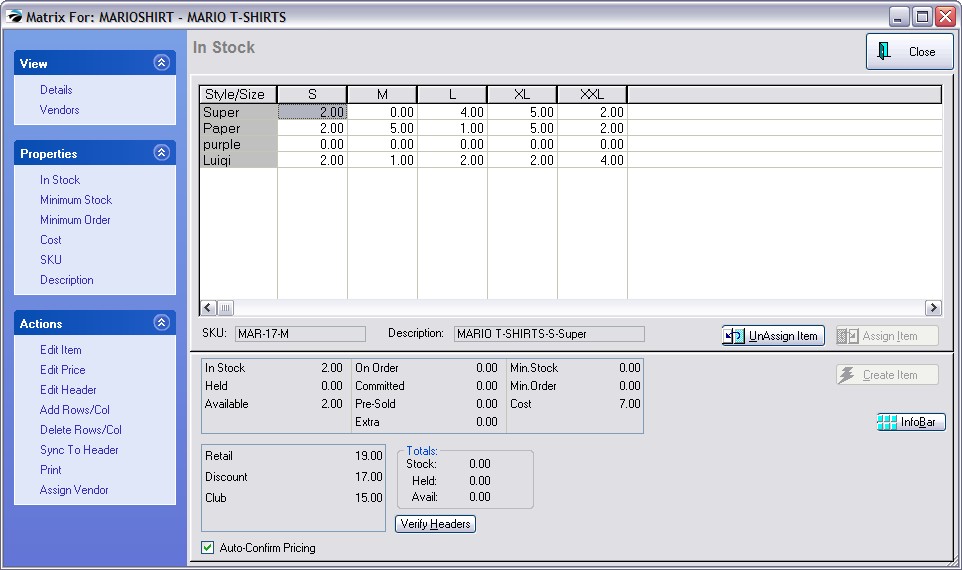
Top Section - On the right at the top are displayed all the cells of individual inventory items. By default you are seeing the current stock counts of each item (In Stock). Other details are available under Properties (see below) for review and editing.
Direct Editing - All cells (with the exception of In Stock) can be edited directly.
•Select the option at far left.
•Highlight the Cell. Use either the mouse or arrow keys for cell selection.
•Press Enter to edit.
•Type the changes.
•Press Enter to save changes.
Maximize View - If your matrix is large, you may view more columns simultaneously by clicking on the full screen icon on the window title bar.
Bottom Section - On the right at the bottom is information about Stock, Pricing, and InfoBar
•SKU - Of the currently selected Cell.
•Description - Of the currently selected Cell.
•Stock Status - The highlighted cell's stock counts are displayed for convenience. To view more details such as the actual Helds, for example, select the InfoBar button at far right and choose Customer Orders from the list.
The quantity in stock of each item. For control purposes you may not edit the stock count directly on this view. It is recommended that you use purchase orders to update your stock counts. If you are entering "initial inventory count" we suggest you use Inventory: Physical Inventory: Reconcile Inventory. (Note: You may use Edit Item [F9] and Verify/Adjust as you would any inventory item.)
Displays the set minimum stock level of each item. This is the number you want on the shelf at all times.
Displays the set minimum order level of each item. This is the suggested number of items you would want to order.
Displays the set cost of each item. The initial cost is always the same as the cost entered on the matrix header when the matrix item was created. If some items have a different cost because of variance in the size or style you manually change costs here. Note: POSitive will automatically update these costs to the correct Last Cost when the item is received on a Purchase Order.
If you change the cost of an item, you will likely want to change the selling prices at the same time. Be sure to turn on Auto-Confirm Pricing at the bottom of the matrix screen. (see Verify Pricing)
Displays a generated SKU of each item. Creating a matrix automatically generates SKUs. The generated SKU consists of the first 8 characters of the description entered on the matrix header, followed by POSitive item number, and then the letter M to indicate it is a matrix item. This SKU is functional, but not practical.
You may change the generated SKU to the product's attached barcode or product number. The generated SKU for matrix items is not easy to work with if you are used to looking items up by SKU. However there are some pros and cons to making such changes.
Disadvantages - 1) you will sacrifice the grouping of like items on the Inventory List screen. Specifically, if you sort by SKU, items which began with the generated SKU prefix will no longer be grouped together. 2) It is work intensive to make the changes, and 3) the probability of human error could increase.
Advantage - a more logical barcode can be used, one of your own creation or as defined on the pre-made label.
Your Options -
1) Leave the SKU as is. POSitive can generate barcode labels for the product using the existing SKU.
2) Change the barcodes.
•Highlight the Cell. Use either the mouse or arrow keys for positioning.
•Press Enter to edit. The existing barcode is highlighted and will be erased in total when a new entry is made.
•Scan the desired barcode or manually type the changes.
•Press Enter to save changes
3) Use an Alternate SKU for each item. This is even more work intensive, but you can retain the generated SKU as well as use the pre-defined barcode. You will have to edit the individual item and add the Alternate SKU. Contact POSitive support for more information.
The description was generated using the item header description as the basis of the individual product description. Automatically attached is the cell's column title and then the cell's row title.
You may edit the descriptions but with some inherent disadvantages.
1) You may sacrifice the grouping of like items on the Inventory List screen. Specifically, if you sort by Description, items may no longer be grouped together.
2) It is work intensive to make the changes, and
3) the probability of human error could increase.
TIP: System Setup: Inventory: General allows for modification of sequencing of elements in the description.
An item in a matrix grid can be removed from the grid and also removed from the entire inventory list This is often used when a specific size or color is not available from the vendor. When generating a matrix, POSitive must create all cells to complete the matrix, even unavailable items. Use UnAssign Item to remove such entries.
How To Deactivate "Unusable" Matrix Items
Do NOT use the Delete option on the Inventory Lookup.
1) Open the matrix view of the item.
2) Click on the Cell and click (or drag it to) the UnAssign Item button.
3) Warning: You will be prompted to confirm the deletion of the item. Choosing NO will retain the item in the Inventory Center and just remove it from the matrix grid. Choosing YES will also delete the item from the Inventory Center and into the Deleted Items Manager from which it can be permanently removed.
Generally, this button is grayed out. Only when highlighting a Cell which has been deleted or removed from the grid as evidenced by the XXXXX in the cell, will this option become available. The purpose of this button is to attach a different, and perhaps even an unrelated inventory item, from your inventory list and link it to this matrix.
This is not a recommended procedure for use on a grand scale, but can be a helpful option. Be aware that changes made to the matrix header (Edit Header) cannot be applied automatically to a "foreign" assigned item.
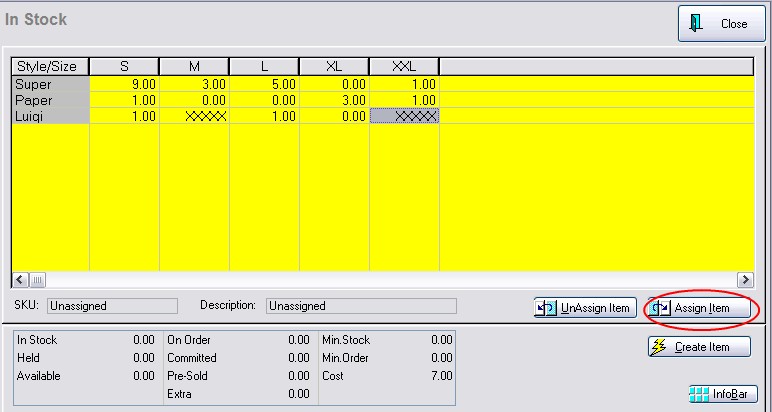
Generally, this button is also grayed out for the same reasons stated above. When you want an unassigned item to be restore as part of the matrix header, choose Create Item and all of the properties of the matrix header will be applicable to this item.
InfoBar
Edit item - make changes to the item of the highlighted cell
Edit Price - opens the Verify Pricing screen of the item of the highlighted cell (see Verify Pricing)
Edit Header - edit the "master" item of the matrix
1) choose Edit Header .
2) review the item and choose Save (not shown)
3) If you made changes to the cost or pricing you will be prompted to update the individual matrix items.

Click to expand
•Update ONLY those items with the old cost and/or price
•Update EVERY item in the matrix
•Do NOT update any items in the matrix
Add Rows/Columns - expands the matrix to include more row or columns
1) first, position the cursor on the cell where new rows or columns are to be added.
2) choose Add Rows/Col
3) Select what to Add and the Position

Click to expand
4) choose Add and type the title(s) to be added
5) choose OK [F10]
Delete Rows/Columns - to remove entire row or column
1) first, position the cursor on the cell where row or column is to be deleted.
2) choose Delete Rows/Col
3) choose Row or Column (not shown)

Click to expand
4) choose to delete the row and/or items
•Delete the Row/Col, leaving each item intact - although the item is no longer visible in the matrix group, the item is still part of the inventory listing
•Delete every Item in the Row/Col - not only removes the whole row, but deletes the items as well so that they are no longer in the inventory listing
•Confirm deletion of each Item in the Row/Col - the Confirm prompt means to delete the item from the inventory listing, nevertheless, the entire Row/Col will be removed from the matrix group view.
Sync To Header
Assign Vendor
Close - Closes the matrix view. Saves changes made.
Pricing Levels - A display of the currently assigned prices. To change pricing select Edit Price under Actions at the far left.
Totals - These are totals for the entire matrix set and shows the number in stock, held, and available for sale.
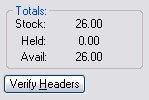
Verify Headers - this button re-calculates the total number of all matrix items and adjusts the Totals as necessary.
Auto-Confirm Pricing - If you change the cost of an item on the Cost [F5] tab, you will likely want to change the selling prices at the same time. By turning this on (check marked) a Verify Pricing window will open to allow you to easily make selling price changes per price level.
Edit Item
Each matrix cell represents a separate inventory item. That you may edit that item as you would any other item. Contact POSitive support for more information.
Edit Price
Opens the Verify Pricing window to easily make selling price changes per price level
Edit Header
The master matrix inventory item which opens this matrix view can only be edited by selecting this button. Editing cost or pricing of the header can affect individual inventory items linked to it. In fact, you will be prompted to make changes or not.
An inventory item in the inventory lookup which serves as the base of all linked individual matrix items is called the Matrix Header. The item is flagged as an M type when viewed in the Inventory Lookup screen.
1) Find the Matrix item in the Inventory List
2) Choose Edit. This opens the Matrix view of all items.
3) Click on Edit Header.
4) Make changes as desired. Editing the cost and/or pricing can be automatically rippled down through the linked inventory items.
When you exit the header item, you will be prompted with the following options. There are no reversal or undo options.
Matrix Header Change
•Update ONLY those items with the old cost and/or price.
•Update EVERY item in the matrix.
•Do NOT update any items in the matrix.
Sync To Header - When you make a change to a header, you may update all individual matrix items by one or more options. (see Sync Matrix Items To Header)
You may modify the structure of the matrix by adding or deleting rows and columns.
Warning: BACKUP YOUR DATA. Before making any major change to POSitive, you should first backup your data so that if the results are less than desirable, you will be able to restore the backup.
Add Rows/Cols - Add one or more rows either above or below the current cell. Add one or more columns either to the left or right of the current cell.
•First, position the cursor in the desired cell.
•Click Add Rows/Cols.
•Choose either Row(s) or Column(s)
•Choose an appropriate position for the new rows or columns.
•Click the Add button. Type the title for the row or column. Repeat to add additional row or column titles. The Delete button will remove an unwanted title from the list. The reposition buttons will move the highlighted title up or down in the list.
•Click OK.
Delete Rows/Cols - Delete either the row or column of the current cell. You will be presented with additional options.
•Delete Row Only - leaves each item in inventory list so that it can be re-assigned if necessary.
•Delete Row/Items - erases all inventory as the row is removed.
•Confirm Deletes - allows you to selectively skip the deletion of some items in the row. The row will be removed, but the items remain in the inventory list and can be re-assigned.
•Cancel - halts the deletion process.
•Delete Col. Only - leaves each item in inventory list so that it can be re-assigned if necessary.
•Delete All Items - erases all inventory as the column is removed.
•Confirm Deletes - allows you to selectively skip the deletion of some items in the column. The column will be removed, but the items remain in the inventory list and can be re-assigned.
•Cancel - halts the deletion process.
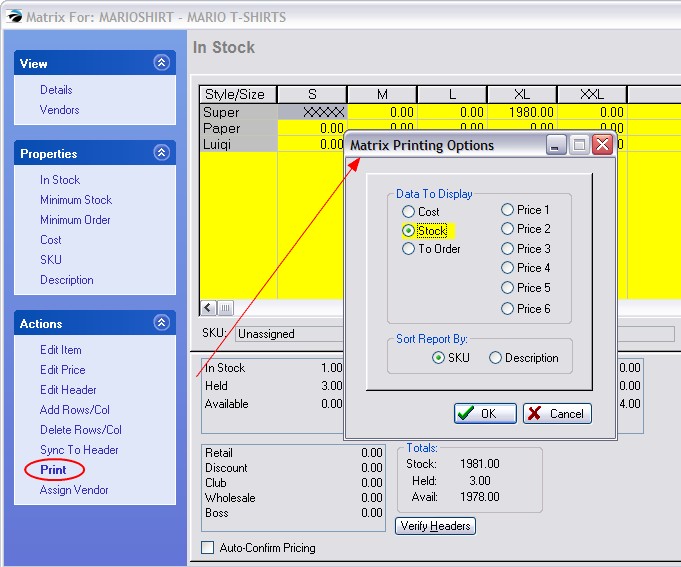
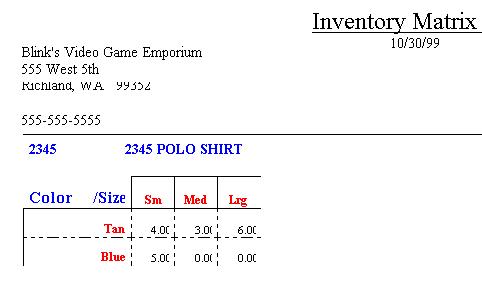
You may print a report of the matrix to show stock counts, costs, order quantities or selling prices. The report appears in a grid format as shown here.
Select which data option you want to display.
Assign Vendor
This will assign all of the matrix items to a specific vendor. It does not matter which cell is highlighted when you select this option.
How To Modify A Matrix
Information in this help topic will describe how to make modifications.
•You may make changes directly in the cells of the individual items.
•You may change the number of columns and rows of the matrix.
•You may globally change costs and prices of all items in the matrix by editing the matrix header.
How To Edit Individual Matrix Items
You may edit an item either from this matrix view by selecting Edit Item [F9] or by selecting Edit from the Inventory Lookup.
Matrix Items And Purchase Orders: Contact POSitive support for more information.
•On The Order List
•On The Purchase Order
•Printing The Purchase Order
•Receiving Matrix Items On A Purchase Order
•Matrix Back Orders
Individually - You may sell an individual matrix item as you would any other item: by scanning the barcode, typing the SKU, or selecting it from the Inventory Lookup.
From The Grid - type or find the matrix header. Often the header SKU is the product style number. The matrix view will open. Cursor to the desired item and press Enter to select it.
How To Delete Matrix Items
Warning: Before making any major change to POSitive, you should first backup your data so that if the results are less than desirable, you will be able to restore the backup.
Individual Matrix Items
Individual matrix items can be deleted from the Inventory List. By highlighting the item and selecting the delete option, the item is removed from the list. However, the cell is still active in the matrix header. The matrix view will show the item as "Unassigned" in the SKU and Description fields.
A better method is to use the Trash Can for deleting the individual item, as described above.
Matrix Header
You may also delete the matrix header and/or related item. By highlighting the matrix header and selecting the delete button, you will be prompted as follows.
•Delete ALL items in the Matrix - Erases the entire matrix and all items linked to it.
•Delete ONLY the Matrix Header. - The matrix view will no longer be functional, but all items will remain entact.
•Prompt to Delete each Matrix Item. - You will be able to skip deletion of some items.