Vendor Price Changes |
  
|
| Show/Hide Hidden Text |
Vendor Price Changes |
|
| Show/Hide Hidden Text |
From time to time, a vendor will announce changes in pricing of its line of inventory.
When these changes are announced, you will want to prepare POSitive so that it will know the new pricing when you prepare purchase orders.
If the changes affect only a few inventory items, you can manually change the costs of these inventory items. However, if there are many items requiring a change, you can use tools in POSitive to export lists and import lists to make the changes.
Vendor pricing is stored in the Vendor Inventory list.
1) Go to Transactions: Vendors
2) Highlight the Vendor
3) Choose Vendor Inventory under the Actions group on the left.
4) This will open the list of all items you can purchase from this vendor.
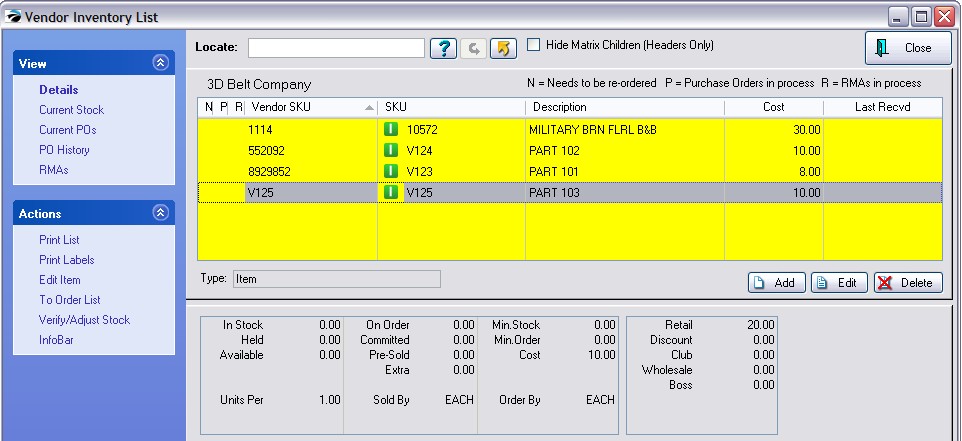
4) Highlight the item to be changed.
5) Choose the Edit button at the far right.
6) Enter the new price in the Cost field.
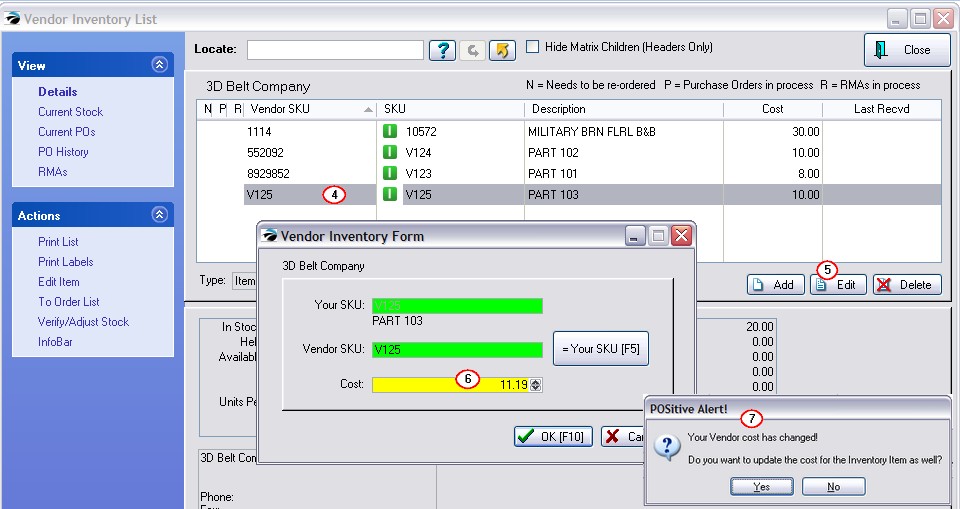
7) Choose OK. You may be prompted with "Your Vendor cost has changed! Do you want to update the cost for the Inventory Item as well?" Last Cost field
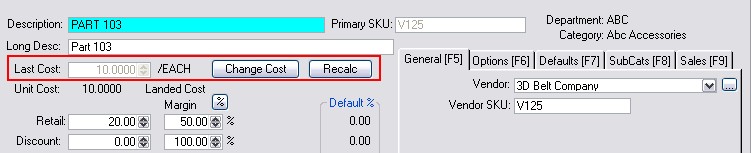
Every inventory item has a Last Cost field. It is automatically updated when you receive new products.
The value in the Last Cost field is subtracted from the selling price to determine your profit. There are options to manually change the cost and to Recalculate new selling prices based on Category default percentages. |
•No - will not update the Last Cost field
•Yes - will change the Last Cost field with the new vendor cost. Pros & Cons
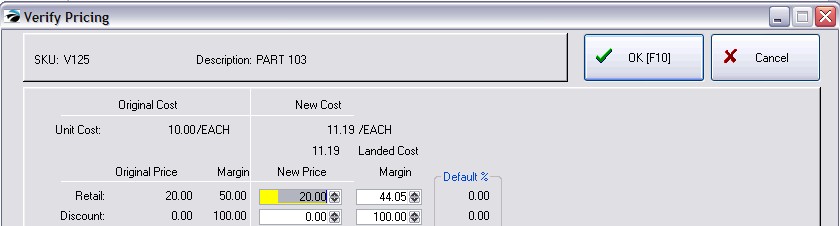
Profit Reports will be unaffected. If you choose either YES or NO, your existing inventory on the shelf will always retain it's actual cost when it was originally purchased from the vendor, because the cost is captured separately in another database. Therefore your profits when those items are sold will be accurate. Inquiries about Costs could be distorted. If an employee simply looks at the details of the item, or if you are creating a quote for a customer, the profits are based on the value in the Last Cost field. If you choose NO then the old costs are used. If you choose YES, then the new costs are used so that you have a better idea of what your true profit will be when you have to order new products. Escalated Selling Prices If you choose YES, you will be given the option to adjust your selling prices so that you can maintain your original profit margin. If you change the selling prices, those selling prices become effective immediately, even for items already purchased at a lower cost, thereby yielding an immediate increase in profit.
see Verify Pricing |
If the vendor can send you a comma or tab delimited file of the price changes, there is a method of importing the information and updating their inventory to the new prices rather quickly.
If the vendor is simply announcing a percent markup, you will need to create your own comma or tab delimited file.
Your SKU is how you are tracking the item. The Vendor SKU is their catalog number. This Vendor SKU may or may not be the barcode on the item.
1) Go to Transactions: Vendors
2) Highlight the Vendor
3) Choose Vendor Inventory under the Actions group on the left.
4) This will open the list of all items you can purchase from this vendor.
5) Choose the Gold Arrow at the center of the screen. This will export this list to an Excel Spreadsheet. See Send To.
6) Using tools in Excel, identify the items with a cost increase and calculate the new costs in a new cell for each inventory item. For example, you could create a formula to multiply the old cost by the new markup percentage to create the new cost.
7) Once you have completed the spreadsheet changes, save the file, not as an Excel workbook, but as a comma or tab delimited file, so that it can be imported as described in the following steps.
Ideally, the vendor will, upon request, send you a comma or tab delimited file with the SKU, Description, and new Cost of each item. Otherwise, you can prepare your own import file. (see above)
This file can be imported into a temporary purchase order to update costs of the items.