Importer for Order List & Purchase Orders |
  
|
Importer for Order List & Purchase Orders |
|
This feature of POSitive allows you to create a Purchase Order or update an Order List by importing items from a file.
Uses:
•Create "Repeating" Purchase Orders - If you regularly order the same products from a vendor, this can automate the process and save you time. Minor adjustments can be made on the generated purchase order as needed.
•Perhaps the vendor has sent you a file listing the items being sold to you. You can use this file to quickly create a new purchase order to be received. Note: items which are NEW to POSitive will have to be created in Inventory Center before you an use the importer.
•If you have a portable scanner (data collector) which you have used to take stock counts or re-order, you can use this to confirm receipt of items as you open the boxes.
While editing a purchase order, either one to be placed or one to be received, there is an Importer tool for updating the purchase order from a comma or tab delimited file.
IMPORTANT NOTICE: Inventory MUST exist in POSitive's Inventory Center as complete inventory items before you can use this importer; otherwise this importer will be useless. If necessary, you might be able to use the selfsame file to import inventory (Maintenance: Import: Import Inventory) into the Inventory Center.
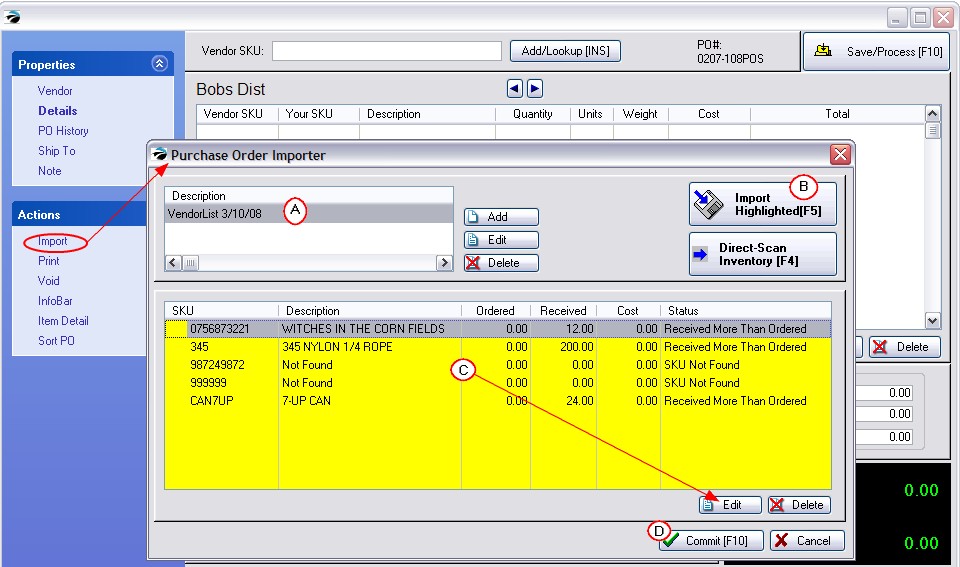
After creating a purchase order for a specific vendor, choose the Import option under Actions on the far left.
This will open the Purchase Order Importer screen.
A) The first step is to create an import file setup (see below).
B) Then you will import the data from the import file.
C) You may review the imported data for accuracy and use the Edit or Delete buttons to make corrections. "SKU Not Found" means POSitive does not have that item in the Inventory Center.
D) And, finally, choose the Commit [F10] button to update the purchase order.
A) POSitive needs to know the name of the file and which fields of the file to link to.
Choose Add to create a new importer definition. This opens the following screen.
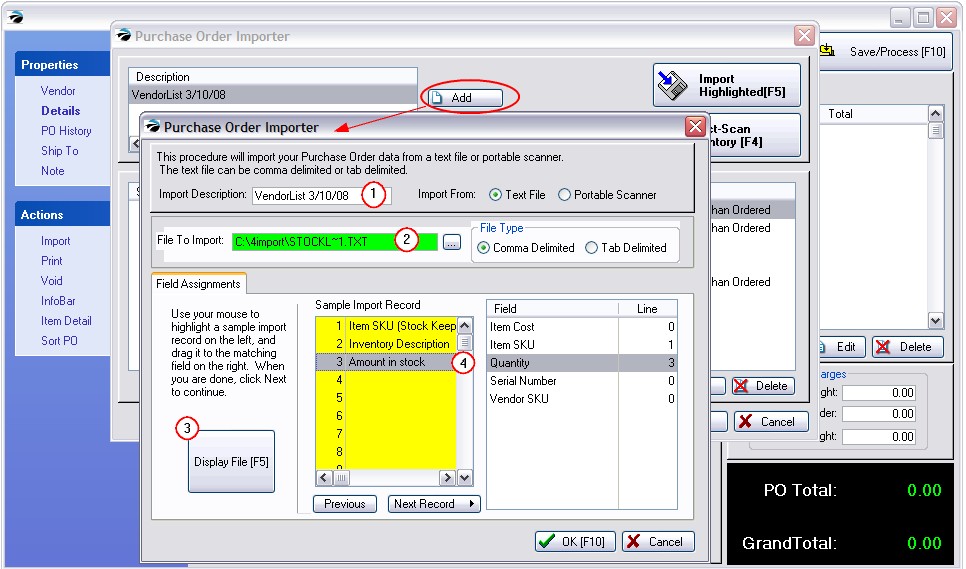
1) Give this import setup a name for easy identification. Choose Text File for type unless you are using a data collector or portable scanner.
2) Find and select the file to be imported. Choose either Comma Delimited or Tab Delimited for type.
3) Select the "Display File [F5]" button to see the import file data. The data must be displayed in separate rows rather than all in row number 1. (Choose a different file type if needed.)
4) Match the sample record number with the corresponding POSitive field on the right. This is done by dragging and dropping the field from the center to the POSitive field on the right.
IMPORTANT NOTICE: You must be able to link the barcode or SKU to POSitive's "Item SKU" field to make a positive connection. TIP: Other fields are optional, but you may link the Item SKU of the sample import file to Vendor SKU of POSitive to save an extra step in the future.
5) When you are finished choose OK [F10] button.
B) Once the setup is complete you will import the data from the import file. Highlight the file name and choose Import Highlighted [F5] button.
You will see the import in process. The results will be displayed in the bottom half of the screen.
C) You may review the imported data for accuracy and use the Edit or Delete buttons to make corrections. "SKU Not Found" means POSitive does not have that item in the Inventory Center. Either the SKU is not the primary SKU or it does not exist in POSitive and will have to be created first before it can be imported.
If you have not imported a cost, then POSitive will use the last order cost or the last vendor cost to the purchase order.
D) And, finally, choose the Commit [F10] button to update the purchase order with this new list of inventory items.
You will be returned the to purchase order screen. Make any changes as needed and process or save the purchase order as usual.