TIPS for New Company Setup |
  
|
TIPS for New Company Setup |
|
When you first create your company, be aware that these settings are the most critical setup options.
There is a floating window available as a quick link to these vital setup screens of POSitive.
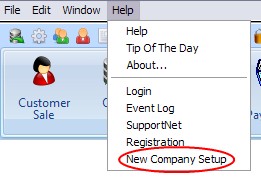
To access this window, go to Help: New Company Setup
It is highly recommended that you take the time to review each one. (*Optional Path = If you do not wish to access the option through this New Company Setup window, you can go to the same setup by following the directions given to the appropriate master menus.)
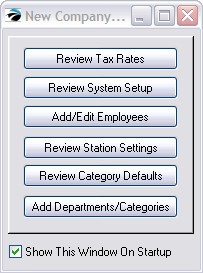
If you uncheck "Show This Window On Startup" this reminder will not be displayed each time you start POSitive. If you want to review it you can reopen this window by going to Help: New Company Setup.
•Review Tax Rates - Proper taxation is always a critical consideration. Detailed help is available On-Line. After opening the Tax Setup screen, press F1 for on-line help. (Optional Path*: Maintenance: Tax Rates)
•Review System Setup - These settings will control the overall operation of POSitive. Many choices are available so that you can tailor POSitive to meet your business style and philosophy. After opening the System Setup screen, press F1 for on-line help. (Optional Path: Maintenance: System Setup)
•Add/Edit Employees - As you add employees, you may set security lockouts for individuals. After opening the Employe File screen, press F1 for on-line help. (Optional Path: Management: Employees)
DO NOT edit or delete the employee POS Manager at this time. POS Manager gives you general access to the program and should remain unedited for about a week or more as you set up your company. You may change the password of POS Manager to lock out unauthorized users.
One of the first things you should do is add yourself as an employee. The Employees section will guide you in this step.
•Review Station Settings - Each computer using POSitive is a workstation. Each station can act differently than other stations. For example, each can can have different hardware to configure such as printers, cash drawers, pole displays, etc. Some may be designated as touchscreen stations, or back office workstations. After opening Station Manager, press F1 for on-line help. (Optional Path: Maintenance: Station Settings.)
Important Note: Although it is possible to configure a workstation remotely, it is best to make the changes for Station Settings while operating the workstation.
•Review Category Defaults - Before adding any inventory and even before creating categories of inventory, you need to understand Category Defaults. Categories are a very significant tool in POSitive. They can be as simple or as detailed as you would like. The more you understand them, the more of a tool and time saver they will be. After you select the button, press F1 for on-line help. (Optional Path: Maintenance: Category Defaults: Master)
Note: The Master category is used as the basis for creating new categories and category defaults. It may be edited as often as you wish to populate of the new categories you are creating.
•Add Departments/Categories - In brief, all inventory is assigned to a category. A department is a group of categories. After you select the button, press F1 for on-line help. (Optional Path: Maintenance: Departments)
•Definitions - As part of your setup of POSitive, you may want to review a standardized list of definitions used in POSitive and make changes to those areas which are of interest to you. To access these settings go to Maintenance: Definitions and select the appropriate options. TIP: Policy Statements and Security Groups are commonly created at this time. (see Definitions List)
•Customer Terms - You will be prompted to create at least one, after that you may choose to create additional terms of payment. Go to Customer Center: Customer Terms under Actions.
•Customer Categories - (Optional) You can leave this blank, but by creating at least one you can have customer information filled in automatically with standard settings and user defined fields. Go to Customer Center: Customer Categories under Actions. (see Customer Categories)
•Vendor Terms - You will be prompted to create at least one, others can be created in advance. Go to Vendor Center: Vendor Terms under Actions. (see Vendor Terms)
•General Ledger Setup - (IMPORTANT) This is already setup with default settings and will work just fine as is. However, your bookkeeper should make any desired changes to the chart of accounts early in the company setup process. Go to Accounting: GL Setup. Contact POSitive support for more information.
•Transaction Screen Editor - (Optional) If you choose to track backordered inventory on an invoice and are not seeing a backorder column on screen, use this editor to enhance the screen to show backorders. Go to Maintenance: Transaction Screen. Contact POSitive support for more information.