Locate Item |
  
|
| Show/Hide Hidden Text |
Locate Item |
|
| Show/Hide Hidden Text |
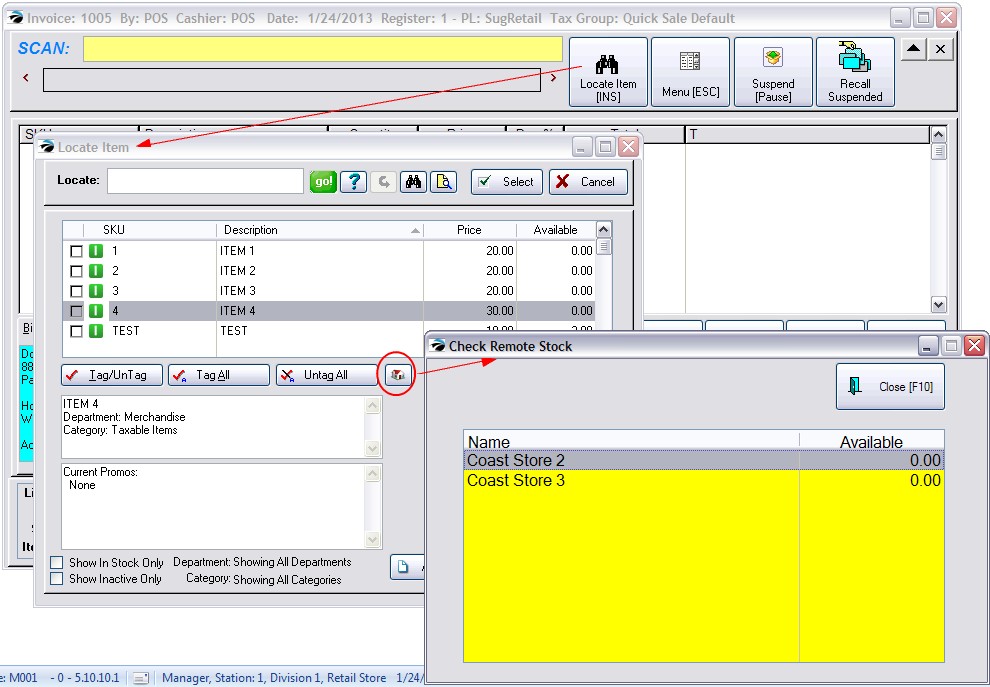
This screen appears when you want to find an inventory item while creating an invoice or pending transaction. You may not know the "exact" SKU or description, but you have a good idea of what you want.
Important Note: Be sure to observe
Switches Which Affect What Will Be Displayed
•Show In-Stock Only - This is typically used for a cash and carry store so that substitute products on hand can be selected .If checked, the list will not display items with a stock count of zero. Setup: To make this a default setting,click on the Find (binocular) icon at the top. Choose Show Options at the bottom left and activate "Show In Stock Only." Unchecking this option will display all items in inventory.
•Show Inactive Only - Displays all items which have been made inactive because they are out of season or otherwise not normally available.
Locate - If you want to search by description or SKU,
1) click on the column title to be searched. The triangle in the title line indicates that the column will be sorted on. The direction of the point of the arrow indicates ascending or descending sort order. The column selected by default is pre-set in the System Setup
2) type some characters in the Locate field. If you press Enter (or choose Go) POSitive will search for those characters at the beginning of the SKU or Description. If you press CTRL-Enter POSitive will look for the characters anywhere in the full SKU or full Description and will list all inventory items which match the search criteria.
3) Once found, highlight the item and choose the Select button (or just press Enter) and the item will be added to the invoice or pending transaction.
Check Remote Stock If your store is part of a MultiSite, you also have the ability to check stock availability at other sites. Click on the icon (next to Untag All) and you will see a listing of stores which also carry the highlighted item and the current stock counts at those stores.
|
There are other methods besides use of the Locate option to find the desired item.
Query - this blue question mark button will allow you to create commonly needed search criteria and selected pre-defined settings as needed. For full details on how to use this function, see Query.
Reset - this button will cancel the results of the Query and display all inventory items.
Find Inventory - this button (binocular icon) allows you to enter a string in the SKU and/or Description fields These fields act like the use of CTRL-Enter described above. Other options can be used to filter the inventory list. (see Find Inventory)
Category - if you know the category to which the desired item belongs, this button will list all items assigned to the designated category. These items will be sorted alphabetically for easy identification.
Display (Types of Inventory) - you may filter the list by inventory type by clicking on the appropriate button
![]()
•All
•Matrix - displays only the matrix headers which are the links to all of the "color/size" matrix items
•Template - displays groups of inventory compiled into templates or special kits
•Consignment - displays items belonging to specific customers to be sold by special agreement
•Unposted - (seldom used) these are incomplete inventory items which have been added on the fly.
Select - picks the highlighted item for the invoice or pending transaction.
Cancel - closes this screen
Instead of guessing which item the customer wants to purchase, each inventory item always displays much information which can help make a positive identification of the item to be selected.
•[Check box] - for multiple selection of items. Note: a single item for selection does not need to be checked.
•SKU
•Description - the name of the item which will be displayed on the invoice and printout
•Price - displays either the customer's assigned price level or the "Promo" price if available today
•Available - the current stock count of the item. If the available count is zero, then the item is out of stock and will need to be backordered. Tip: Activate the option "Show In Stock Only" so that items not in stock will not be displayed.
•Text Boxes - at the bottom left show the description, department name, category name, standard note, current promos.
•Item Picture - a full color image of the item; this picture will be posted to your web site.
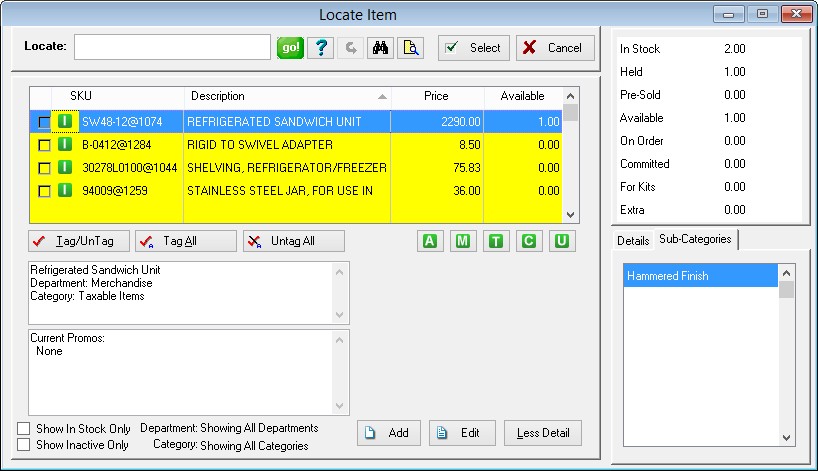
More Detail - Choosing the "More Detail" button reveals more information about the customer. (Always Show More Detail)
If you always want to see this extra information when accessing this Locate Item screen, you can activate a switch in System Setup: Transactions: "Show 'More Detail' on Inventory Lookup." |
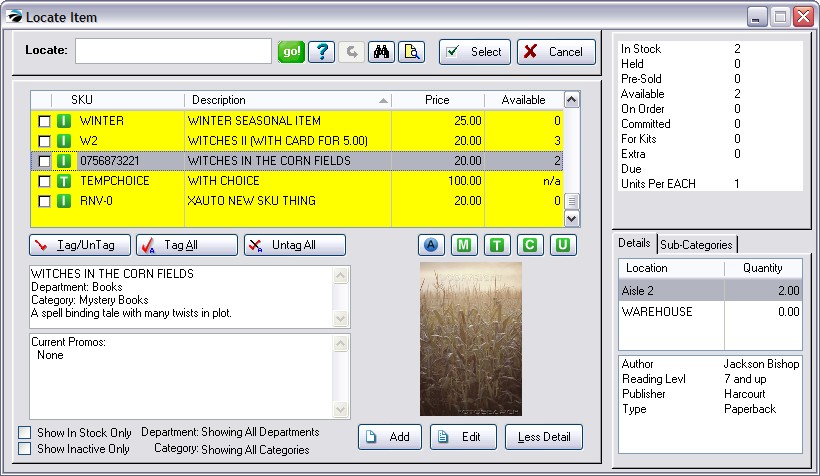
•Location(s) - where products are displayed with location stock count.
•User Defined Fields - with specific contents
•Sub-Categories - assigned classifications or groupings
•Current Stock Status - displays In-Stock, Held, Pre-Sold, Available, Used Items, On Order, Committed, For Kits, Extra numbers.
Tag / Untag Items - for selection of multiple items; this will place checkmarks beside selected items and will add all items to the customer invoice or pending transaction.
Add - Creates a new inventory item. Typically used to create special order inventory. This could open an abbreviated "Fast Add" screen or a general inventory record screen. Fill in as much detail as possible and choose OK. (see Fast Add)
Edit - either review more detail or make changes as needed.