Importing Inventory |
  
|
Importing Inventory |
|
An electronic list of items you sell can be obtained or created quite easily. Often your vendors are willing to provide an electronic catalog of products of their complete line or a filtered list of just your inventory. As updated price schedules are received, use the importer to update POSitive.
Another source may be the actual inventory database of a program you are currently using. Quite frequently, the file can be imported directly or the program my have an export option to create a tab or comma delimited file which POSitive will be able to read.
A third option is to write your own list. Use of Microsoft Excel™ or some other spreadsheet or data basing program gives you more control over your entries. It may seem to be more time consuming, but can be more precise. There are many editing tools within these data basing programs to speed up the work.
Whatever your source of the electronic list, you can create unlimited inventory import setups and they can be reused as often as needed to update POSitive.
To take full advantage of POSitive, consider adding fields such as department and category and special notes to your existing import file. Data editing programs such as Excel can greatly enhance the editing process by using its tools for filling down, sorting, and copying record elements.
The following list should give you an idea of the elements you may want to include in the import file. Items in bold are mandatory. Items followed by an asterisk (*) are recommended. Items in italics followed by a double asterisk (**) cannot be part of an initial import, but can only be imported after the items have been imported once.
Importable Fields For Inventory - (maximum character length)
Alternate Description (32)
Alternate Quantity (9)
Alternate Units of Measure (6)
Alternate SKU - (20)
Category - (20)
Commission (%) - (3)
Commission (Amount) - (9)
Cost - (10)
Department Code - (8)
Department Name - (20)
Description - (32)
Extended Note - (10,000+)
In Stock - (9)
Label Form - (2)
Landed Cost - (9) (note: if importing landed cost you must also import a cost without freight included)
Last Date Sold - () (special application only - do not use)
Last Date Sold (DB) - () (special application only - do not use)
Long (Quote) Description - (50)*
Manufacturer ID - (6)
Manufacturer Name - (30)
Manufacturer Part # - (17)
Matrix Column Desc. - (8) (special application only - do not use for general import)
Matrix Definition - () (special application only - do not use for general import)
Matrix Master Desc. - (12) (special application only - do not use for general import)
Matrix Master SKU - (12) (special application only - do not use for general import)
Matrix Row Desc - (8) (special application only - do not use for general import)
Maximum Stock - (10)
Min. Order* - (10)
Min. Stock* - (10)
Number Sold - () (special application only - do not use)
PO Note - (50 practical) a note which will appear on vendor purchase orders
Price 1 - (10)
Price 2 - (10)
Price 3 - (10)
Price 4 - (10)
Price 5 - (10)
Price 6 - (10)
Price Brk Price** These are for importing QUANTITY PRICE BREAKS ("Over" not "Sell") See below.
Price Brk Price Levl** Leave this BLANK if you want to select All Price Levels
Price Brk Quantity**
Purchase By - (6)
Sell By - (6)
Serial Number - (30) (only one serial number per inventory record; sku, desc, etc. duplicated for each serial number)
SKU - (20) also known as a barcode or PLU; this will become the "primary" product code.
Standard Note - (110 approx)
Stock Location - (20)
Tag-Along Master SKU - (20)
Tax Override ID - ( ) (rarely used - an individual taxrate for the item in lieu of the category taxrate)
Transaction Note - (500 approx)
UD Field 1 - (20)
UD Field 2 - (20)
UD Field 3 - (20)
UD Field 4 - (20)
UD Field 5 - (20)
UD Field 6 - (20)
Units Per Order - (4)
Vendor Code* - (6)
Vendor Cost - (9)
Vendor ID (Hidden) - () (special application only - do not use)
Vendor Name - (30)
Vendor SKU* - (20)
Weight - (6)
This is a global definition to be automatically applied to a newly created category. The new category can then be modified slightly to better reflect the inventory needs. You will also need to select a Tax Category, the taxation method assigned to all items within the category.
For example, all categories will have the same label type and stocking options in common, but some categories will be serialized and this modification can be made as needed.
Go to Maintenance: Category Defaults (see Categories With Defaults)
All inventory must be assigned to a category. The importer can automatically create the category, however, before importing inventory, you may want to MANUALLY create the categories to which the items will be assigned. If you create the categories in advance, you can control the price markups, calculated prices, tax category, and other settings which would be unique to the category.
When importing inventory, the following scenarios will be in effect.
•Import record has no category assigned. All such items will be relegated to one category as selected in the import setup. This one category is generally very generic such as Taxable. Later, to take advantage of the many benefits of category assignments, you will have to manually change each category.
•Import record has a category assigned but the,
•Assigned category does NOT exist in POSitive POSitive will create categories for each unique entry in the category field of the inventory import. All created categories will have the same pre-defined settings as determined by the POSitive Category Default. Global category changes to existing can be done later, but will require some extra effort.
•Assigned category does exist in POSitive. When an item is imported it will automatically take on the pre-defined settings of the category to which it is assigned. This is the most time saving and most accurate scenario available.
Each vendor must have a unique Vendor ID. Before importing inventory, consider importing Vendors or creating a vendor list. The vendor ID can then be included in the inventory import file and direct links.
1) Go to Maintenance: Import: Import Inventory.
2) Choose Add.
3) Fill in the following for the Inventory Importer
•Import Description. A text note to yourself describing the project.
•File To Import - Include the full path and file name of the prepared inventory file.
•File Type - Choose either comma or tab delimited as appropriate. If you do not get "rows" of information, switch to other type.
•Skip First Record When Importing - if the first record is title information, activating this option will not import it.
4) Click on the Display File button.
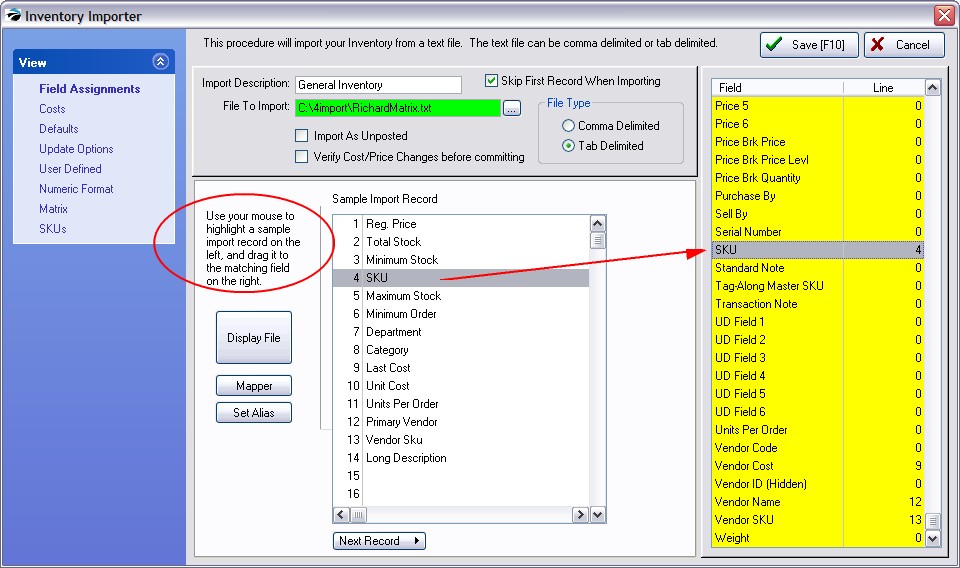
Cross Match.your data in the Sample Import Record screen with POSitive fields on the right. Your data is displayed on the left-hand side. POSitive link fields are displayed on the right hand side.
Use the mouse to DRAG and DROP from your data to POSitive. Highlight the line in your data, hold down the left mouse button and drag it over to the matching field in POSitive. In the example above, line number 4 is linked to the SKU field in POSitive.
Repeat the process until all necessary items are assigned.
NOTES:
• At the very least, SKU and Description must be linked.
•You may use a line number more than once. For example, Last Cost is usually used for both Cost and Vendor Cost.
•To unassign a line, drag from POSitive to your data and the POSitive line number will revert to 0.
Next Record - the Next Record button scrolls forward through the data to assure consistency. Press Display File to return to the first record.
SPECIAL NEEDS
For more information about Landed Costs, Importing Quantity Price Breaks and use of the Mapper and Set Alias, see Inventory Import Special Options.
You must activate these options or else costs and pricing will not be imported.
Click on the Costs View.
•A "First Time" import requires checking Update Costs and Update Prices. If you choose to Update Prices, pick which price levels will be updated. Later, you can ignore or use the fields as needed.
•If checked, pricing will be updated in the following order:
1) By matching the imported fields to the pricing field, and
2) By applying category markups.
In other words, if the import file does not contain the selling price (price1, price2), then the category settings will be applied used with the cost field to automatically calculate the pricing fields.
•If the import is designed to update items already in POSitive, then you can choose to update any or all of the six price levels.
*** Imported Price Includes Tax - (International Setting) check this ONLY if your selling price already includes tax amounts. Contact POSitive support for more information.
There is a required field here. Click on the Defaults View.
Make selections as appropriate. The information entered here will be applied to all inventory items being imported. If this is not wanted, leave it blank.
•Vendor ID - if all items being imported are from one vendor, then enter the vendor ID here, otherwise leave this blank.. (Remember to activate Add/Update Imported Items To Vendor Inventory List on the Update Options tab)
•Default Department - ALWAYS select a department and category. The department/category will only be used if the individual line item does not have a category assignment.
•Default Category - (filled in automatically when selecting department)
IMPORTANT: new categories to be created during the import will use the default settings of this Default Category.
If a record in your import file
• does not have a category field for the item, then it will be assigned to the Default Category set here.
• does have a category field for each item,
•and if the category does not exist yet, the newly created category will use the same settings as the one set here.
•but if the category does exist, then the new item will use the settings of the existing category.
Click on the Update Options View.
Choose an option from the first and possibly the second group depending upon your purposes.
Caution: Your import file may have a SKU listed which already exists in POSitive. Generally, the import file will overwrite existing information, whether you want it to or not. Be sure to select an appropriate option. If nothing is selected, the importer will not work.
•If item already exists in inventory, DO NOT UPDATE OR ADD
•If item already exists in inventory, UPDATE EVEN IF DESCRIPTION IS DIFFERENT
•Update item ONLY IF DESCRIPTIONS match; otherwise add as new item
IMPORTANT:
•Add/Update Imported Items To Vendor Inventory List - If you have included a vendor link in your import file, POSitive can automatically build the vendor inventory file as it imports the inventory items. In other words, if you want the imported items to be linked to the vendor, then this MUST be checked.
•Add Imported Items To Label List (Valid Only When Importing Stock Counts) - Printing labels for inventory being created is a common need. However, POSitive will need to know how many labels to print so this option is only valid when a stock count is included.
•Do not add if item not found This is designed to ignore inventory from a vendor, for example, which you choose not to stock. Typically, the vendor can give you a catalog of inventory in an importable file. This switch is used to update costs and pricing, for example, only on items already in POSitive and not add new inventory items.
These are OPTIONAL. see Inventory Import Special Options.
Click on the Numeric Format View.
Format of Prices / Costs - The price and cost fields of your import file must be consistent in the number of decimal places. POSitive can interpret three formats as displayed on the setup screen. Select one.
(Optional) Click on the Matrix tab.
Click on the SKUs tab.
•Auto-Create-SKU If Blank -
If AUTOSKU is activated in the category to which the inventory item will be assigned after import, then the AutoSKU rules and functions of the category will be used
In the event an inventory item is missing a SKU while being imported, checking this box will create one automatically. The new SKU created will be TS-xxx (xxx=next available number, TS=temporary SKU).
•If you really want POSitive to generate SKUs, your import file must not link anything to the SKU field on the right column of the Field Assignments tab.
•Leaving this box unchecked will cause POSitive to skip the item in the list and not import it.
•Delete Dashes in Imported SKUs - The hyphen is generally a recognizable character for barcode readers, but not always. You should test your scanner in advance to see if it can read the hyphens. If your vendor relies on the hyphen in the SKU, then set this option as UNCHECKED. POSitive will otherwise strip the hyphen out of the SKU as it creates barcode labels for the item. If you have questions, contact your dealer or POSitive Support.
Choose Save [F10] when you have finished. This will add the setup definition to a list and can be reused or modified in the future.
1) MAKE A BACKUP! Before performing the import, it is a good practice to make a backup of POSitive. If the results of the import are incorrect, restore the backup, make necessary corrections and import again. It is easier to restore a backup than to clean up messes.
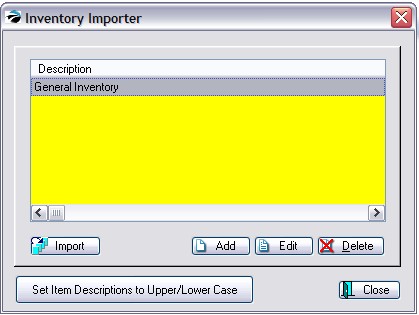
2) Go to Maintenance: Import: Import Inventory.
3) Highlight the desired import setup. You may choose to Edit the setup for review or modification first.
Note: you may have an unlimited number of Import Definitions, one for each vendor. Some people get regular inventory updates from vendors which are generally always in the same format, just a new file. Edit and select the new file, review the import options, save, and Make A Backup before importing
Set Item Descriptions to Upper/Lower Case - (Optional) this is primarily for cosmetic reasons. Some people prefer that the description of the inventory item use caps and lower case letters. If this is selected it cannot be reversed to All Caps.
4) Click on the Import button.
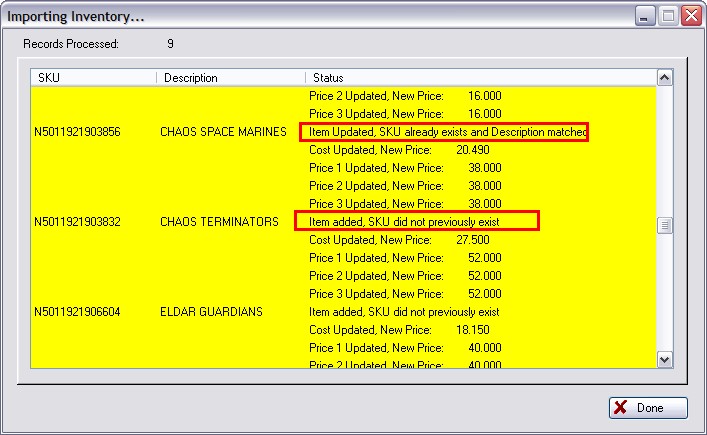
5) A data line will be displayed to show that the importing is in process. You will be notified when it is finished.
6) Check the imported data for accuracy.
When you are importing inventory, the display will include statements of item status.