Shipping Address |
  
|
Shipping Address |
|
Each customer account can have multiple ship-to addresses with one being tagged as a default ship-to address which will be used automatically unless otherwise selected.
These multiple ship to addresses can be accessed and edited directly in the customer record or while in the process of preparing an order, quote, or invoice.
Click here to view our How to Use the Ship To List video.
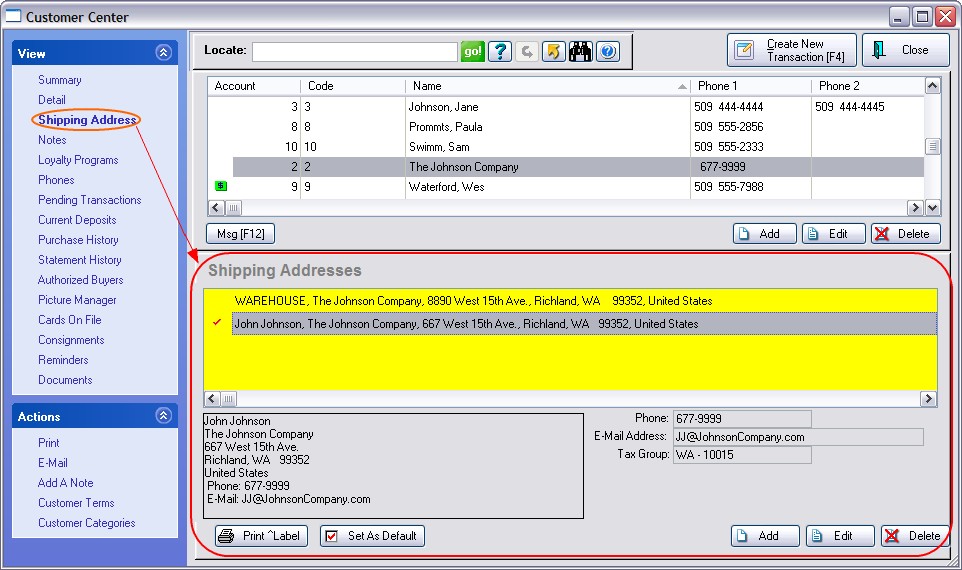
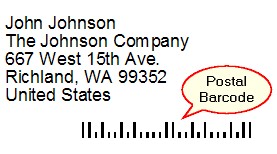
Print Label - You may print a shipping label for the highlighted entry. (Note: For this to function properly, you must first designate the label form for the ship to address in Maintenance: Station Settings: Printers/E-Mail: Printing Options: Customer Labels. Each workstation will need to be activated separately.)
The shipping label will print with a US postal barcode which is automatically generated from the zip code. You may edit the label form as needed by going to: Reports: Report Center: Actions: Customer Labels
Set As Default - While highlighting an address, this option will place a red check mark beside the address and thereby designate it as the shipping address to be used at all times unless otherwise specified.
NOTE: For practical purposes, you may set up multiple addresses while in an invoice, order, or quote by selecting the optional Invoice Button for Ship To (see Invoice Buttons) Otherwise, you can choose ADD, Edit, and Delete here to make necessary changes.
Some businesses who ship products and services need to charge taxes based upon the point of destination or delivery. POSitive handles this by assigning a customer an In-Store-Purchase ship-to address which will charge the local sales tax when products are purchased on premise and also an actual ship-to address with corresponding tax rates for use when products are delivered. The Tax Group is selected through a Lookup while editing the Ship To address.
Go to System Setup: Customers and activate "Tax Group Based On Shipping Address"
This Customer Shipping Addresses screen will appear when starting an invoice and/or when you attempt to change the Ship To Address.
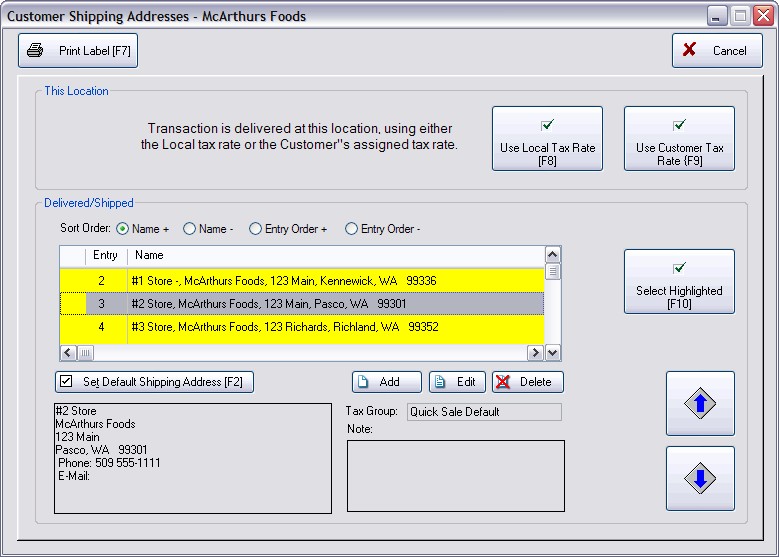
When creating an invoice and the customer is there to pick up products in your store, you would most likely use "Use Local Tax Rate [F8] button. This will apply the Quick Sale Default tax rate to items on the invoice.
The "Use Customer Tax Rate [F9] will use the tax rate setting in the customer record. (Note: it is possible that if your customer list was imported that the correct tax rate was not assigned. Before using this button, make sure that each customer is properly assigned to a tax group.)
If the product is being delivered or shipped and is not being picked up in your store,
1) highlight one of the Ship To Addresses listed. (The ADD button will allow you to create new ship to addresses. Be sure to select an appropriate Tax Group.)
2) please confirm that the assigned Tax Group (just below the Add, Edit, Delete buttons) is correct for this transaction. Choose Edit to make corrections as needed.
3) select the "Select Highlighted [F10]" button
4) add products to the invoice / order and process normally.
This will flag one of the addresses to be used as the primary shipping address.
For your convenience, if you have many ship to addresses for a customer you can sort this list by choosing one of the following radio buttons
Name + alphabetically lists in ascending order A-Z
Name - alphabetically lists in descending order Z-A
Entry Order + places the newest address first
Entry Order - places the oldest address first
If you are using a touchscreen, you can scroll through the list using these buttons.