Invoice Button Definitions |
  
|
| Show/Hide Hidden Text |
Invoice Button Definitions |
|
| Show/Hide Hidden Text |
The Invoice screen has a button bar at the bottom of the window. These buttons give you quick access to Pre-defined activities and specific SKUs which do not have a barcode, but are frequently sold.
The button bar consists of several rows of buttons and by pressing F2 you can switch between the rows of buttons. Most importantly, you may edit and design your own button bars.
An alternative to Invoice Buttons is a true touch screen interface or the use of Desktop Buttons. (see Maintenance: Definitions) |
Go to Maintenance: Definitions: Invoice Buttons to access this screen.
A) At the bottom of the screen choose an Invoice Type. (Your selection here must match your selection of Invoice Style on Station Detail: Invoice/Misc)
•Invoice screen layout suitable for computer stores, service stores needing detailed invoices
•Register - screen layout suitable for cash-carry, gift stores, etc. (all sets are blank)
B) Select a Button Row. In the upper left corner you can choose either a new row number or one you wish to edit.
You can now add pre-defined options to the button row, create a button which will sell a specific product, and color or otherwise modify the look of the button.
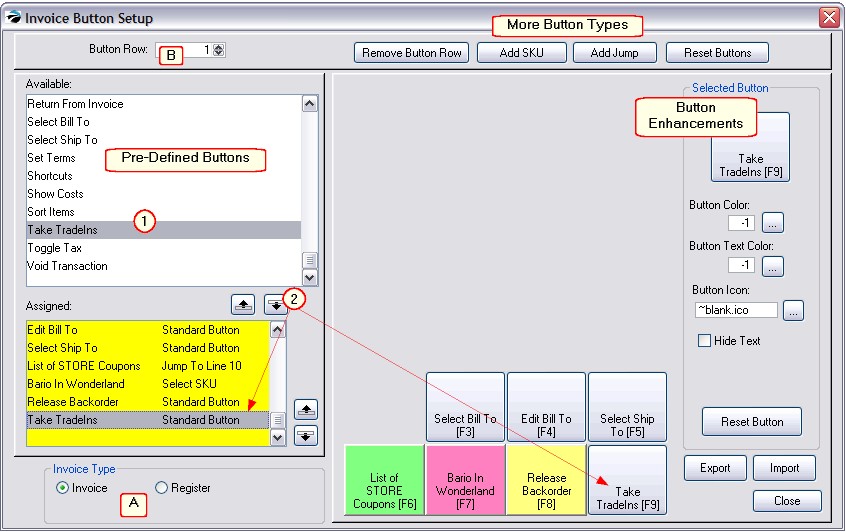
4) Highlight a function from the Available list on the left, press the down transfer button in the middle of the screen between the Available and Assigned lists The button will be titled automatically.
5) If you want to add a specific inventory item such as a Freight charge to a button, choose the Add SKU button at top center. Select an inventory item and enter a name for the button.
6) Reposition buttons as desired with the up and down buttons.
7) Choose Close when you are finished.
1) After choosing the Invoice Type and Button Row, HIGHLIGHT a pre-defined function in the Available list. (Listing of Predefined Buttons)
2) Click on the Down Transfer to Row button. This will simultaneously add the function into the bottom section and add a button into the stack of 7 buttons.
Note: There is a limit of only 7 buttons per button row. You may remove a button from the center by clicking on the UP Transfer Button, thereby transferring it back to the Available list.
3) (Optional) Use Button Enhancements to color the button, change font size, and font color.
1) highlight a blank button
2) choose Add SKU
3) enter or find the desired product
4) fill in the text you would like printed on the button
5) (Optional) Use Button Enhancements to color the button.
Because you are limited to just seven buttons per row, you may make one button jump to a different row of buttons which could be a collection of specific SKUs or functions.
1) highlight a blank button
2) choose Add Jump
3) enter the row number to which it should jump
4) fill in the text you would like printed on the button
5) (Optional) Use Button Enhancements to color the button.
6) BE SURE to go to the row and add buttons as needed.
Key Concepts
INVOICE TYPE - in the bottom left, you must choose the style of invoice you will be using for a particular workstation.
ROWS - up to seven buttons can be assigned per row. In the upper left corner you choose the row number to be defined or edited. Row number 1 is visible immediately upon opening the invoice screen.
AVAILABLE - a listing of functions which can be assigned to a button (see below for an explanation of each Function / Feature)
ASSIGNED - a listing of the seven buttons currently assigned to the button row.
To assign a button, highlight it in the Available list and choose the Down button to assign it. (Use the Up button to remove it.)
The position of the button can be changed by using the reposition Up or Down buttons.
REMOVE BUTTON ROW - Warning! this will delete the currently selected button row. There is no "undo" option. You should choose the Export button in the bottom right to make a backup before choosing to delete a row.
ADD SKU - a button can be used to add a specific inventory item to the invoice. You must first add a BLANK button to the button row, highlight the Blank, and then choose ADD SKU. You will be prompted to enter or find the SKU from your inventory list. You then enter the name of the product on the button to make it useful to the clerks. Can be used for labor charges, shipping, Gift Certificate or any other frequently sold product.
ADD JUMP - a button can be used to open a new row of buttons. You must first add a BLANK button to the button row, highlight the Blank, and then choose ADD JUMP. You will be prompted to select a row number and enter a name for the button. For example, create a button called "Drinks" that "jumps" to row 4. On row 4, put in buttons for SKUs for small soda, medium soda, large soda, and finally, add another button called "Main" that jumps back to row 1.
RESET BUTTONS - Warning! - The button bars will all be restored to a default set. Changes made WILL BE LOST. See EXPORT button to save settings first.
SELECTED BUTTON Enhancements - After selecting and highlighting a button, you may color the button, the button text, or assign a picture to the button.
•Click on the Button Color LOOKUP button. Select a color from the palette.
•Click on the Button Text Color LOOKUP button. Select a color from the palette.
•Click on the Button Icon LOOKUP button. You will need to create the images first before you can select them. We recommend you save these images in the ...\data2\images folder so that they are available to all stations using POSitive.
•Activate Hide Text if your Button Icon is self-explanatory.
•Use Reset Button to remove changes of this specific button.
EXPORT - saves all the button definitions in a file named INVBTNS.BTN in the C:\POSitive\PRM directory.
IMPORTANT: Be sure to Export before you make major changes. If you make some mistakes, you can restore the button list by clicking on the Import button.
IMPORT - loads all button list settings from a file named INVBTNS.BTN which must exist in the C:\POSitive\PRM directory.
Remove Button Row - erases all the content of a button row as selected in the upper left corner.
Reset Buttons - erases all buttons and overwrites it with a pre-defined set of buttons
Selected Button - the highlighted button is also displayed separately in the upper right corner. Here you can choose to change the button color, font size, and font color.
Reset Button - erases enhancements such as color and text font.
Export Buttons - creates a "backup" of your button layout into a file named INVBTNS.BTN. This backup allows you to make changes and restore the original if you don't like the changes you have made.
Import Buttons - finds the INVBTNS.BTN file and replaces all current rows and buttons with those previously designed and saved.
For an an alphabetical listing of the Pre-Defined functions or features which can be assigned to buttons see Pre-Defined Buttons.