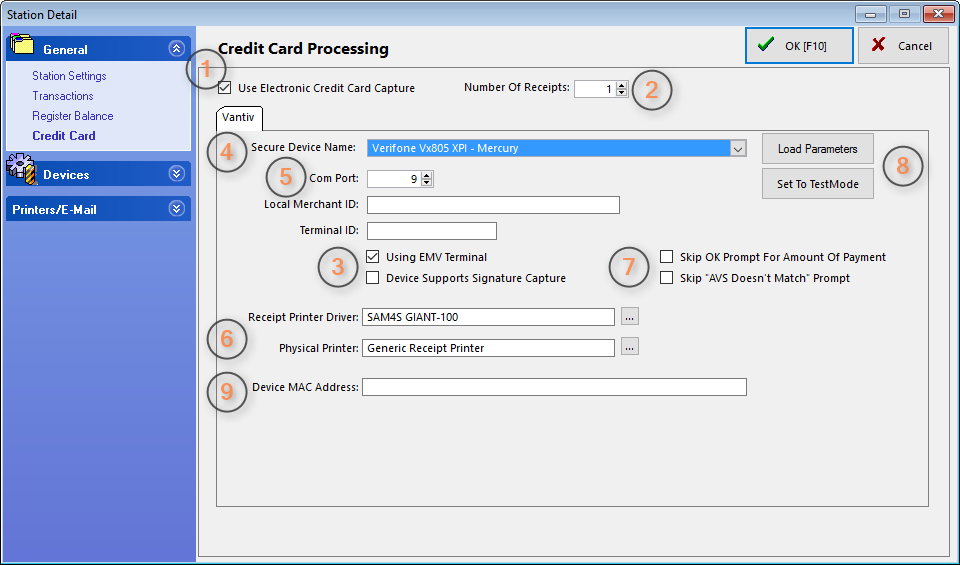
ADVANCE SETUP: Credit cards can be processed in POSitive by first preparing the Credit Card Setup under Management: Credit Cards: Setup.
Then the individual workstation needs to be activated.

Note: The settings show are for use with Vantiv, our preferred payment processor. (See: "Using Vantiv".)
1. Check this box if using internal credit card processing. If using a stand-alone terminal, this should be checked and all other settings may be left blank.
2. Select the number of receipts to be printed. Typically one or two.
3. If you are using EMV (chip card) payment devices, you must check this first. Also check if using a supported signature capture device.
4. Select the EMV (chip card) device from the pull-down list. Note: Only devices on the list are supported by POSitive.
5. Enter the COM port for your device. If your device uses Bluetooth or Ethernet, you still need to put a number in this field (any number between 1 and 9 will work). "Local Merchant ID" and "Terminal ID" are used with payment processors other than Vantiv. Contact your dealer or POSitive Software for more information.
6. If you are using a 40 column printer for receipts, enter the settings here. Otherwise, leave blank.
7. By default your credit card device will prompt to approve the amount of the transaction. You may skip this prompt by putting a check next to "Skip OK Prompt For Amount Of Payment". For card information that is entered manually, you may skip the Address Verification Service (AVS) prompt by putting a check next to "Skip "AVS Doesn't Match" Prompt.
8. "Load Parameters" is only used when setting up a credit card device for the first time. "Set To TestMode" is only used for special circumstances, and is typically used only by your dealer, or POSitive's support staff.
9. "Device MAC Address" is only used with specific credit card devices. Contact your dealer for POSitive Software for more information.