Navigation:  Key Concepts > E-Commerce >

PCLink

Previous pageReturn to chapter overviewNext page


This section describes our e-commerce interface called the POSitive Commerce Bridge for Magento (PCBM). The PCBM allows a near real-time connection between your POSitive software product and Magento Community Edition (free open source ecommerce software solution). Product uploads and order retrieval can now be automated, which will save you a lot of time.

 
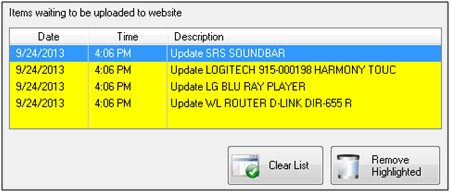
In short, the way it works is that a separate application (pclink.exe) runs out of your POSitive software product folder waiting for commands from your POSitive software product to upload inventory or retrieve orders.  As you go through this setup manual it will become clearer as to how this works.

 
Although the POSitive Commerce Bridge (or “PCBM” or “PCLink”) for Magento application is ready for use, please keep in mind that it is a work in progress and additional features may be added from time to time.


Prerequisites and Initial Setup


Latest Supported Release


First, you’ll need to be running the latest supported release of your POSitive software product.  Ask your dealer or POSitive support if you’re not sure what you have.  If you need to upgrade, be sure to backup your database and software first before proceeding.

E-Commerce Edition Setup


General Settings


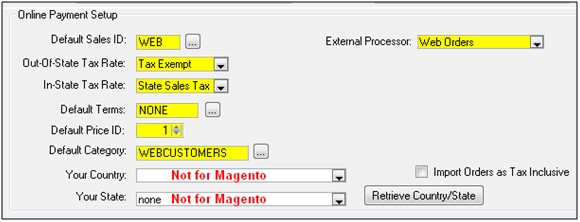
In your POSitive software product go to the E-Commerce tab > Web Store Setup > General Settings menu option under View on the left and select Magento from the Service droplist.  Next, you’ll need to enter an Account Name and the Web Site URL for your Magento web site.  To keep things simple just enter the same thing for both (e.g. “www.mymagentosite.com”.  If you are currently using another version of POSitive Commerce note any changes to your original settings, because you’ll need to change them back if you still need to upload products to your current Joomla/VirtueMart or Magento web site).  Next, enter the Encryption Key, SOAP User Name and SOAP API Key that we’ve assigned to you (The SOAP User Name and SOAP API Key are created and managed from within the Magento Admin page in System > Web Services > SOAP/XML-RPC – Roles.  See Web Services section later in this document).

Test Connection
 

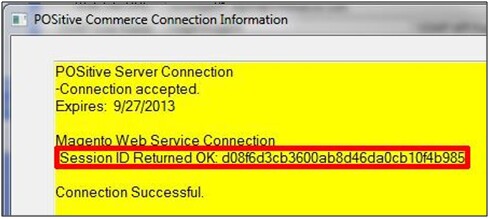
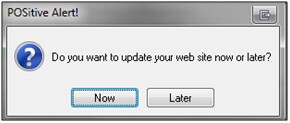
The Test Connection button confirms that the PCLink has been correctly registered with us.  After entering your information you might need exit completely out and restart your POSitive software product software application for the settings to fully take effect.  After clicking the Test Connection button you should receive a Session ID that looks similar to the one pictured below:

If you received a response similar to the image below, then check your settings and try again:

Setup PCLink.exe to Run Automatically
 

The PCLink runs separately from your POSitive software product and we recommend setting it up on a computer that is always on.  To setup the PCLink.exe, navigate Windows Explorer to your POSitive software product installation directory where you’ll find a file called PCLink.exe.  Create a “shortcut” and copy it into the Windows Startup folder (e.g. in Windows 7 - C:\ProgramData\Microsoft\Windows\Start Menu\Programs\Startup) on the computer you’ve selected, so it will run automatically if the computer is restarted.  When you first run PCLink you’ll be prompted to select your company when it starts.  Alternatively, you can edit the properties of the shortcut and include your company ID number.  For example, if you are running a single company on your POSitive software product, your company ID would be 1.  For example: “pclink.exe 1” (i.e. filename-space-numeral 1).

Once PCLink.exe is running you will see the globe tray icon in your Windows System Tray.  The PCLink will run in the background and handle the communication between your POSitive software product and your web store.

Running PCLink
 
Depending on your Web Store Setup, product information can be updated manually or automatically as it’s added or changed.  Orders will automatically be retrieved from the web site as they’re placed.  The PCLink maintains a running log of actions, as seen below.


Features & Setup
 

In the E-Commerce tab > Web Store Setup > General Settings menu option under View on the left  select the price level(s) you wish to display on your web site in the Features & Setup section.  By default, if you only use one price level, Our Price will automatically be filled in and only a single price will be displayed online.  If you want to show the List Price, but sell at a lower price, then you need to assign the appropriate selling price level to Default Shopper Group.  Magento will automatically display both prices based on the difference in pricing.


E-Commerce Edition Setup:  General Settings – Features & Setup

You can also choose to Use Long Descriptions and you will need to decide if you want to upload items that have zero stock count.  If you don’t track your stock counts on some or all items, leave that option unchecked.  Finally select the Currency.

Retrieve Orders Setup

Online Payment Setup

Select the E-Commerce tab > Web Store Setup > Retrieve Orders Setup menu option under View on the left.  When you enter a new customer at the register, certain information is automatically assigned, such as a sales person, tax rate, terms and price level.  Web customers may have their own defaults, which you select in Online Payment Setup section:

Default Sales ID:  This is the salesperson assigned to process your web store sales.

Out-Of-State Tax Rate:  This is the tax rate for out of state customers.

In-State Tax Rate:  Is the tax rate for in-state customers.  Even though PRM and VirtueMart support destination based sales tax, for simplicity we only have a single in-state tax default for web customers.  You may manually change the customer record once it has been saved.

Default Terms:  Customer payment terms.

Default Price ID:  The price level in PRM you wish assigned to web customers.

Default Category:  This is customer category you assign to web customers.

External Processor:  Designates the method of payment processing and we recommend creating a new tender definition for web orders.

Import Orders as Tax Inclusive:  You might need to consult your dealer or POSitive Support to learn more about this option.  It is not selected by default.

Monitor Options

Select the E-Commerce tab > Web Store Setup > Monitor Options menu option under View on the left.  This is where you’ll determine if product information will be sent to the site manually, automatically, or prompt you for a choice:

E-Commerce Edition Setup:  Retrieve Orders Setup – Monitor Options

-Do Not Update Site:  Select this option if you want to pick when your site is updated.  A list of items to be added, deleted or updated is created and can be edited before sending to the site (Select this option for now)

-Update Site Immediately:  Select this option to update the site automatically whenever you add, delete or modify an item.  For example, if you change pricing, the site will be updated within minutes.

-Prompt for Options: Whenever you make a change to your inventory, PRM will give you the choice of updating the site immediately, or waiting until you do it manually at a later time.

-PC Agent Options: Check For Orders Every (Option #1 Method):  You can set how often you want the PCLink to check the web site for orders in two places.

-The Enable Pop Up Alerts option activates a message that will pop up on the computer running the PCLink whenever an order is retrieved.

E-Commerce Edition Setup:  Retrieve Orders Setup – Monitor Options

PC Agent Options: Check For Orders Every (Option #2 Method):  The other method of setting this option is in the Settings screen of the PCLink application:

You have completed the basic POSitive Commerce setup for Magento and can start adding inventory to your Internet Inventory List and then send it to your web site.