Pole Display |
  
|
Pole Display |
|
A pole display or customer display device allows the customer to view the products and prices being purchased.
POSitive supports several brands of pole displays. Check with your local dealer for a current list and choose one which will best suit your purposes. Select one of the following or similar types.
Test The Display First
You should first test to make sure the Pole Display is functional as described in the owner's manual. Turn off power to the pole display and turn power back on. It will run through a self test and display it's standard setup. If it does not look like it is functioning properly, refer to the manual and/or the manufacturer.
Pole Display Setup
•Use Pole Display - If you are using a pole display on this computer, this setting must be checked.
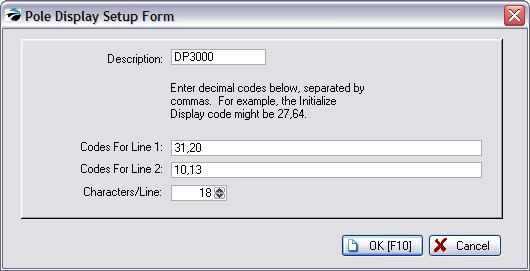
•Pole ID - Defining a pole display means to enter the manufacturer's codes for activating the 1st and 2nd lines of the display. Contact POSitive support for assistance.
How to define a pole ID
1) Select or create a Pole ID
•Click on the Lookup button to the right of the ID number.
•Highlight an undefined entry and choose Edit
•Enter a description (model number of the pole display)
•Enter codes for lines 1 and 2 as provided in the pole display manual.
•Enter number of characters per line (typically 18).
For example, a Logic Controls model DP3000
2) Pole Display Port - Choose the port to which the pole display will be attached.
3) Enter your messages on Pole Line 1 and Pole Line 2
Message Lines - When the pole display is not showing products and prices, you may choose a greeting or message for display. The message can be changed as often as you wish. The length of the message is dependent upon the brand of pole display.
Pole Line 1: Welcome To
Pole Line 2 Blink's Video Store
4) Click the Test button and watch the display. If it works, then you are finished here. If nothing is displayed consider selecting a Pole Printer.
Pole Printer - (Not Required except when the printer is plugged into a USB port instead of a COM or LPT port or for other special scenarios such as a pole display plugged into a receipt printer.)
Test Button - Sends a signal to the pole display to confirm that settings are correct and to display the message lines.
If the test is NOT successful, turn off the power (unplug) on the pole display, wait 10 seconds and plug the pole display in again. The pole display will go through a self test. Then try the Test button again.
A pole display is usually two lines of text with the description on the top line and the quantity and price of the item being sold on the bottom line. You may customize what information is displayed by selecting an element, a line, starting position and length.
Advance Setup
First, make the pole display functional using the instructions above.
Activate Use Custom Layout
Line: 1= top line 2= bottom line
Position: (1-20) Starting character position (some pole displays only use 18 characters)
Length: number of characters to display
Example settings pictured below results in the following pole display information
Line1 Description Price
Line2 Qty Total Price
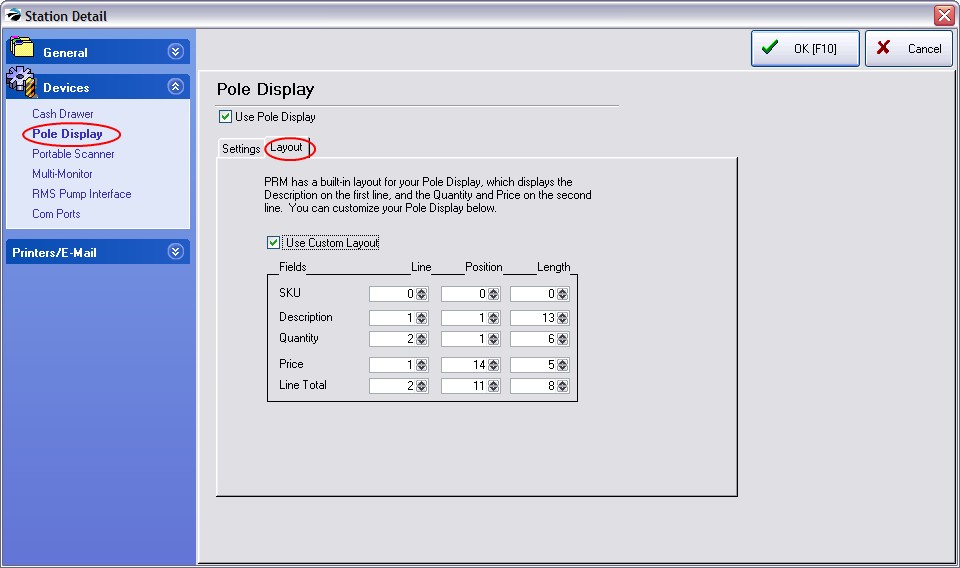
line-1: 0,0,0
line-2: 1,1,13
line-3: 2,1,6
line-4: 1,14,5
line-5: 2,11,8