One Of A Kind Trade In |
  
|
One Of A Kind Trade In |
|
The trade-in item becomes a normal inventory item and can be modified much like any other inventory item. However, accepting more like items, does not affect the stock count of any similar item, but instead adds another separate inventory item.
For example, if you accept an item named "Special Widget" the SKU will be a unique number and the stock count will be one. If you accept another identical item, the name could also be "Special Widget" but the SKU will be a different unique number and the stock count will also be one. There is no provision for combining the two as one inventory item with a stock count of two. (see Trade-Ins and Used Items for an explanation of other options)
Feature |
One Of A Kind Item |
Notes |
•Automatically assigned a SKU by POSitive |
Yes |
The SKU is generated with a number followed by a hyphen and the letter T (for trade-in) |
•SKU can be changed |
Yes |
The SKU can be replaced or amended by using Inventory Center: SKU Management |
•Can re-assign item to a different category |
Yes |
Highlight item and under Actions of the Inventory Center choose Change Dept/Catg |
•Can make the item Active or Inactive |
Yes |
Edit the item, and under Options tab uncheck "Item Is Active" |
•Can adjust the cost of the item to reflect labor charges or other enhancements |
Yes |
Edit the item and choose Change Cost. Optionally, could be part of a template which includes labor and parts applied |
•Can change the selling price |
Yes |
Edit the item and change the selling prices |
•Item can include or exclude sales tax calculation |
Yes |
Assign the item to a category which is set to charge or not charge tax |
•Can edit the description, add transaction note, tag-alongs, and other POSitive functions |
Yes |
Edit the item. Use other features under Stock Management |
•Can be deleted from your inventory |
Yes |
Highlight the item and choose DELete. Deletion is permanent and cannot be "undone." |
•Can be assigned a special "Used Item" label |
Yes |
Edit the item and on the Options tab select the label form |
•Assignment of item "condition" |
No |
n/a |
1) Create a category named TRADE-IN and set the category taxation to Non-Taxable. (It is important that the category name be hyphenated, but does not have to be in all caps.)
Taxation: Trade-ins are usually non-taxable, but depending upon your state tax laws, a trade-in can include or exclude taxes. If you choose an exempt tax rate, then the trade in will not deduct taxes from the overall purchases on the invoice.
DO NOT set markup percentages, rounding, GL account numbers, AutoSku, nor any category defaults.
Note: A trade in item is assigned to the TRADE-IN category only temporarily. Once you are ready to process it, assign the item to a different category and apply that category's defaults.
2) Make sure that Maintenance: System Setup: Inventory: Trade-Ins (Used Items) is totally blank; all options must be off.
ACCEPTING A TRADE:
Create an invoice. Press CTRL-T and fill in the form. Process the invoice. Sell additional product if you wish.
Edit the newly added inventory item and set pricing. In addition, you can change the SKU adjust the cost for your efforts to fix it up, and move it to a new category.
RESELL ITEM:
Add the item to an invoice. Stock count will be reduced to zero (0).
Creating A Trade In
1) Open an invoice for a customer. (NOTE: the transaction MUST be an invoice. It does not work or any type of pending transaction.)
2) Press CTRL-T on a blank line.
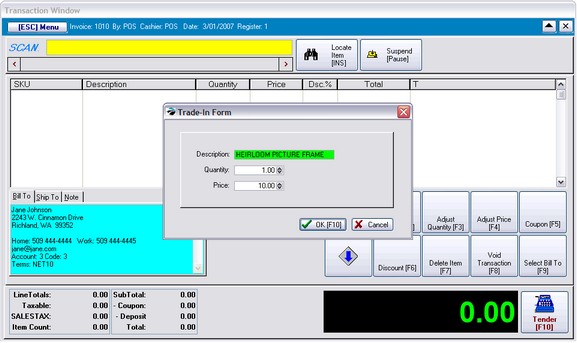
3) Fill in the appropriate fields:
Description - a description of the item being accepted.
Quantity - number of items of this type being taken in on trade.
Price - the credit value of the item.
4) Press OK [F10]. The item will be added to the invoice. The value of the trade-in will become a credit amount to be deducted from the invoice purchases or paid to the customer.
5) Add any other transactions to the invoice and compete and process the invoice.
Once you have created a Trade In item through a customer invoice, the item is added to the Inventory Center as an "Unposted" inventory item which needs to be edited. The SKU will be a number followed by the letter T. In this example it is 34-T.
Notice also that there is no selling price for the item yet.
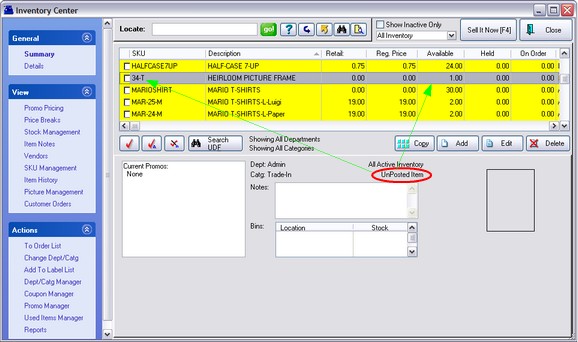
1) Go to the Inventory Center
2) To find the Trade-In item, click on the letter "U" to display UnPosted.
The SKU will be a number followed by the letter T.
3) Edit the item and make adjustments to Cost, Selling Prices, Description and SKU and re-assign it to a specific category (select Change Dept/Catg) to make it ready for resale.
4) Choose to Save and exit.
The Stock Management view reveals some helpful information.
•Invoice - the invoice number of origin
•Received - date of invoice of origin
•PO Number - will always say Trade-In
•Name - customer's name who gave you the trade in
•Cost - the value you allowed for the trade in
•Stock - quantity taken in trade
The trade in item is now your property and is sold as any other inventory item.
After this one of a kind item is sold, you could delete it so that it will no longer show in your inventory list. This is a permanent removal and cannot be recovered.
Or you could change it to Inactive to hide it from view. (Click on the General tab and uncheck Item Is Active)
If the purpose of accepting the trade-in was to close the sale and you have no intention of reselling the item, you may delete it.