Inventory Labels Editor |
  
|
Inventory Labels Editor |
|
How To Edit An Inventory Label
1) Go to Report Center: Inventory Labels
2) Select a Label on the "Standard" Tab
3) Click on the Edit button. If the label is "UnDefined" you will be prompted to give it a name.
The label editing screen consists of 4 basic areas and tools.
The white area is the label printing area
Buttons and menus surrounding the white are are tools for formatting the label.
Preview (floating window) for seeing on screen what the label will look like as you design it.
List Of Variables (floating window) for selecting contents to be printed on the label.
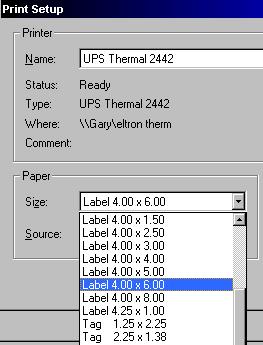
4) Choose the Label Size.
Go to Project pull down menu and choose Page Setup.
Click on the Printer Selection tab.
Click on the Choice button for the "Printer Page Independent" printer.
Select the correct Printer.
(Note: You must have the printer and printer driver installed under Windows.)
VERY IMPORTANT: Select the correct PAPER SIZE.
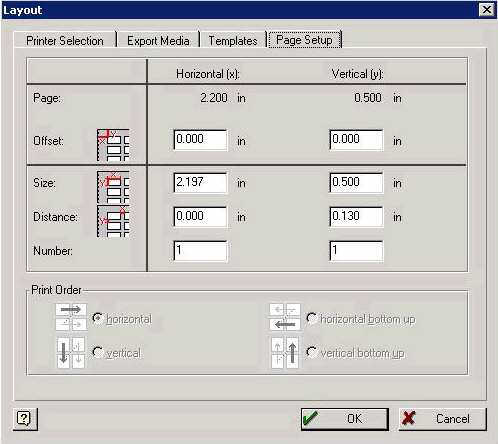
5) Adjust the Print Area Dimensions
Select the Page Setup tab of the Layout window. You will likely need a ruler to measure the true dimensions of the label and the backing to which the label is attached.
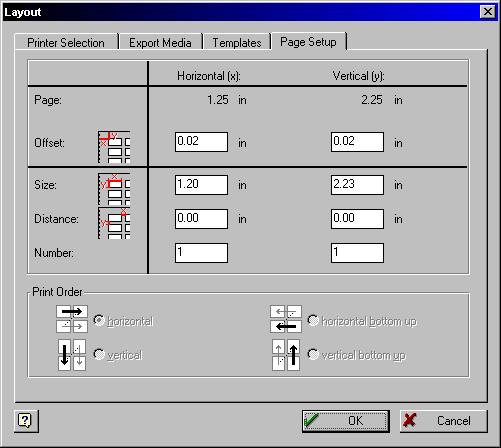
Horizontal (x) Vertical (y) (refer to red illustrations)
Page the dimensions of the page of labels
Offset the distance between the edge of the backing and the label
Size the dimensions of the label itself
Distance the distance between labels (often 0.00)
Number number of labels per row and rows per page
Choose OK. If the settings do not add up to the label size, you will be notified that there is a mistake and you will need to make adjustments.
6) Select and Arrange Print Elements
Each print element is contained in a small box. The box can be sized and the contents formatted for font and orientation.
After setting the label size in the previous step, you are returned to the layout. Remember that the white area is the print area. Note that in the following example, the boxes extend beyond the label area. They will have to be resized and the contents modified.
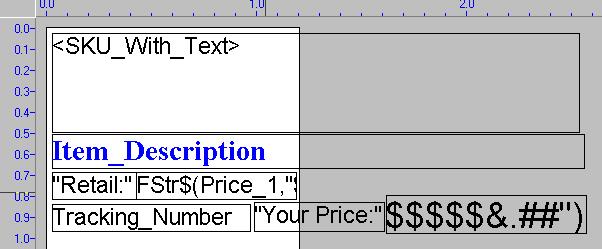
To Delete An Element
Click on the box and press the DELete key.
To Add An Element
Find the desired element on the "List Of Variables" window. (If you cannot see it, go to View: Windows: Popup Variables.)
Click and Drag the variable to the white area. This will automatically create a box.
Resize and modify the contents.
(Note: it is recommended that the box NOT extend to the edge of the print area; leave a bit of a margin around the box.)
How To Modify the Contents of a Box
RightMouseClick on the box. Choose Properties.
You will be able to edit the font and orientation of the contents.
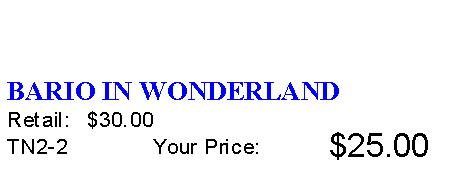
7) Preview and Print
You may use the Preview window to see how the label will look. If the contents of some boxes is blank, review the size and contents of the box.
You may print a sample label by going to File: Print Sample Without Frames.
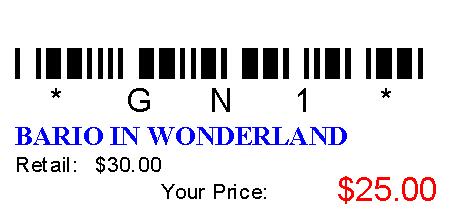
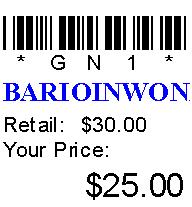
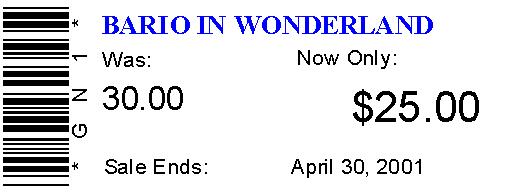
Here are some sample labels.
8) Save the Label
DUMBELL LABEL FORMAT
The following information only applies to Eltron/Zebra brand dumbell labels
RULES
The SKU must be of a restricted size to fit on a small dumbell label.
Specifically, 8 characters only. (not 6, not 7, not 9, ...)
The characters of the SKU can only be numbers; no alpha characters.
Barcode symbology must be 2.5 Interleave
AUTO SKU SETUP
It would be to your advantage to let POSitive automate the generation of SKUs. This is a two step process.
*** Edit MASTER category ***
You need to enter a starting number for AutoSKU.
Go to Utilities: Category Defaults
Edit MASTER
On the AutoSKU tab choose
Automatically Create SKUs
Fixed Length = 8
Set Sequential Number at 100 or whatever
Pad SKU with "Leading Zeros"
Leave all other settings at "Nowhere"
*** Edit EACH CATEGORY ***
Go to Utilities: Categories
Choose the Defaults button
On the AutoSKU tab choose
Automatically Create SKUs
Fixed Length = 8
Use Sequential Number From Master
Pad SKU with "Leading Zeros"
Leave all other settings at "Nowhere"
Repeat the above for each category for which you will be using dumbell labels.
DESIGNING DUMBELL LABELS
Follow basic directions above.
Barcode symbology MUST BE 2.5 Interleave
The barcode should be defined as .5 inches long.
Here are the Layout proportions
Note: for this style of label note that the Distance setting cannot be 0 and 0 otherwise the printer will not feed correctly.