Departments |
  
|
| Show/Hide Hidden Text |
Departments |
|
| Show/Hide Hidden Text |
A department is the top classification level; above categories. A department signifies a major section of your store which can be broken down into smaller segments called categories.
But categories are ultimately more important because they do SO MUCH.
Before proceeding, please take a few moments to better understand What Categories Can Do and how Master Category Defaults work.
Click here to watch our Department and Category setup video.
Click here to watch our How to Change Departments and Categories video.
How To Use Department Manager
A department groups one or more categories into a reporting unit. From this window, you can create an unlimited number of departments and assign categories to those departments.
You may add, edit, and delete departments by choosing Departments under the Maintenance master menu. Here you will also assign categories to specific departments.
The entry, UNASSIGNED, is for catching lost categories. If there are categories listed below it, they have not been properly assigned to a valid department. How?
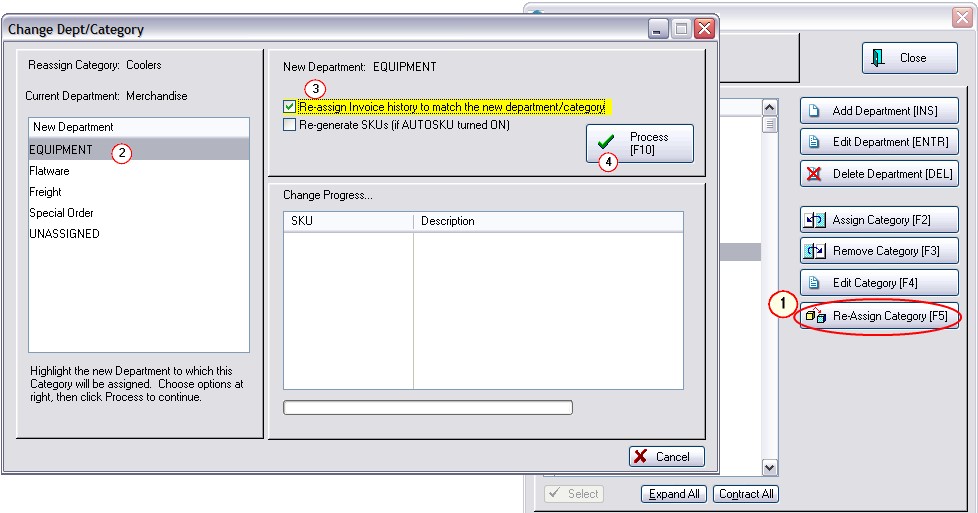
1) After highlighting the category, choose the "Re-Assign Category [F5]" button 2) highlight the desired department to which this category is to be assigned. 3) TIP: Activate "Re-assign Invoice History to match the new department/category." This will make sure that sales reports by category will include transactions made prior to this re-arrangement of categories. 4) choose Process [F10]
|
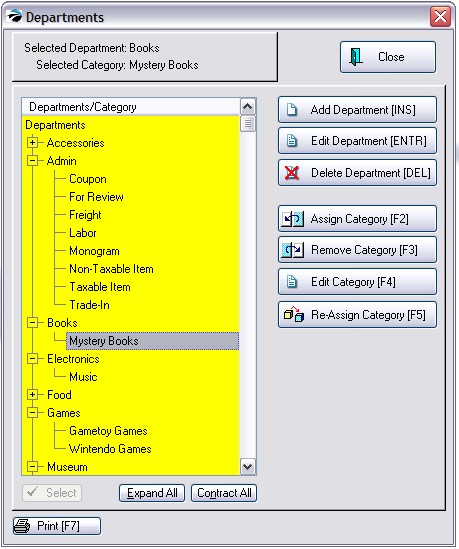
The listing of departments and categories is done in a "tree" format. The + in the box indicates there are categories not being displayed.
The buttons Expand All and Contract All will affect all departments and categories.
By clicking on the + or on the - in the box you will expand or contract the list respectively.
There is a System Setting: Inventory that automatically contracts all Departments upon opening this Departments screen.
Prints a listing of departments and categories.
1) First, highlight a department, then click on the Add Department button.
2) Enter a department code. The code can be any combination of numbers and letters. Note: The department list will always be sorted by the description.
3) Enter a description.
4) (Optional) You may assign a code for AutoSKU. This code can be included in an automatically generated SKU for the item. See AutoSKU Setup. Note: Most users find this option impractical. Because you cannot have both a Dept and Category SKU assigned to an inventory item, the Category SKU has proven to be more useful.
1) Highlight the desired Department.
2) Select the Assign Category button. This opens the Category Listing.
3) Highlight the desired category and choose Select.
NOTE: You can assign a category to more than one department. This is intentional because you can do a report on a Department/Category, or just a Category.
For example, if you stock shoelaces in the Shoe department, and also in the Children's department, you would want to know the total sold from the Shoelaces category. It would then show you how much sold from each department.
If a category is to be assigned to a different department, first highlight the category.

(1) Click on Re-Assign Category [F5]
(2) On the left, select the new Department
(3) Activate the option "Re-assign Invoice History To Match The New Department/Category" This function will edit the invoice history table so that when you run a report on sales of the item it will be reported in this new department/category instead of the old one.
(4) Choose Process [F10] - A listing of all items affected by the change will be displayed.
If there are any inventory items currently assigned to the category you will not be able to remove the category.
1) Highlight the category.
2) Click on the Remove Category button.
If you are unable to remove the category because there are items assigned to it, go to Inventory List. Choose Dept/Catg Filter [F8] and select this category.
All items assigned to the category will be displayed. Click on the General tab at the bottom of the Inventory List and choose "Change Dept/Catg for the highlighted item. You may tag multiple items to assign them to a different category.
Note: You will not be deleting the category from POSitive, you will just be removing the link to the department. If you want to totally erase the category, go to Utilities: Categories, highlight the category and choose Delete. You will then be given further options as described in Category Listing.
At some time you may want to rename and re-arrange departments and categories in POSitive to make them more functional or expressive of relationships. This is especially important to do if you will be utilizing POSitive's e-commerce feature.
You should always
1) make a plan - know what you want to accomplish -
You should have a good understanding of the relationship of departments and categories. You should also create departments and categories with the "customer" in mind. If a new customer comes to your web page, what will help the customer find the desired products most efficiently?
2) make a backup of POSitive - if you make a mistake you will want to restore the backup
3) make time - the process will require POSitive to be out of use, so you will need to do this when no one else wants to use POSitive. Each category change could take several minutes to do, depending upon the size of your inventory.
Re-defining the Department List and the associated Categories needs to follow some simple steps so that the inventory items are properly linked to the new departments.
First, consider the options of what can be done on the Department List. After reviewing your current Dept/Category structure you may decide to....
1) Rename A Department - the categories under the department are fine, but the name of the department needs to be changed.
2) Keep The Department, but Remove Some Categories From It -
3) Add A New Department - to the new department you will want to assign or re-assign some categories
4) Delete A Department - the department is no longer useful. (OK, but be sure to follow correct procedures, otherwise it may not do what you thought it would.)
The categories under the department are fine, but the name of the department needs to be changed.
Open the Department List. (Utilities: Departments)
Highlight the Department Name and choose Edit.
Type in the new name for the department
Choose OK.
You will be prompted to confirm the change being made.If you choose OK, your computer will read all your inventory files and make the appropriate changes. This will essentially freeze the computer from doing anything else.
The department name is good, but some categories need to be removed or more categories assigned to it.
To remove a category, highlight the Category and choose the Remove Category button.
You will be prompted to confirm the removal.
1) make sure the category is first removed from any other department. (Exception to the rule: you may want the category to be assigned to multiple departments.)
2) highlight the department name and choose the Assign Category button.
3) the category list will be opened. Find the category and choose Select. (If the category does not exist, then you would first choose ADD, define the category, and then select it.)
4) you will be prompted to confirm re-assignment of inventory items.
NOTE: this means that only inventory items, which for some reason or another, belong to the category, yet have no department be assigned to this department link. This would indicate that the category and some items are already a part of another department and the department is still in the active list.
To create a department, click on the Add Department button. Enter a code and a Description. Remember that the description will be viewed by visitors to your web page and should be easily understood.
You will then want to assign categories to the department.
Highlight the department name and choose Assign Category. Follow steps as described previously.
Choosing to delete a department simply removes the name of the department from the list. The categories are not deleted, nor are the inventory items assigned to the categories.
IMPORTANT: You MUST remove a category from a department FIRST, even if the entire department will be deleted.
For example, if you plan to remove the entire department called GAMES, the two categories Gametoy Games and Wintendo Games must be removed first. (see first picture)
WARNING: If you simply highlight the department and choose delete without first removing the categories, then ALL inventory items associated to the categories ARE NOT automatically changed and will be wrong until EACH is manually corrected.