|
AR Payment |
  
|
| Show/Hide Hidden Text |
|
AR Payment |
|
| Show/Hide Hidden Text |
Accepting Payment Towards Accounts Receivable
Full or partial payments can be received towards outstanding invoices. The AR Payment window will display a customer's outstanding invoices listing the oldest invoice first. Generally, payments are made towards the oldest invoices first, however, you can choose to apply payments to specific invoices and also use specific store credits for specific invoices.
Handling Multiple Checks: POSitive does not allow for multiple checks to be recorded in the same transaction. If a customer has mailed you multiple checks, do not attempt to enter the total of all checks. Process each check payment separately. If you choose to use Unapplied Credits in payment, process that payment separately from any other payment.
Click here to watch our AR Payment Processing video.
1) Choose the Take Payment button and select the customer. Note: this button can be found in several places: 1) on the Transactions main menu, 2) on the Accounting: Payments main menu, 3) on the Customer Center: Summary view, 4) while viewing AR Detail for the customer, and 5) while invoicing and selecting the Take Payment Invoice Button. After the customer has been selected, this opens the AR Payment screen. 2) Highlight an invoice to be paid or select Auto-Pay under Actions which will apply payment to the oldest transactions first. 3) Press Enter. The full amount of the invoice will be entered in the Payment field. If only a partial payment is being tendered, change the amount to the actual amount being paid, 3) Press F10 to process or Take Tender. 4) You will be prompted to select a payment type, cash, check or credit card. 5) When you are finished, a payment receipt will be printed. (see Station Settings: Printers/Email: AR Receipt) |
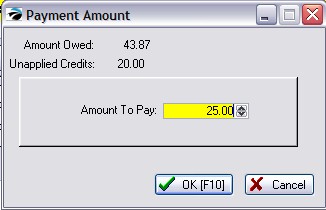
There is a simplified method for taking AR Payment more quickly. This is often chosen when using Touchscreen mode. By default it will always pay the oldest invoices first and does not provide any options normally available on the AR Payment screen. (see below) This is a setting per station, therefore only some stations will use Fast AR Pay and others can continue with the more flexible processes already described. SETUP Go to Station Manager: edit the station, and choose Transactions: Misc tab. Activate the option "Use Fast AR Pay" OPERATIONS 1) Choose the Take Payment button and select the customer. Note: this button can be found in several places: 1) on the Transactions main menu, 2) on the Accounting: Payments main menu, 3) on the Customer Center: Summary view, 4) while viewing AR Detail for the customer, and 5) while invoicing and selecting the Take Payment Invoice Button. After the customer has been selected, this opens the Payment Amount screen.
2) Fill in the EXACT amount being paid and choose OK [F10] 3) You will be prompted to "Confirm AR Payment," and then given the opportunity to select the tender type for the payment. Do not mix Unapplied Credits with additional payments in cash, check, or credit card. 4) Complete the process and print a customer receipt. |
How To Accept Third Party Payments
When AR statements are sent out, the third party (Finance Company) will be billed for the customer purchases. The statement will identify the customer and the charges. The third party will then send you payment in the name of the original customer. Payment is accepted towards the Finance Company. Find the Finance Company in the Customer Center. Choose Take Payment. |
How To Use Unapplied Credits To Pay AR Charges
Note: using unapplied credits MUST be done as a separate transaction and not in conjunction with other payment types such as cash, check, or credit card. 1) Choose the Take Payment button and select the customer. 2) Highlight the invoice to be paid, choose Enter Payment button, and enter only the amount of the unapplied credit to be used. 3) When you press Take Tender [F10] you will be notified that the customer has credits and asked again how much of those credits are to used. Then continue with the payment process. |
How To Use a Specific Store Credit To Pay A Specific AR Charge
SETUP |
Explanation Of Screen Layout
In the AR Payment window you see the following information and options.
Customer Name - to assure that you are viewing the appropriate customer.
Payment Post Date - Today's date, but you may choose an earlier date if you are trying to match the customer's date on the check to the payment date.
Unapplied Credit - The amount of store credit owed to the customer. The amount displayed here can be used in payment of outstanding debts. The Unapplied Credit amount comes from using the Advance Pay feature, from a refund after returning product, as an award through Frequent Buyer, or because of a manually entered credit transaction in the AR Detail screen. Refund Credit To issue this store credit to the customer as a refund, you can choose to sell a gift card for the amount or issue a check as payment. Go to Management: Check Refunds. Add the customer and enter the value of the store credit.
Total Due - The sum of the Balance amounts listed in the listing of debts.
Total Paid - The sum of payments being applied when the tender is processed. This amount will equal the amount entered under Auto-Pay, or it will be the sum of the entries in the Payment column above. This will be 0.00 until you use one of the options described above to take AR payment.
Outstanding Debts Listing - A list of all open transactions are listed. For each open invoice the following information is displayed.
| • | Transaction - This is usually the invoice number. A reference number for other than an invoice may be generated by POSitive under special circumstances |
If the field is blank, it could come from a manual entry into the customer's AR Detail screen. |
| • | Type - CHG = charge FIN = finance charge |
| • | Date - the date of the invoice or transaction |
| • | Terms - the term of payment assigned to that invoice or transaction |
| • | Due Date - The date payment is due in full according to the terms of payment set when the invoice was processed. |
| • | Original - Amount of the original charges. |
| • | Paid - Amount of payments received towards this invoice if the invoice has not been paid in full. |
| • | Disc. Taken - automatically applied discounts generated by the Terms of Payment. To remove this discount value, choose "Enter Discount" and enter a negative amount to offset this value. |
| • | Discount - Amount of a discount applied towards this invoice. It would have been entered using the "Enter Discount" button in the lower right of the screen. (see explanation for Enter Discount below) |
| • | Balance - The amount currently due for the highlighted invoice. |
| • | Payment - The amount being applied towards the balance due of the highlighted invoice. |
Invoice Number - The invoice number of the highlighted transaction is displayed in the bottom left to serve as a reminder.
BUTTONS
Enter Payment - The Payment field of the highlighted transaction will be filled in with the balance due. TIP: Simply pressing Enter on the transaction will do the same thing.
Enter Discount - Before processing a payment, you may choose to enter a discount on the highlighted transaction. Your reason for discounting could be as a reward for early payment, as an incentive to pay off a long overdue bill, to offset accrued finance charges, or any other reason.
1) Click on Enter Discount.
2) Enter a dollar amount to be deducted from the total of the transaction.
NOTE: this discount must be used immediately as you receive a payment. Making an entry here will not be retained for future use. As an alternative, you could manually add a store credit as the discount value and apply it at any time in the future.
3) When payment is made towards the invoice the discount amount will be deducted from the total due.
NOTE: The way to reverse discounts applied in error is to select the Enter Discount button again and enter 0.00.
Take Tender [F10] - After you have tagged and/or determined the amount to be paid on which invoice(s), press F10 to accept the payment and indicate the type and amount of payment tendered. (see Confirm Payment)
ACTIONS
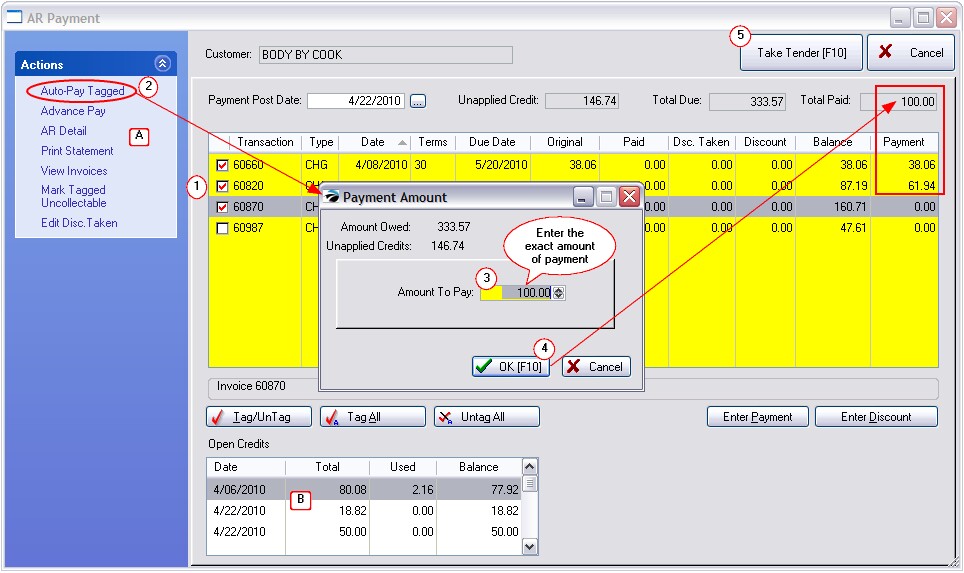
Auto-Pay Tagged
A) This SmartFeature will distribute the total payment received over the oldest invoices until the balance is fully distributed.
(1) Click on Auto-Pay.
(2) POSitive will prompt you to enter the total amount of the payment. (If the customer is paying with multiple checks, do not combine checks or tender types. Process each one separately.)
(3) Choose OK [F10]. Payment will be applied to the oldest, top-most, invoices first. If there is a balance remaining it will be applied to the next oldest invoice, and so on.
(4) Press Take Tender [F10] to confirm payment is being made and then enter the tender type and print a receipt.
Advance Pay
This SmartFeature accepts payment in advance of a purchase. When a purchase is finally made, the funds are already available as store credit to tender payment. This option is especially useful in youth camps or other institutions where frequent exchanges of money is discouraged.
1) Click on Advance Pay. POSitive will prompt you to confirm that you want to initiate an advance payment.
2) Enter only the amount to be applied as advance payment. For example, if you are tendering a $100 check but only making an advance payment of $90, enter 90.00 because it is the amount to be applied as advance payment. If the cash or check is OVER the planned advance payment, you will be prompted with the amount of change to make.
3) Highlight the tender type.
4) Press Enter and the amount of the advance payment will be entered. If necessary, change the amount to the actual amount being tendered.
5) Press Enter to process the transaction.
6) You may choose to print a receipt or not.
7) Change due the customer will be displayed. Select OK. POSitive will then close the AR Payment screen.
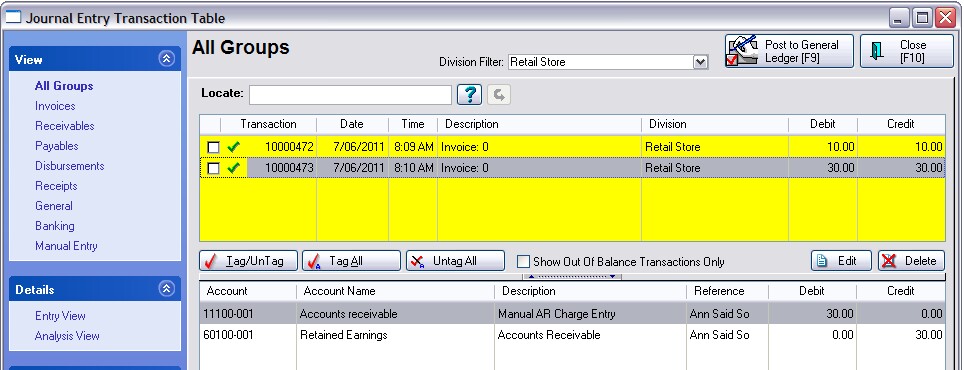
Note: The advance pay credit will be displayed in the Unapplied Credit field at the top of the screen when this screen is opened again. General Ledger Entry
A general ledger entry will debit the Accounts Receivable account and credit the Retained Earnings account. Before posting, you could choose to reassign the credit entry to some other special account number. (Note: to find such advance payment transactions search for invoice number "0".)
|
If an Advance Pay needs to be refunded see: Refund Advance Pay
Other Actions
AR Detail - Opens the complete list of AR Transactions. (see AR Transactions)
Print Statement - will print an AR Statement for this customer only.
View Invoices - will open a filtered list of Invoice History showing invoices for this customer only.
Mark Tagged As Uncollectable - If you have determined that you will never be able to collect this debt, or if you want to nullify the charges, you may mark a transaction as uncollectable. It will be removed from the customer list and reported to the Uncollectables report.
Note about Taxes: marking an invoice uncollectable does not automatically alter your sales tax report nor does it give you a tax credit, but there is a method to do so. see Steps
1) Highlight the transaction 2) Click on Mark As Uncollectable. You will be prompted to confirm your choice. 3) If you answer yes, the transaction will be flagged as uncollectable and displayed as such just above the Auto-Pay button. The next time you enter this dialog box, the transaction will be removed from the list. The AR statement will no longer list the transaction nor is any mention made that it was marked uncollectable. It will be included in the Uncollectable Debts Report accessed through Accounting: AR Reports: Uncollectable Debts.
Getting a Tax Credit You should consult with your bookkeeper about how to report uncollectables in your state. If you still want to reduce the sales taxes paid, After following the steps for Uncollectable (because this gives you a report you can file and recall as often as needed), create a return invoice for the customer. 1) Go to the customer center and highlight the customer 2) Choose "Purchase History" on the left 3) On the right, highlight the original invoice. 4) Choose the "Return" button. 5) Tag ALL items on the invoice 6) This will place all items in a new invoice with a negative status and with a refund due the customer. 7) Choose Tender. 8) You will be prompted to select a REASON for the Return. Select one which says "Will NOT Be Returned To Stock" 9) On the Tender Screen, since you do not want to really credit the customer or affect your cash in the drawer, choose Gift Cert [F3] button at the top of the Invoice Tender screen. 10) Enter a unique number such as "Invalid001" 11) Answer YES to create the Gift Certificate. Answer OK to apply to Gift Certificate.
NET RESULT Your sales taxes will be reduced for this reporting period. It will all balance out in the long run. You can run a sales tax report for today and you will see the negative amount for sales tax.
ADDITIONAL CLEAN-UP Inventory 1) Go to Purchasing: Returns From Customers. 2) Find and Tag all the entries associated with the return invoice you had created. 3) Because you are not getting your property back, you do not want to adjust your current stock counts. Choose DISCARD under Actions at the right. This will remove the return items. 4) You can then go to Transactions: Reports: Inventory Reports: Items Discarded to get a printout of the items removed.
Gift Certificates 1) Go to Management: Gift Cards. 2) Find and Highlight Invalid001 gift card 3) Choose to Delete the entry. (Delete button at the top of the screen, not the History Delete button.
|