|
Standard/Cost Format |
  
|
| Show/Hide Hidden Text |
|
Standard/Cost Format |
|
| Show/Hide Hidden Text |
You may modify the invoicing screen which the sales clerk views while creating an invoice, order, service order, layaway, etc. This is a global setting for all workstations; change it at one computer and it will be changed at all computers.
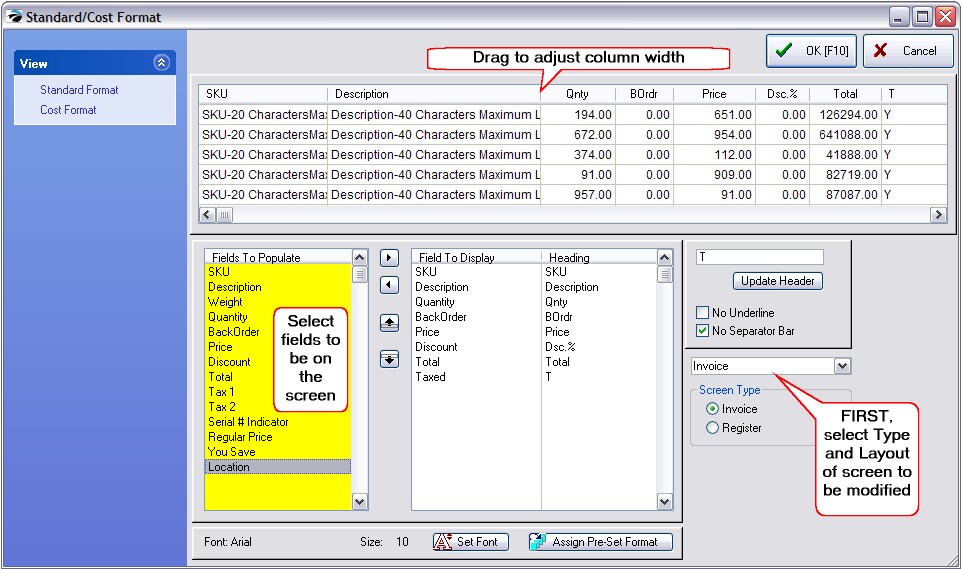
To open this screen editor, go to Maintenance Definitions: Invoicing: Invoice Layout
This opens a Standard / Cost Format screen. which is also known as the Transaction Screen Editor. This window allows you to customize the way the Invoice, Order, Quote, etc. appears on the screen as you are preparing a transaction. Screens
If you want to standardize all the screens, be sure to edit each on and make the necessary changes. Invoice |
TWO IMPORTANT REMINDERS
• |
There are two types of screens: Register Style and the classic Invoice Style. Before making modifications, you should explore both types to determine which is best for your business needs. |
• |
Changes made here do NOT affect paper printouts in any way; this only modifies what is viewed on screen while creating the transaction. To change printouts, see Report Designer |
Before Editing
The first step is to identify which type of screen needs to be edited, then determine the fields to be displayed, and finally set the width of fields being displayed.
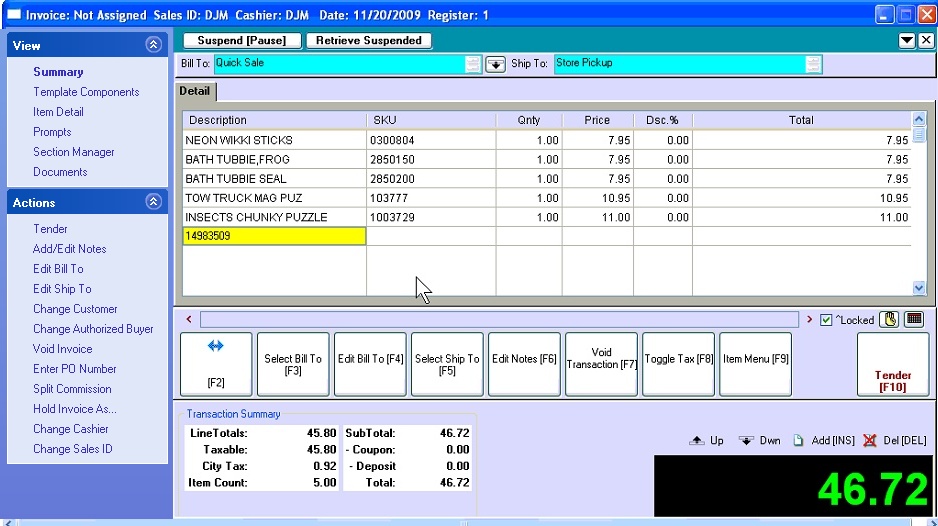
SAMPLE
In this sample, the screen has been changed so that the description is listed first and then the SKU. Note that one still enters the SKU in the first column, but after pressing Enter the line will be displayed as desired. Not shown is the ability to use a larger font size and use fewer columns.
A SAMPLE EXERCISE
Currently, the Register style invoicing window does NOT display a column showing backorder status. In this exercise we will add that column and teach some editing principles used in making other changes..
How To Display Backorder Status On The Invoice Screen
1) Go to Maintenance: Definitions: Transaction Screen and choose Go.
2) In the bottom far right corner, choose the type of Transaction (Invoice) and Type of Screen (Register) to be edited.
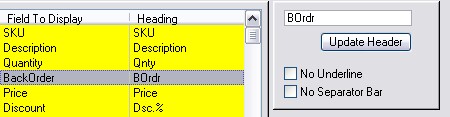
3) Highlight BackOrder in the "Fields To Populate" section at the far left.
4) Click on the Transfer Right button ![]()
5) Highlight the transferred item in the "Field To Display" section.
6) Click on the Position Up button ![]() to place the BackOrder entry below the Quantity entry. (see below.)
to place the BackOrder entry below the Quantity entry. (see below.)
7) While still highlighting BackOrder, type the word BOrdr in the field at right (above "Update Header" button). This will be the column title on screen and it is best to have it short.
8) Choose OK to save your changes and exit the Transaction Screen Editor.
If you wish, you may make additional changes. But first, BACKUP POSitive so you can restore the data if you make a major mistake.
Fields To Populate - This is a list of fields which can be displayed on the screen. choices
|
Field To Display - This is a list of fields currently being displayed on the screen. They are added or removed from the Fields to Populate section.
Heading - This is the column title for the field. The column title can be changed by typing in the white field at upper right. Abbreviations may be necessary.
How To Add/Remove Fields Displayed On Screen
1) Highlight the field (either in the Fields To Populate or in Field To Display lists)
2) Click on the ![]() or
or ![]() buttons to transfer the item from one list to the other.
buttons to transfer the item from one list to the other.
3) Reposition the field with the up ![]() arrow or the down
arrow or the down ![]() arrow.
arrow.
--- Cost Format---
The Show Cost Format is the invoice screen as it will be displayed when you change to "Show Costs" while viewing the invoice, order, or quote. You will find on the Invoice Button Bar an option to show costs which will display the contents of this screen.
Note that this layout is basically the same screen layout, but with a Cost field in place of the Backorder field, and a Markup percentage instead of the Discount percentage field.