|
Invoice # as Barcode (Other Thermal Printers) |
  
|
|
Invoice # as Barcode (Other Thermal Printers) |
|
Printing Barcodes on Receipts with a Epson, Samsung or
POS-X Thermal Receipt Printer and POSitive
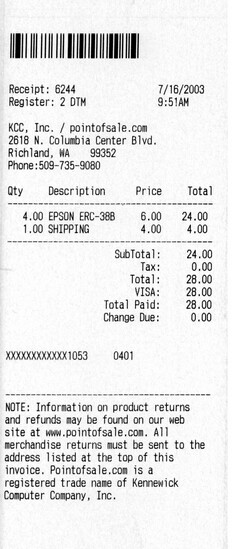
By using the Transactions Report Editor in POSitive, you can add a barcode to your receipts that will print if you use a Epson (or compatible) thermal receipt printer. In our example, we’re going to print a barcode that represents the receipt number at the top of the receipt.
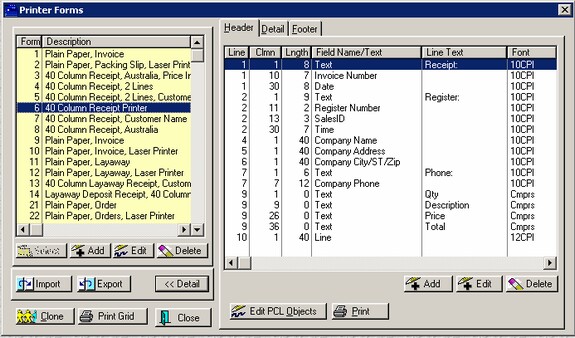
First, go to File, Editor and Transaction Report Editor. Find the 40 column receipt you use. In our example, we’re using form 6, “40 Column Receipt Printer”. We don’t allow you to edit the properties of POSitive’s standard forms, so we’re going to copy or clone form 6 and create a new form. Click on the form to highlight it and press the Clone button in the lower left corner of the window.
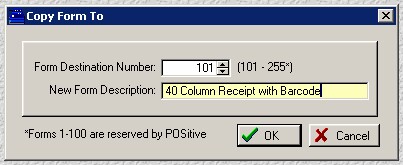
Give the form a new number, which must start at 101 or higher, and a description. In our example, we’re using “40 Column Receipt with Barcode”, and click OK. Be patient, it will take a minute to create the new form. Once it is finished, the new form will be automatically highlighted and we can now edit it.
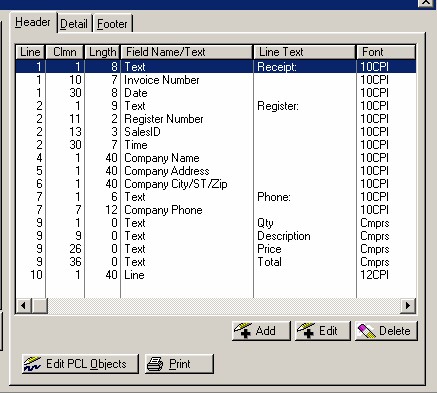
One the right side of the Printer Forms screen, you should see our example above. This is the layout information for the form. In order to print a barcode containing the receipt number at the top of the form, we’ll need to insert a command line at the top. Click on top line to highlight it and then right click on it and select Shift Down. Line number 1 and all the lines that follow it will automatically be renumbered. Next, click on the Add button.
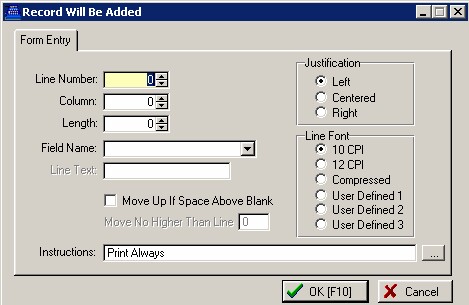
This screen is where we enter the commands to make the barcode print at the top of the invoice. We’ll be using this window four times.
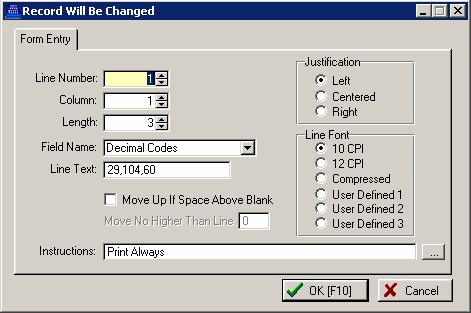
First, enter 1 for your Line Number, 1 for the Column and then scroll through the list of Field Names and select Decimal Codes. Enter 29,104,60 for the Line Text. Next, enter 3 for the Length. All the other options are left alone. Click OK. By the way, the last number of the string, 60, determines the height of the barcode.
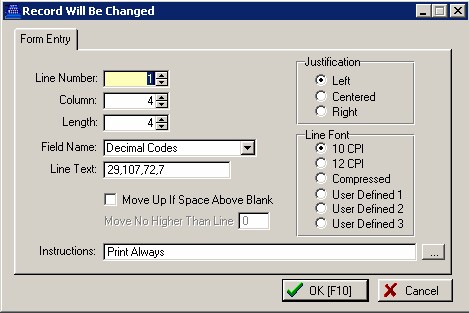
Click the ADD button, and we’ll start on the next set of commands. Enter 1 for your Line Number, 4 for the Column and then scroll through the list of Field Names and select Decimal Codes. Next, enter 29,107,72,7 for the Line Text. Finally, enter 4 for Length. Click OK.
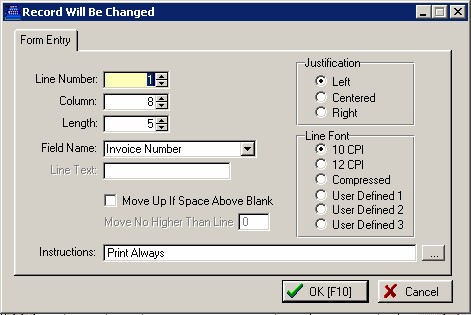
Click the ADD button, and we’ll start on the third set of commands. Enter 1 for your Line Number, 8 for the Column and then scroll through the list of Field Names and select Invoice Number. Now, the next step is VERY important. The number you enter for Length must match the number of digits you use for your invoice number. You may want to consider using 5 or 6 digits for your invoice numbers. In our example, we’re using 5. Once you’ve entered the correct number, click OK.
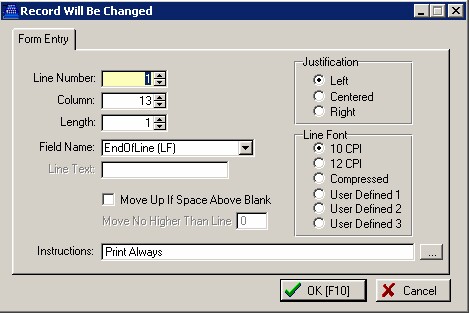
Finally, click the ADD button one last time. Enter 1 for your Line Number. Column is determined by adding 8 to the number of digits used for your invoice number. In our example, we’re using 5 digits for our invoice number, so Column is set to 13. Next, set Length to 1. Last, scroll through the list of Field Names and select EndOfLine (LF). Click OK.
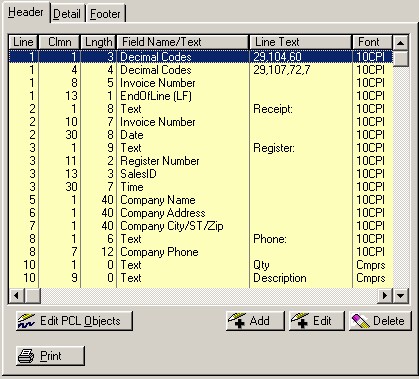
Ok, we’re done! Check your layout in the Printer Forms and it should match our example above. Click the Close button at the bottom of the Printer Forms screen to save your work.
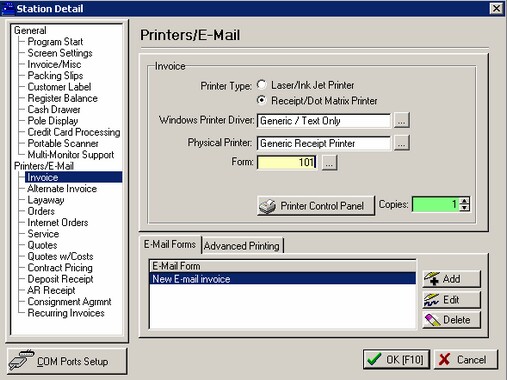
One last thing. Go to your Station Settings, Printers/E-Mail and Invoice and change your form number to 101. To test, reprint a receipt and you should see a barcode printed at the top.