POSitive will support up to 4 decimal places for these numbers.
Pricing Decimal Places - The number of decimal places to display in the price field. Choose 0 (zero) if you never sell fractional quantities. Two decimal places is recommended; use of 3 or 4 is impractical.
Quantity Decimal Places - The number of decimal places to display in the quantity field. Two decimal places is recommended; use of 3 or 4 is may be necessary.
Cost Decimal Places - The number of decimal places to display in the cost field. Two decimal places is recommended; use of 3 or 4 is dependent upon your inventory costs.
Basis For Price Markups
POSitive calculates selling prices with markups over cost. The cost of an item can be defined in four ways. Choose the definition of cost which will best suit your business needs. (See Cost Examples)
Cost - Cost is the price you pay for the item from the vendor.
Average Cost - Average Cost is the sum total of the costs of items in stock divided by the number of items in stock.
Each time an item is ordered, the true cost of the item is recorded. If the cost of an item changes from purchase order to purchase order, then an average cost would be more reflective of the item cost.
The average cost is based directly upon the number of items in stock. The downside of average costing is that within hours you could see the 'cost' of an item change dramatically because, as items are sold on a FIFO, first in first out, basis, the cost of the item will vary.
Landed Cost - Landed Cost is the price you pay for the item from the vendor plus a proportionate amount of the shipping charges on the purchase order. The shipping charges are distributed based on the weight of each item, the cost of each item or the number of items. If you select Landed Cost or Include Landed in Average be sure to activate Calculate Landed Cost Based On in System Setup: Purchase Orders: Receiving POs (see Purchase Order Defaults).
Include Landed in Average - Include Landed in Average Cost is of the same dynamics of Average Cost but with the addition of proportionate shipping charges. Include Landed in Average Cost is also subject to the same downside of average costing.
Notes:
| • | Your selection here, no matter which costing method you select, will affect the selling prices which are based on a markup or margin over cost. It will also affect profit reports. |
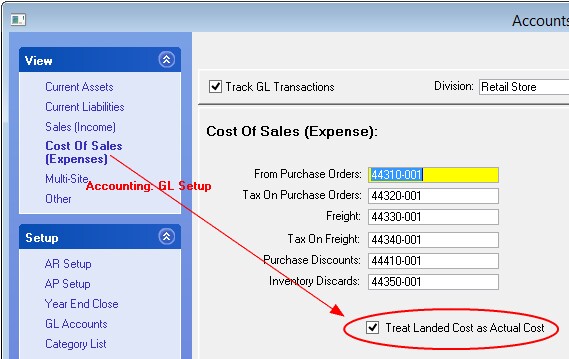
| • | If you choose Landed Cost, you MUST also activate "Treat Landed Cost as Actual Cost" in Accounting: GL Setup (see GL Setup option) |
|
Use Current Cost If Cost Is Zero When Verifying - To prevent misreporting of profits, if stock items have inadvertently been listed without a cost, then the Current Cost of the item will be used. Also known as Last Order Cost on the inventory definition screen.
Price In SKU Setup - Also known as Random Weight or UPCB. Define the structure of a barcode which will include a price or weight in the barcode. This option is often used in retail stores which sell products by weight. In the packaging process the scale prints a barcode with the price embedded in the barcode. (see Price In SKU Setup)
Price Descriptions
Price levels are titled. If there is no title, then there will be no access to the field when editing an inventory item.
You may use up to six different pricing levels in POSitive. Your titles can be codes or descriptive titles such as Retail, OurPrice, Wholesale, Club, Employee etc.
Title each price level you want to use.
Price 1: AQ List (Recommended) The AutoQuote List Price of the item is helpful as a base price especially when some customers get a discount off on AQ List.
Price 2: (Example: Wholesale, Discount, Club, Employee
Price 3: etc.
Default Quick Sale Price Level - Of the six available pricing levels, select the one which will be used for Quick Sale - Walk-In Customers.
Default Customer Price Level - Of the six available pricing levels, select the one which will be used for your Customers By Name.
Be aware that these titles can appear on inventory price labels so the names should be appropriately worded. These price level names will also be displayed on your web page if you are using POSitiveCommerce and in inventory definitions, in customer setups, and on various reports.
IMPORTANT NOTE: Do Not Skip Levels - All price levels must be sequential without skipping any levels. In other words you cannot activate levels 1, 2, and 6, skipping levels 3, 4, and 5. If you try to do it, level 6 will not be functional for invoicing purposes.
The actual selling prices for these price levels are determined by the inventory being sold, the category markup percentages, and the customer's assigned price level.
Tip: If you find a need to sell product to yourself for your own consumption or for other reasons, create a price level named Cost and choose no markup for this price level.
Tip: Even if you never sell at Retail, you may want to include it anyway. You can design your inventory price labels to show both the Retail price and the Our Price levels so that customers will know they are getting a bargain when shopping at your store.
Tip: Experienced users of POSitive suggest that only one price level be used. Then, apply special discounting for employee purchases through the use of coupons, permanent discounts, and other discounting options.
Item Code - "See Item Code (Cost Disguised As An Item Code) in Customer Item History"
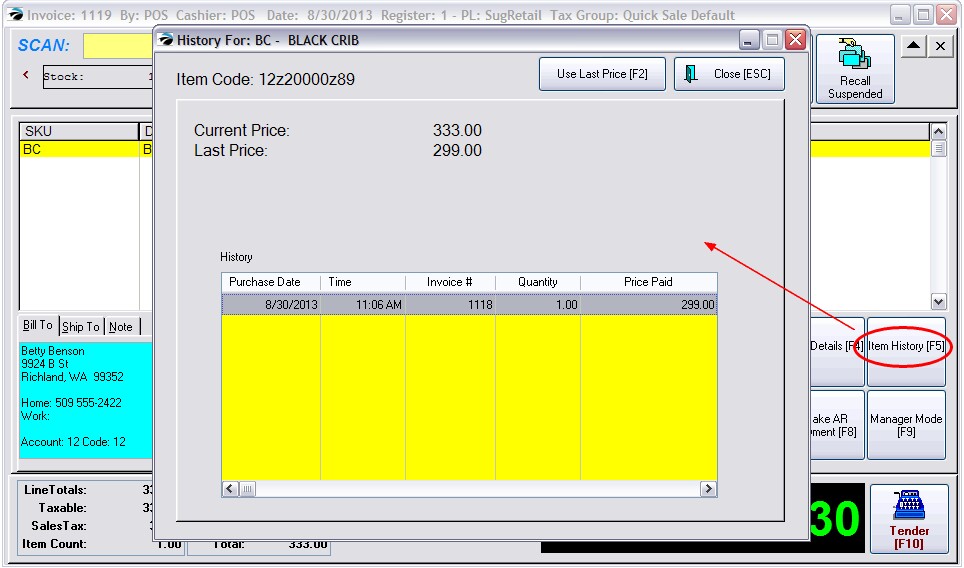
This is a setup feature for an Invoice Button named "Item History." The purpose of "Item History" is to give the sales person information about the customer's previous purchases of this one highlighted item. While in an invoice or pending Order, highlight the item and choose the "Item History" button on the Invoice Button Bar. (see Sample Item History )
|
Item Code
The Item Code is a disguised "Last Cost" of the item so you can know your cost before you change the selling price of the item. In the above example, the cost is $200.00.
The "disguising" of the last cost is done by adding a prefix and suffix of your choice. Go to Maintenance: Inventory: Pricing tab. Activate the option "See Item Code In Customer Item History," and add a prefix and/or suffix. The use of numbers and letters (upper/lower case) is allowed.


