|
Accepting Customer Returns |
  
|
| Show/Hide Hidden Text |
|
Accepting Customer Returns |
|
| Show/Hide Hidden Text |
Customers have many reasons for wanting to return purchases. To keep the customer happy, you want to quickly identify what is to be returned, how much money is involved, and, most importantly, tag the item so you can reshelve it or return it to your vendor for credit or replacement.
STEPS FOR PROCESSING A CUSTOMER RETURN
In short, return items are added to an invoice with a quantity of minus 1 (-1) which triggers a refund. The invoice is processed and the inventory is then moved back to the shelf for resale or sent to the vendor or dumpster.
To assure that all things are handled properly, the follow steps explain procedures and options.
Step 1. Create A Return Invoice
The first step is to create an invoice. The invoice may be either a cash sale or a customer sale invoice, but depending upon your settings in System Setup, you might not be able to do returns on a cash sale invoice. On the Transactions master menu choose the Returns button. -- OR While in an invoice press CTRL-R (for Return) |
Step 2. Find The Original Invoice
When processing a customer return, you will be asked for the original invoice number and then mark the specific item(s) to be returned. Linking to the original invoice is the optimal method for handling returns. If you know the original invoice number... Enter the invoice number from the customer's receipt. This assures that the correct items and true selling prices are being used. If you do NOT know the original invoice number... Select one of these options
|
Step 3. How To Select Items To Be Returned
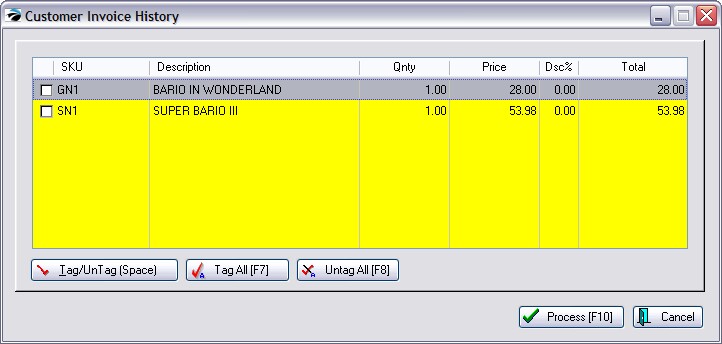
After you have selected the customer's original invoice all inventory items on that invoice are displayed on a Customer Invoice History screen. Select only the item(s) being returned.
1) All items on an original invoice are listed. ALERT: Watch for pricing exceptions. In all cases, you will need to review the original invoice and look for Discount or Coupon entries which would affect the refund amount. Sale prices will be automatically accounted for, but discounts and coupons may be automatically factored in. 2) Highlight and tag each item to be returned. You may press the Space bar to tag or untag an item. The Tag All [F7] and Untag All [F8] will speed up the process. 3) Choose Process [F10]. 4) The item(s) selected will now be listed on the new invoice with negative quantities and dollar values. There is also a reference to the original invoice number at the top of the list. How To Select Just One Of A Multiple Quantity Purchase If only one of a multiple quantity is being returned, select the item anyway. For example, the customer purchased 3 of an item but only 1 was defective. You will be asked how many are being returned. Once the item is on the new invoice, you may change the quantity field on the return line if necessary. Selecting An Item In a Package If the return item was originally sold within a Package (see Packages) then it is especially important to link to the original invoice. The value of the refund is a calculated value based on the purchase price of the entire invoice. (see Templates) |
Step 4. Enhance The Invoice (OPTIONS RELATIVE TO RETURNS)
Add Other Items To The Invoice (Optional) You may add other items to this invoice, either as a replacement to the item(s) being returned or as additional sales. The credits and charges will offset themselves. How To Charge A Re-Stocking Fee (Optional) If your store policy is to charge a restocking fee for returned items, you may do it in one of two ways. Percentage Fee - Press Enter on the item being returned. In the DSC% field, enter a percentage such as 15.00. The extended price will be reduced by 15%. Flat Fee - Add the RESTOCKING FEE inventory item (which has been done as an Advance Setup.) Edit the entry to add a Price proportionate to the value of the item being returned. How To Issue A Customer RMA Number (Optional) Hold Invoice As An Order. A return invoice assumes the customer is returning the item at the time of invoicing. If the customer will be bringing in the return item at a later time, then you should convert this return invoice to an Order or start the return process from a new customer Order. The Order number will serve as the customer's Return Merchandise Authorization number and the customer should write that number on any packages being sent to your store. When you have physical possession of the returned item(s) then convert the order to an invoice and complete the invoice. |
After all items for return and/or purchase have been added to the return invoice, press F10 to complete the invoice. |
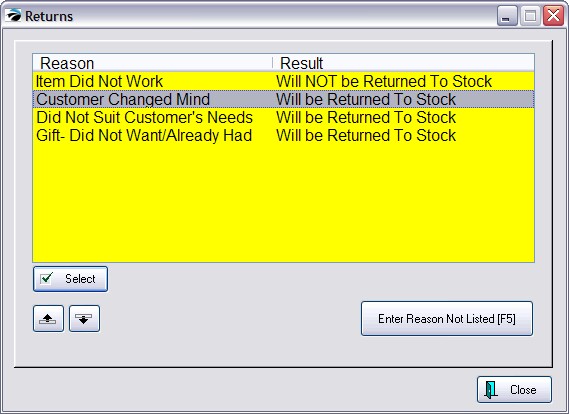
Step 6. Select A Reason For The Return
Selecting a reason is important. The reason selected will help others of your staff determine what to do with this returned item. This list of reasons can be edited by management. See Reason For Return.
|
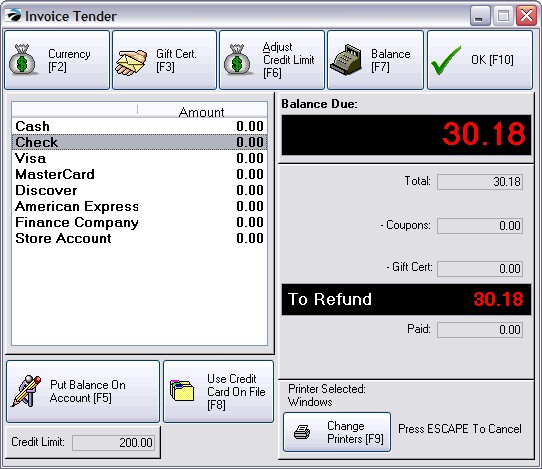
Step 7. Choose A Method Of Refund
If you still owe the customer money you will see an amount in the upper right corner To Refund. You may choose any of the refund options listed. Your store policy will dictate whether or not you will pay out by cash or check or credit card. NEVER select Finance Company.
Depending upon the method of refund you select, various screens will appear. Cash - Highlight and press Enter to Fill in the Amount. The cash drawer will open and you will be expected to remove the amount from the drawer. Check - Highlight and press Enter to Fill in the Amount. You will be prompted on how the check is to be issued.
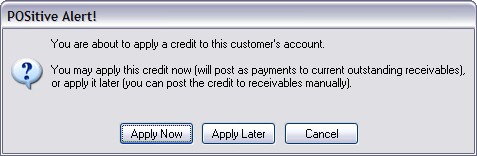
Credit Card - If the purchase was made by credit card, you will most likely want to refund the charged amount to the card. Highlight the appropriate card and press Enter to fill in the amount. A credit card needs to be present, stored as a “card on file”, or the number otherwise provided by the customer, such as read over the phone. Gift Certificate - Choose CANCEL and return to the invoice. Sell a Gift Certificate at the value of the refund and process the invoice. See Gift Certificates. Store Account - It is to your advantage to apply the refund towards future purchases rather than to pay out by cash or check. Later, any unused store credit can be refunded by check. Press F5 to place the amount on Store Account.. If the Credit Limit field (lower right) is 0.00, first press F6 to adjust the credit and then press F5 to put it on account. Press Enter to process the invoice. You will be given two options.
--- NOTE: This feature can be simplified to always accept one or the other in Station Settings. Apply Now - The refund amount will be applied automatically towards the original invoice. If you would like to control to which AR invoice the refund is credited, choose Apply Later, and then apply the Unapplied Credit to the invoice of your choice. Apply Later - The customer's account will be credited and flagged as an "Unapplied Credit." This unapplied credit can be used as an AR payment or towards the customer's next purchase. When the customer makes another purchase, the clerk will be asked if the credit should be applied to the purchase. The clerk may answer yes or no. If you wish, this unapplied credit can be refunded by a check to the customer. Go to Management: Process Check Refunds. SPECIAL SITUATIONS Split Refund Payment - You may split the refund over more than one refund type. For example, you could pay out part in cash and part by store credit. Finance Company - Use this ONLY if the customer originally purchased the item through third party billing would you refund to the finance company or third party. |
Step 8. Ready To Process - Press Enter or [F10]
Confirm that you are ready to complete the invoice. If you select cancel, you will return to the invoice and can go through the cycle again. |
THE NEXT STEP
You are "almost" done. Accepting customer returns is a two phase process. Now that the customer is satisfied, the returned inventory items need to be processed. The items returned may NOT* have been automatically put back into stock for resale depending upon the setting of the Return Reason. The next step is to Process Customer Returns.
* Choices in the Reason For Return screen can be defined in the Reason For Return to automatically return it to stock.
SHORTCUTS
#1 In the SKU field of an invoice type the customer's "original invoice number" preceeded with a minus sign (-). For example, if the customer's original invoice is 1005, then type -1005 in the SKU field. Press Enter and POSitive will then list all items from that invoice number. Select the item being returned. See Step 3, below.
#2 On a blank line of an invoice, press CTRL-R. This will open the Return window which provides for various linking options.
#3 On a blank line of an invoice, type a hyphen or minus sign. This will open the Return window.