| Show/Hide Hidden Text |
The Section Manager is an enhancement to the creation of Invoices, Layaways, Service Orders, Quotes, etc.
•It allows products and services to be grouped and subtotaled in manageable sections or tabs.
•It allows for quick navigation between sub-sets.
•Printing can be done for all or selected subsets.
•In addition, these sub-sets can be transferred selectively from quote, to service, to invoice using partial delivery.
Alternative Solution: see Printing With Grouping Options
To be able to use POSitive Section Manager you must Activate INVOICE of Invoice Style on the Station settings. This is a "workstation" setting which will allow some computers to use it while other computers do not. (see Invoicing Screen Choices)
Section Manager can enhance your invoice or order by grouping items under variously named tabs. These tabs are displayed next to the original tab named Detail. They can be added in three ways:
A) by clicking the Section Manager button at the far right, or
B) by opening Section Manager under View, or
C) by pressing CTRL-INSert

Section Manager under View
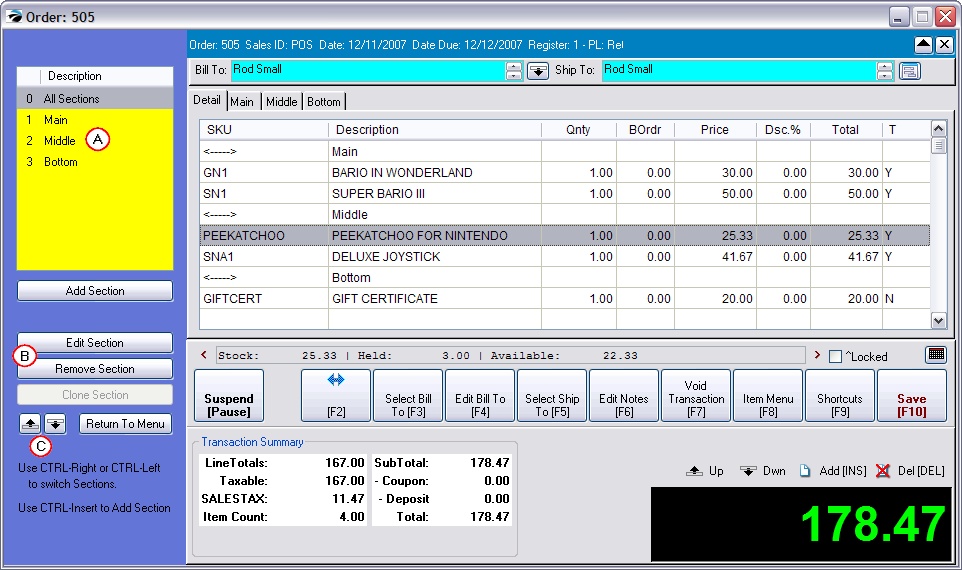
Choosing Section Manager allows you to add or edit sections. Each section is given a name which is descriptive of the needs of the particular invoice or order. Products and services are grouped under each tab or section.
A) The top half displays the currently named sections

B) The buttons in the middle of Section Manger allow you to Add, Edit, Remove, and even Clone a Section.
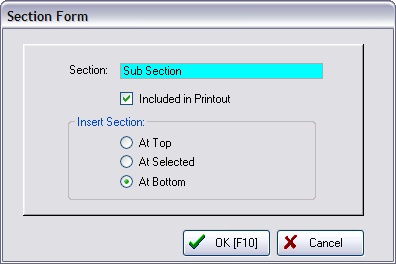
When you choose Add, you type a name for the section.
Section: The names can by anything descriptive of your purposes. Computer stores could identify different computer systems such as Server, Office 1, Front Counter, etc. Garden Center Landscapers could identify work areas such as Patio, Front Walkway, Backyard, etc.
Include In Printout: Typically you will want to print all sections and contents of sections, but you do have the option to not include a section which contains notes to yourself.

Insert Section: establishes the position of the section relative to other sections (Top, Bottom, or At Cursor) already defined. If you change your mind, the section can be repositioned. Section Limits?
If you are entering many sections, the default option "At Bottom" will reach a limit of 22 sections and it will appear that you will not be able to add more. Actually there is no limit to the number of sections. The solution is to add more sections and choose "At Selected" and then you will not be limited. |
C) The repositioning buttons will move a highlighted section to the top or bottom of the list.
Edit Section - simply allows you to turn on or off the Printout option
Remove Section - erases a named tab. This can also be done from the Detail Tab and choosing the DELete button on the keyboard while highlighting the Section Name.
Clone Section - copy a section and it's contents
Return To Menu - closes Section Manager
Use CTRL-Right or CTRL-Left to switch between sections.
Use CTRL-Insert to Add a section.
Press CTRL-Up or CTRL-Down arrow keys while viewing Details to move a highlighted section or inventory item into another section.
Press CTRL-S to subtotal each section
The Detail tab lists everything on the order or invoice. Each section is separated with a <------> symbol.
Items in one section are easily re-located to another section while viewing the Detail tab.
1) Highlight the item to be moved
2) Press CTRL-Up or CTRL-Down arrow keys to move the item into another section.
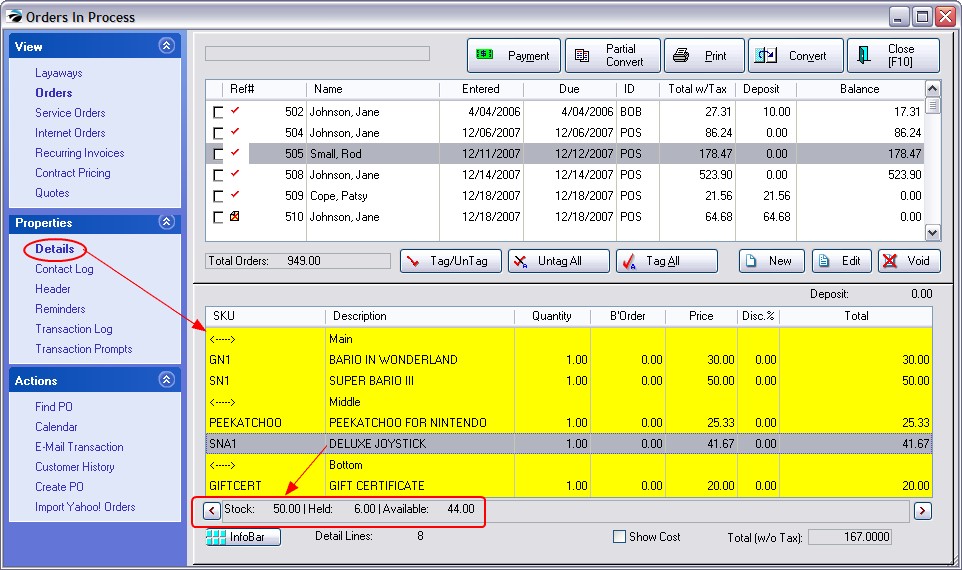
Sections are visible while viewing transactions In Process and by choosing the Details property.
Each section name is identified with a <------> symbol and looks much like the same view as the Detail tab while editing the transaction.
Highlighting an item on the pending transaction will give more information about stock counts, location, etc. And choosing the InfoBar will give purchase order and sales information about the item.

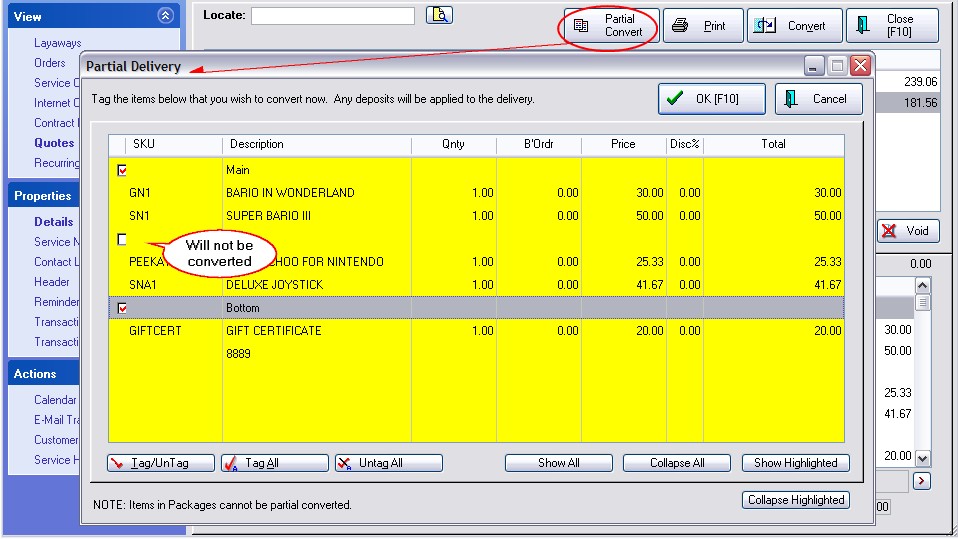
Once sections are employed, you can choose to process selected sections of the Pending Transaction and leave the other sections behind for later delivery or deletion.
1) Highlight the Pending Transaction
2) Choose Partial Convert button at the top of the screen
3) Choose type of transaction to convert to: Invoice, Order, etc.
4) Tag (checkmark) sections to be converted.
